Easy Cheese Ball Recipe: Tangy and Velvety

- Time: 10 min active + 60 min chilling = 70 min total
- Flavor/Texture Hook: Velvety, tangy center with a shatter crisp toasted nut coating
- Perfect for: Christmas parties, game day, or a hearty family gathering
- Easy cheese ball recipe
- Simple specs and timing
- The Secret to Smoothness
- The core ingredients
- Tools you'll need
- Putting it all together
- Fixing common mistakes
- Tweaks for different diets
- Scaling and size adjustments
- Simple truths and myths
- Storage and zero waste
- Platter and serving ideas
- Recipe FAQs
- 📝 Recipe Card
The smell of toasted pecans hitting a hot pan is, for me, the official scent of the holidays. There is something about that nutty aroma that just makes a house feel like a home, especially in a Tennessee kitchen where we love things hearty and soul warming.
But for years, I had a recurring nightmare: the "Cheese Ball Puddle." You know the one, where you spend all that time shaping a beautiful sphere, only for it to slump into a sad, creamy blob the second it hits the room temperature air of a crowded party.
The problem usually comes down to a lack of structural contrast. Most people just throw everything in a bowl and hope for the best, but that's how you end up with a dip instead of a ball. I found that the trick isn't just about the amount of cheese, but the temperature of the ingredients.
Mixing softened cream cheese with chilled sour cream creates a stable emulsion that holds its shape, even when the room gets warm.
This easy cheese ball recipe is my targeted fix for that sagging mess. We are going to focus on a contrast of textures - the velvety smoothness of the interior versus the crunch of the toasted nuts. It is a simple, reliable way to get a centerpiece that looks impressive but takes almost no effort.
Trust me on this, once you see it hold its shape for hours, you will never go back to the "puddle" method.
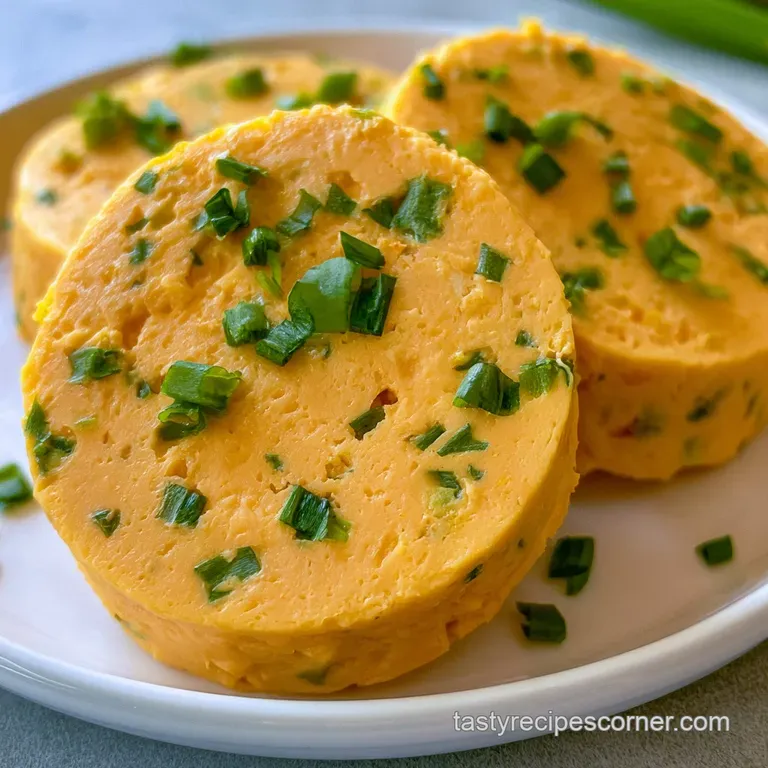
Easy cheese ball recipe
You will love this because it hits every single flavor note. You have the salty punch of the ranch seasoning, the sharp bite of the cheddar, and the freshness of green onions. It is the kind of hearty appetizer that keeps people coming back for "just one more" cracker. If you enjoy the rich, savory profiles found in my Creamy Garlic Chicken, you will appreciate how the garlic powder and sharp cheddar work together here to create a deep, savory base.
The beauty of this dish is how it balances opposites. We have the heavy, rich fats from the cream cheese and cheddar, but we cut right through that with a splash of lemon juice. This acidity is the secret weapon. According to the experts at Serious Eats, adding an acid like lemon juice to rich, fatty foods brightens the overall taste and prevents the palate from getting fatigued.
It is also a fantastic way to use up a few random items in the fridge. A bit of sour cream, a handful of nuts, and some leftover parsley are all you need to turn a basic block of cream cheese into a party highlight.
It feels like an old-fashioned treat but with a cleaner, sharper finish that doesn't leave you feeling weighed down.
Simple specs and timing
Right then, let's look at the numbers so you can plan your party platter. This isn't a long project, but it does require a bit of patience for the chilling phase. Don't try to skip the fridge time, or you'll be right back to the "puddle" problem.
The active work is barely 10 minutes. Most of your "cook" time is actually the cheese resting in the fridge to set its structure. This is a non negotiable step. The fats in the cream cheese need to firm up and lock in the air bubbles from the beating process, which gives you that velvety texture rather than a dense, clay like consistency.
Since this serves 16 people, it's a great volume for a crowd. If you are hosting a smaller group, you can easily halve it, but honestly, cheese balls have a way of disappearing quickly. I usually make the full batch and just enjoy the leftovers with some celery sticks the next morning.
The Secret to Smoothness
I've spent a lot of time wondering why some cheese balls feel grainy and others feel like silk. It comes down to a couple of simple human level tricks.
Temperature Contrast: Using room temp cream cheese but chilled sour cream prevents the mixture from over softening during the mixing process.
Air Incorporation: Beating the base before folding in the solids creates tiny air pockets that make the ball feel lighter on the tongue.
Acidity Balance: The lemon juice doesn't just add flavor, it breaks down the heavy proteins in the cheese to make the texture more consistent.
Nut Toasting: Heating the nuts releases oils that act as a natural preservative for the crunch, preventing the coating from getting soggy.
Serving Size Calculator
| Guests | Batch Size | Chill Time | Suggested Base |
|---|---|---|---|
| 1-5 people | 1/2 Batch | 60 minutes | Small mixing bowl |
| 6-16 people | Full Batch | 60 minutes | Medium mixing bowl |
| 17-32 people | Double Batch | 90 minutes | Large stand mixer |
Component Analysis
| Ingredient | Science Role | Pro Secret |
|---|---|---|
| Cream Cheese | Structural Base | Must be truly soft to avoid lumps |
| Sour Cream | Moisture/Tang | Keep it cold to maintain sphere shape |
| Lemon Juice | Flavor Brightener | Use fresh; bottled lacks the necessary zing |
| Toasted Nuts | Texture Contrast | Toast until fragrant, not brown |
The core ingredients
For this easy cheese ball recipe, you don't need a massive shopping list, but the quality of your cheddar makes a huge difference. I always go for a sharp or extra sharp cheddar. A mild cheddar just gets lost in the cream cheese, but a sharp one cuts through the fat and gives you that soul warming flavor.
The Shopping List:
- 225 g cream cheese, softened to room temperatureWhy this? Provides the essential structure and creamy body
- 60 g sour cream, chilledWhy this? Adds tang and keeps the center velvety
- 5 g lemon juiceWhy this? Cuts through the richness of the fats
- 115 g sharp cheddar cheese, finely shreddedWhy this? Adds a salty, sharp punch
- 8 g ranch seasoning powderWhy this? A shortcut for herbs and garlic flavor
- 15 g green onions, finely mincedWhy this? Adds a fresh, oniony bite
- 1.5 g garlic powderWhy this? Deepens the savory notes
- 60 g chopped pecans or walnuts, toastedWhy this? Essential for that shatter crisp exterior
- 4 g fresh parsley, choppedWhy this? Adds a pop of color and herbal freshness
Ingredient Swaps
| Original Ingredient | Substitute | Why It Works |
|---|---|---|
| Sharp Cheddar | Pepper Jack | Same saltiness. Note: Adds a spicy kick |
| Pecans/Walnuts | Almonds | Similar crunch. Note: Lighter, nuttier flavor |
| Sour Cream | Greek Yogurt | Similar tang. Note: Slightly thicker, higher protein |
| Ranch Seasoning | Onion Powder + Dried Dill | Mimics the profile. Note: Less salty overall |
Trust me, don't even bother with low-fat cream cheese here. You lose the stability and the flavor. This is a party dish, not a diet snack, so stick with the full fat versions to ensure the ball doesn't collapse.
Tools you'll need
You don't need a professional kitchen for this. A few basic tools will do the job perfectly. I prefer a handheld mixer for the base, but a sturdy whisk and some elbow grease work just as well.
- Mixing Bowl: Medium size, stainless steel or glass is best.
- Hand Mixer: Such as a KitchenAid or any standard handheld beaters.
- Plastic Wrap: Heavy duty wrap is better for shaping.
- Small Skillet: For toasting your nuts.
- Spatula: For folding in the cheddar and onions.
Putting it all together
Let's crack on. The key here is the order of operations. We blend the smooth stuff first, then fold in the chunky stuff.
- Toast the nuts. Place pecans or walnuts in a skillet over medium heat for 3-5 minutes until they smell fragrant and look golden. Let them cool completely. Note: Cooling prevents the cheese from melting on contact.
- Cream the base. Combine the softened cream cheese, chilled sour cream, and lemon juice in your mixing bowl. Beat with a mixer for 2 minutes until the mixture is velvety and free of lumps.
- Add seasonings. Fold in the ranch seasoning and garlic powder. Mix until the powder is fully incorporated and the color is uniform.
- Fold in solids. Stir in the shredded cheddar and minced green onions. Use a spatula to mix until the ingredients are evenly distributed but not over mixed.
- Prep for shaping. Scoop the mixture onto a large piece of plastic wrap.
- Roll the sphere. Using the plastic wrap to guide you, roll the cheese into a tight, smooth sphere. Squeeze out any air pockets.
- Set the shape. Twist the ends of the plastic wrap and refrigerate for at least 60 minutes. Note: This is where the "puddle" is prevented.
- Apply coating. Remove the chilled cheese ball from the plastic wrap.
- Roll in nuts. Roll the sphere in the toasted nuts and fresh parsley, pressing gently until the entire surface is covered.
- Final Rest. Let it sit for 10 minutes before serving to let the coating adhere.
Chef's Tip: If you want a really professional look, roll the ball in the nuts, then gently press a few whole pecan halves into the top for a rustic, centerpiece vibe.
Fixing common mistakes
Even the best of us hit a snag. Most cheese ball issues are related to temperature or mixing technique. If your ball feels a bit off, don't panic - it's usually a quick fix.
The Ball is Too Soft to Shape
If the mixture feels like frosting rather than dough, you likely let the cream cheese get too warm or over beat the sour cream. The solution is simple: pop it in the freezer for 15 minutes before attempting to roll it.
The Texture is Lumpy or Grainy
This happens when the cream cheese isn't fully softened before mixing. You'll see little white clumps in the final product. You can fix this by briefly pulsing the base in a food processor, but it's better to start with room temp ingredients.
The Coating is Slipping Off
If the nuts are sliding off the ball, the cheese was likely too warm when you rolled it, or you didn't let the nuts cool. Make sure the ball is cold to the touch before coating.
| Problem | Root Cause | Solution |
|---|---|---|
| Sagging Ball | Not chilled long enough | Refrigerate for an extra 30 mins |
| Bland Taste | Low quality cheese | Add a pinch of salt or more lemon |
| Nutty Bitterness | Over toasted nuts | Toast on lower heat, stir frequently |
Quick Check for Success:
- ✓ Cream cheese is soft enough to leave a fingerprint.
- ✓ Sour cream is cold from the fridge.
- ✓ Nuts are completely cooled before coating.
- ✓ Ball has chilled for a full 60 minutes.
- ✓ Cheddar is finely shredded (not thick shreds).
Tweaks for different diets
This easy cheese ball recipe is naturally quite flexible. Depending on who is coming to your party, you might want to shift the flavor or the ingredients.
For a smoky, savory kick, I love making an easy cheese ball recipe with bacon. Just fry up some bacon until it's shatter crispy, crumble it finely, and fold it into the mixture with the cheddar. The smokiness of the bacon pairs brilliantly with the ranch seasoning.
If you are looking for an old-fashioned cheese ball experience, swap the ranch seasoning for a mix of Worcestershire sauce and a bit of smoked paprika. This gives it that vintage, 1970s potluck vibe that my grandmother used to make in her kitchen.
For those following a low carb lifestyle, this is already mostly there. If you want to serve it with something other than crackers, check out my Keto Fathead Dough Pizza for inspiration on low carb textures, or simply serve the ball with cucumber slices and bell pepper strips.
Nut Free Options
If you have guests with allergies, don't skip the coating. Instead of pecans, use toasted panko breadcrumbs mixed with a bit of melted butter and parsley. You'll get a similar crunch without the risk.
Scaling and size adjustments
When I make this for a big family reunion, I usually triple the recipe. However, you can't just multiply everything linearly and expect it to work the same way.
Scaling Up (2x-4x): When doubling or tripling, increase your salt and ranch seasoning to only 1.5x the original amount first. Taste it, then add more. Spices can become overwhelming when scaled up.
Also, give the ball more time to chill - a giant cheese ball takes much longer to cool in the center than a small one. I recommend 2 hours for a double batch.
Scaling Down (1/2): If you only need a small snack, halve everything. Use a smaller mixing bowl to ensure you can beat the cream cheese effectively without it flying everywhere. Your chill time remains 60 minutes, as the structure still needs to set.
| Goal | Action | Result |
|---|---|---|
| Giant Party Ball | 3x Ingredients | Heavier, needs 2hr chill |
| Small Snack | 1/2 Ingredients | Quicker prep, same chill |
| Extra Firm | Add 20g extra Cheddar | Sturdier for warm rooms |
Simple truths and myths
There are a few things people tell you about cheese balls that just aren't true. Let's set the record straight.
Myth: You must use a food processor for a smooth base. Truth: A handheld mixer is actually better. Food processors can over work the cream cheese, causing it to break and become runny. A mixer incorporates air, which gives you that velvety feel.
Myth: You can skip the chilling step if you use extra cheese. Truth: Extra cheese adds flavor, but it doesn't replace the need for the fats to stabilize. Without the fridge time, the ball will lose its shape regardless of how much cheddar you add.
Storage and zero waste
To keep this easy cheese ball recipe fresh, store it in an airtight container in the fridge for up to 5 days. If you've already coated it in nuts, the nuts might soften slightly over time. To prevent this, store the base and the nut coating separately and roll the ball right before serving.
Freezing Guidelines: You can freeze the shaped (but uncoated) ball for up to 2 months. Wrap it tightly in plastic wrap and then foil. When you're ready to eat, thaw it slowly in the fridge overnight. Do not thaw it on the counter, or it will sweat and lose its structure.
Zero Waste Tips:
- Nut Scraps: If you have leftover toasted nuts, toss them into a morning bowl of oatmeal or a salad.
- Green Onion Tops: Don't throw away the green ends of your onions. Chop them up and freeze them in a small bag to toss into soups or omelets later.
- Leftover Ball: If you have a bit of cheese ball left over, it makes an incredible spread for a toasted bagel or a grilled cheese sandwich.
Platter and serving ideas
The way you present this is half the fun. I like to place the ball on a wooden board or a slate platter to lean into that rustic, hearty feel.
Surround the ball with a variety of "dippers." I suggest a mix of textures: some salty Ritz style crackers, a few slices of a crisp baguette, and plenty of fresh vegetables. Celery and carrots are classics because their snap contrasts with the velvety cheese.
For a truly "better than dining out" platter, add some contrasting colors. A handful of red grapes, some green olives, and maybe a few dried apricots. The sweetness of the fruit plays off the salty cheddar and ranch seasoning, creating a balanced bite every time.
Just remember to keep the platter cool; if you're serving outside, place the platter on top of a larger tray filled with crushed ice to keep the ball from sagging.
Recipe FAQs
What is a homemade cheese ball?
A savory appetizer made of mixed cheeses and seasonings. It is shaped into a sphere, chilled, and typically coated in nuts or herbs for serving.
What is the best cheese for a cheese ball?
Softened cream cheese paired with sharp cheddar. The cream cheese provides the essential spreadable structure, while the sharp cheddar adds a bold, salty flavor.
What is the easiest cheese to make for beginners?
A cream cheese based ball is the simplest option. It requires no cooking or complex curing, only mixing and chilling.
What are some common cheese ball mistakes?
Using cold cream cheese or skipping the refrigeration period. Cold cream cheese causes lumps, and failing to chill the ball for 60 minutes leads to a loss of structure when serving.
How to store a cheese ball?
Place it in an airtight container in the fridge for up to 5 days. Store the nut coating separately and roll the ball right before serving to prevent the nuts from softening.
Can I freeze the cheese ball?
Yes, you can freeze the uncoated ball for up to 2 months. Wrap it tightly in plastic wrap and foil, then thaw it slowly in the fridge overnight to prevent sweating.
What should I serve with a cheese ball?
Fresh vegetables, crackers, or toasted bread. This pairs perfectly with a warm sourdough focaccia for a complete appetizer platter.
Easy Cheese Ball Recipe

