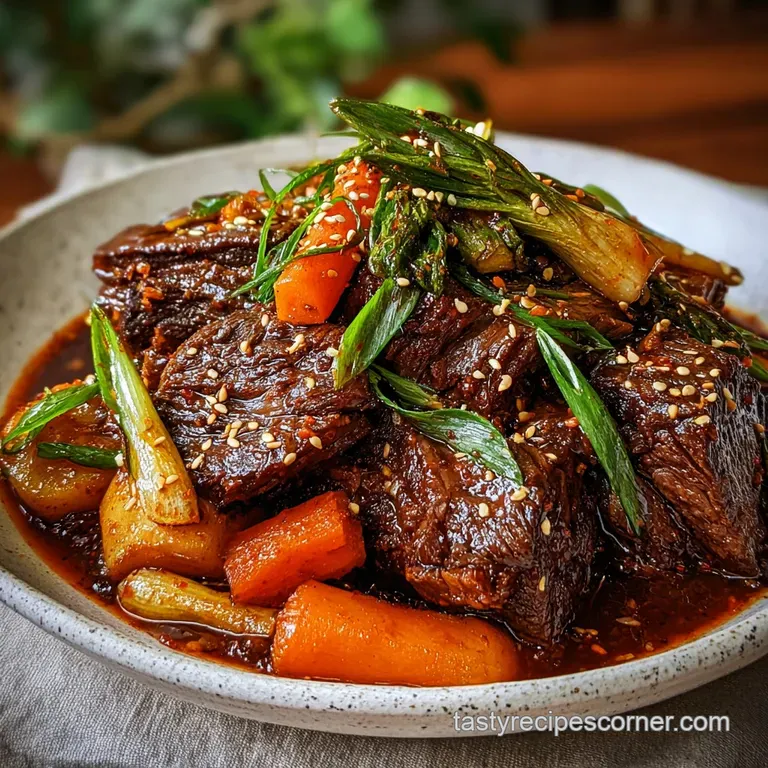
Tasty Korean Pot Roast Recipe
- Time: Active 20 minutes, Passive 8 hours, Total 8 hours 20 minutes
- Flavor/Texture Hook: Velvety, fork tender beef with a sticky, spicy sweet glaze.
- Perfect for: A cozy family Sunday dinner or effortless meal prep for the week.
- Bringing Soul Warming Spice to Your Table with Tasty Korean Pot Roast
- The Science of Meltingly Tender Beef and Bold Umami Flavors
- Calculating Your Kitchen Success with Precise Timing and Temperature Checkpoints
- Component Analysis of Spicy Fermented Pastes and Sweet Fruit Nectars
- Essential Heavy Bottomed Pots for Achieving That Low and Slow Braise
- A Step by Step Guide to Crafting the Ultimate Comfort Meal
- Navigating Common Kitchen Hurdles for a Silky Smooth Finishing Sauce
- Creative Variations for Tacos or Low Carb Dietary Needs
- Smart Storage Solutions and Zero Waste Tips for Leftover Beef
- Crafting the Traditional Spread for a Hearty Fusion Family Feast
- Very High in Sodium
- Recipe FAQs
- 📝 Recipe Card
Bringing Soul Warming Spice to Your Table with Tasty Korean Pot Roast
The first time I tried this, the sizzle of the beef hitting my heavy cast iron pot was the only sound in my quiet Tennessee kitchen. I’d grown up on the standard carrots and potatoes roast, which I love, but I was craving something with a bit more punch, something that would make the house smell like a mix of ginger, garlic, and toasted sugar.
When I finally pulled the lid off after eight hours, the aroma was so intense it practically felt like a hug.
You know that feeling when you realize a recipe is going to become a permanent part of your rotation? That was this moment. The beef didn't just fall apart, it practically shattered at the touch of a fork.
The sauce had turned into this dark, glossy, velvety nectar that was equal parts spicy from the gochujang and mellow from the pear nectar. It’s the kind of meal that makes everyone at the table go silent for the first three minutes because they’re too busy enjoying the contrast of the rich fat and the bright rice vinegar.
We're not doing anything fancy or difficult here. It’s just about layering flavors and letting time do the heavy lifting. If you’ve ever made my Dutch Oven Pot recipe, you already know the basic mechanics of a good braise. But today, we’re swapping out the red wine and rosemary for a flavor profile that’s going to wake up your taste buds in the best way possible. Trust me, once you smell this simmering, you'll never go back to the plain version again.
The Science of Meltingly Tender Beef and Bold Umami Flavors
Creating a truly great roast isn't magic, it's chemistry. Understanding how the heat interacts with the muscle fibers helps you avoid that dreaded dry, stringy texture that ruins a good Sunday dinner.
- Enzymatic Tenderization: The pear nectar contains calpain, a natural enzyme that helps break down tough proteins in the beef before the heat even starts to work.
- The Maillard Reaction: Searing the beef at high heat creates hundreds of different flavor compounds that don't exist in raw meat, adding a savory depth that can't be replaced by liquid seasonings alone.
- Collagen Conversion: Long, slow cooking at low temperatures (around 190°F to 200°F internally) is required to turn tough connective collagen into silky, rich gelatin.
- Capillary Action: As the meat rests in the liquid after cooking, it actually re absorbs some of the flavored braising juice, ensuring every bite is moist.
| Beef Thickness | Target Internal Temp | Rest Time | Visual Doneness Cue |
|---|---|---|---|
| 2 Inches | 203°F | 15 minutes | Meat pulls apart with light pressure |
| 3 Inches | 205°F | 20 minutes | Connective tissue looks translucent and soft |
| 4 Inches | 205°F | 30 minutes | Center of the roast wobbles like jelly |
When you’re looking for that specific "shred" factor, the internal temperature is actually more important than the clock. While we aim for 8 hours, some pieces of chuck are more stubborn than others.
If you try to pull it at 180°F, it'll be cooked through but it'll feel like chewing on a rubber band. You have to push past that "stall" to get to the velvety stage.
Calculating Your Kitchen Success with Precise Timing and Temperature Checkpoints
Getting the timing right is the difference between a stressed out cook and a relaxed one. Because this recipe relies so heavily on the slow cooker or a very low oven, you have a lot of flexibility, but you still want to hit your marks.
1. The over High heat Sear
Don't rush the initial browning. You want a deep, mahogany crust on all sides of that 3 lb beef chuck roast. This usually takes about 4 minutes per side. If the pan isn't smoking slightly when the oil goes in, it’s not hot enough.
2. The Low Slow Transformation
Whether you use a slow cooker on low for 8 hours or a Dutch oven at 275°F for about 4 hours, the goal is the same. We want a gentle bubble, not a violent boil. A violent boil toughens the muscle fibers, while a gentle simmer coaxes them into submission.
3. The Finishing Polish
The final step is reducing the sauce. I like to take the liquid and simmer it on the stove for about 10 minutes after the beef is done. This concentrates the sugars from the 1/4 cup brown sugar and the pear nectar, turning a thin broth into a coating glaze.
| Ingredient | Science Role | Pro Secret |
|---|---|---|
| Gochujang (3 tbsp) | Fermented depth and heat | Sauté it briefly in the oil to "wake up" the oils |
| Pear Nectar (1/2 cup) | Acidic tenderizer and sweetener | Use Korean Shingo pears if you can find them |
| Rice Vinegar (1/4 cup) | Fat cutter and brightness | Add a splash more right before serving for "pop" |
| Chuck Roast (3 lbs) | Fat to lean ratio for braising | Always look for heavy white marbling (intramuscular fat) |
The contrast between the heavy fat of the beef and the sharpness of the vinegar is what keeps you coming back for more. It's similar to how I balance the richness in my Korean Ground Beef recipe. Without that acid, the dish can feel a bit too heavy, especially after a big serving.
Component Analysis of Spicy Fermented Pastes and Sweet Fruit Nectars
To make a truly Tasty Korean Pot Roast, you need the right building blocks. Each ingredient in this list serves a specific purpose in the flavor map: salty, sweet, spicy, and sour.
- 3 lbs beef chuck roast: This is the king of braising cuts. It has enough fat and connective tissue to stay moist during the long haul.
- 2 tsp kosher salt & 1 tsp black pepper: Essential for the initial dry brine and sear.
- 2 tbsp neutral oil: Use something with a high smoke point like canola or grapeseed.
- 1/3 cup soy sauce: Provides the primary salt and a massive hit of umami.
- 3 tbsp gochujang paste: Why this? It provides a unique fermented funk and a slow burning heat that defines the dish.
- 1/2 cup pear nectar: Why this? Contains natural enzymes that tenderize beef while adding a subtle, non cloying sweetness.
- 1/4 cup brown sugar: Adds a molasses like depth and helps with the glaze consistency.
- 1/4 cup rice vinegar: Necessary to cut through the richness of the beef fat.
- 6 cloves garlic, smashed: Use fresh cloves, not the jarred stuff, for the best aroma.
- 2 inch piece fresh ginger, sliced: Provides a zingy, sharp contrast to the earthy beef.
- 1 large yellow onion: Cut into wedges to hold up during the long cook time.
- 1 lb carrots: Cut into 2 inch chunks so they don't turn to mush.
- 4 green onions: Cut into 1 inch batons for a fresh, oniony finish.
| Original Ingredient | Substitute | Why It Works |
|---|---|---|
| Pear Nectar | Grated Apple | Similar enzymes and sugar content. Note: Texture will be slightly pulpier. |
| Rice Vinegar | Apple Cider Vinegar | Similar acidity level. Adds a slight fruity note. |
| Gochujang | Miso + Sriracha | Miso provides the ferment, Sriracha provides the heat. Note: Less smoky than the original. |
If you can't find pear nectar, don't panic. A finely grated Bosc pear or even a splash of apple juice works in a pinch. The goal is to get those enzymes and a bit of natural sugar into the pot to help the beef break down over those 8 hours.
Essential Heavy Bottomed Pots for Achieving That Low and Slow Braise
You don't need a kitchen full of gadgets, but a couple of items make this recipe a lot easier. For the best results, you want something that holds heat evenly and doesn't have "hot spots" that might burn the sugars in the sauce.
I usually reach for my 6 quart enameled cast iron Dutch oven. It’s a workhorse that transitions perfectly from the stovetop sear to the over low heat braise. If you prefer a "set it and forget it" approach, a standard slow cooker (like a Crock Pot) is your best friend.
Just make sure you still do the searing in a separate skillet first don't skip that step, or you'll lose out on so much flavor!
If you're looking for a different kind of one pot meal, you might enjoy my Hearty Dutch Oven recipe. It uses similar heat retention principles to get that perfect tender meat. For this roast, having a pair of sturdy tongs is also helpful for turning that heavy 3 lb slab of beef without splashing hot oil everywhere.
A step-by-step Guide to Crafting the Ultimate Comfort Meal

Now, let's get down to the actual cooking. Follow these steps, pay attention to the smells, and you'll have a masterpiece on your hands.
- Season the beef. Rub the 3 lbs beef chuck roast with 2 tsp kosher salt and 1 tsp cracked black pepper. Note: Doing this 30 minutes early allows the salt to penetrate the fibers.
- Sear the roast. Heat 2 tbsp neutral oil in a large pot over medium high heat. Brown the beef for 4-5 minutes per side until a dark, crusty bark forms.
- Aromatize the oil. Remove the beef and toss in the 1 large yellow onion wedges and 6 cloves smashed garlic. Sauté for 3 minutes until the onion edges start to char.
- Bloom the spices. Stir in 3 tbsp gochujang paste and 2 inch piece of ginger. Cook for 1 minute until the kitchen smells spicy and toasted.
- Build the liquid. Whisk in 1/3 cup soy sauce, 1/2 cup pear nectar, 1/4 cup brown sugar, and 1/4 cup rice vinegar, scraping the bottom of the pot.
- Combine and cook. Place the beef back in the pot (or move everything to a slow cooker). Add the 1 lb carrots.
- The long wait. Cover and cook on Low for 8 hours until the beef yields easily to a fork.
- Vegetable check. Add the 4 green onions (batons) during the last 30 minutes of cooking until they are bright green and tender.
- The reduction. Remove the meat and carrots. Boil the liquid on the stove for 10 minutes until it coats the back of a spoon.
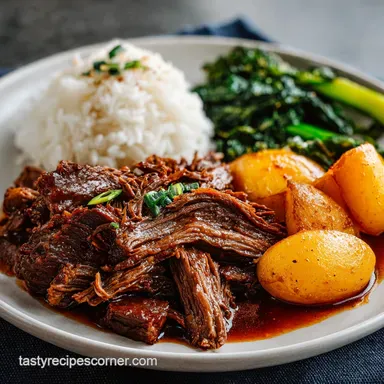
- Final shred. Pull the beef into large chunks, pour the reduced sauce over the top, and serve.
Chef's Tip: To get a truly velvety sauce, use a fat separator or skim the excess oil off the top of the liquid before you start the final reduction. Chuck roast is fatty, and while that fat is flavor, too much of it can make the sauce feel greasy on the tongue.
Navigating Common Kitchen Hurdles for a Silky Smooth Finishing Sauce
Sometimes things don't go exactly as planned. Maybe your roast feels tough after the timer goes off, or perhaps the sauce is too thin. Don't worry, these are easy fixes.
Why Your Pot Roast Is Still Tough
If your meat isn't shredding, it almost always means it needs more time. People often think they've overcooked it when it's tough, but with chuck roast, it's usually the opposite. The collagen hasn't had enough time to turn into gelatin yet. Give it another hour on low and check again.
Controlling the Heat
If you're using a slow cooker, "High" isn't always better. High heat can sometimes cause the protein to contract too quickly, squeezing out all the moisture before the collagen can break down. This results in "dry" meat that is technically falling apart but feels like sawdust.
Stick to "Low" for the full 8 hours whenever possible.
| Problem | Root Cause | Solution |
|---|---|---|
| Sauce is too salty | Too much soy reduction | Add a splash of water and a squeeze of lime |
| Beef is dry/stringy | Cooked at too high a temp | Braise on "Low" and ensure liquid covers half the meat |
| Sauce won't thicken | Not enough sugar or time | Simmer uncovered or add a small cornstarch slurry |
Common Mistakes Checklist:
- ✓ Skipping the sear (you lose the Maillard flavor profile)
- ✓ Using "lean" beef like round roast (it will be way too dry)
- ✓ Adding the green onions too early (they will turn to brown mush)
- ✓ Forgetting to deglaze the bottom of the pan after searing
- ✓ Not resting the meat before the final shredding
Creative Variations for Tacos or Low Carb Dietary Needs
One of the best things about this Tasty Korean Pot Roast is how versatile the leftovers are. You can easily pivot this dish into several different directions depending on what you have in the pantry.
The Korean Taco Twist
Take the shredded beef and char it slightly in a dry skillet. Serve it in warm corn tortillas with a quick slaw made of cabbage, lime juice, and a little mayo. The contrast of the crispy beef edges with the cool slaw is incredible.
It’s a great way to use up the meat if you're tired of the traditional roast format.
The Low Carb Swap
If you're watching your carbs, you can replace the 1/4 cup brown sugar with a monk fruit sweetener or erythritol blend. Instead of serving over rice, try cauliflower rice or even over a big pile of sautéed bok choy.
The sauce still carries enough flavor from the gochujang and ginger to make the vegetables feel like a treat.
| Fresh Ingredient | Shortcut Version | Flavor Impact |
|---|---|---|
| Fresh Ginger | Ginger Paste (tube) | Slightly less zingy but very convenient |
| Smashed Garlic | Jarred Minced Garlic | Less pungent aroma, use 1.5x the amount |
| Pear Nectar | Unsweetened Applesauce | Adds body but less "floral" sweetness |
If you want a different slow cooked vibe, you might also like my Crock Pot Black recipe. It’s another one of those "set it and forget it" meals that fills the house with amazing smells.
Smart Storage Solutions and Zero Waste Tips for Leftover Beef
In my house, the leftovers are almost more anticipated than the initial meal. The flavors in the sauce have more time to meld, and the beef stays incredibly moist if stored correctly.
- Fridge
- Store in an airtight container with the braising liquid for up to 4 days. The liquid will turn into a jelly like consistency that’s the gelatin, and it’s pure gold.
- Freezer
- This freezes beautifully. Place the shredded beef and sauce in a heavy duty freezer bag, squeeze out the air, and keep for up to 3 months. Thaw in the fridge overnight before reheating.
- Reheating
- Use a small saucepan over low heat. Add a splash of water or beef broth to loosen the sauce. Avoid the microwave if possible, as it can make the beef a bit rubbery.
Zero Waste Tips: Don't you dare throw away that leftover braising liquid! If you have extra sauce but no meat, use it as a base for a quick ramen or stir fry. You can also freeze the liquid in ice cube trays and pop one into your next batch of beef stew to add a massive umami boost.
Even the onion wedges and garlic bits can be blended into the sauce for a thicker, heartier texture.
Crafting the Traditional Spread for a Hearty Fusion Family Feast
When you're ready to serve your Tasty Korean Pot Roast, think about textures. I love serving this over a big bowl of fluffy white rice to soak up every drop of that spicy glaze. A side of quick pickled cucumbers or some kimchi provides a cold, crunchy contrast to the hot, rich beef.
If you want to go full "fusion feast," serve it alongside some roasted broccoli or even mashed potatoes. I know, mashed potatoes aren't traditional in Korea, but the way the spicy gochujang sauce swirls into the buttery potatoes is something you have to experience to believe.
It's the ultimate Tennessee meets Seoul comfort food.
- If you want a thicker glaze, whisk 1 tbsp of cornstarch with 1 tbsp of cold water and stir it into the boiling sauce at the end.
- If you want it spicier, double the gochujang or add a sprinkle of gochugaru (Korean chili flakes) over the top before serving.
- If you want it milder, increase the pear nectar and reduce the gochujang to 1 tablespoon.
There’s a myth that searing "seals in the juices" of a roast. That's actually not true moisture loss happens no matter what. However, we sear because it creates the crust that gives the sauce its color and complexity. Another myth is that you need a lot of liquid to braise.
In reality, you only need about an inch of liquid in the bottom of the pot; the meat will release its own juices, and the steam trapped by the lid will do the rest of the work. Now, go get that roast in the pot and let the magic happen!

Very High in Sodium
1840 mg mg of sodium per serving (80% of daily value)
The American Heart Association recommends limiting sodium intake to no more than 2,300mg per day for most adults. Consider aiming for an even lower limit of 1,500mg per day for optimal health.
Tips to Reduce Sodium in Your Korean Braised Beef
-
Reduce Kosher Salt-25%
Reduce the amount of kosher salt from 2 tsp to 1 tsp. You can always add more at the end if needed, but starting with less will significantly reduce the overall sodium content. This will greatly impact the saltiness.
-
Low-Sodium Soy Sauce-20%
Replace regular soy sauce with a low-sodium soy sauce. This simple swap can drastically cut down on sodium without sacrificing flavor. Look for options labeled 'reduced sodium' or 'low sodium'.
-
Reduce Gochujang-15%
Gochujang paste can be high in sodium. Reduce the amount from 3 tbsp to 2 tbsp. Taste and adjust other flavorings as needed to compensate for any loss of flavor.
-
Pear Substitute-10%
Instead of pear nectar, use fresh, pureed pear or unsweetened applesauce. This will provide sweetness and moisture without added sodium often found in processed nectars. Ensure the puree is 100% fruit.
-
Boost Flavor with Herbs & Spices
Enhance the flavor with sodium free herbs and spices like garlic powder, onion powder, dried mushrooms, or a touch of red pepper flakes for extra heat instead of relying on salt. Experiment to find your preferred blend.
Recipe FAQs
What cut of beef works best for this Korean Pot Roast?
Chuck roast. This cut has the ideal fat and connective tissue ratio necessary to break down into velvety shreds during the long, slow braise.
How long should the roast cook on the low setting?
Low for 8 hours. This extended, gentle cooking time is crucial for converting tough collagen into rich, mouth coating gelatin, making the meat fall apart easily.
How to create the final sticky glaze for the beef?
Remove the beef and rapidly simmer the remaining liquid. Boil the braising liquid on the stovetop, uncovered, for about 10 minutes until it reduces and coats the back of a spoon.
Is it true that searing the beef doesn't really affect the tenderness?
No, searing is mandatory for flavor development. While it doesn't tenderize, the high heat creates hundreds of savory compounds through the Maillard reaction, which forms the dish's deep base flavor.
Can I substitute the pear nectar if I don't have any?
Yes, use finely grated apple or unsweetened applesauce. Both contain natural enzymes similar to pear that aid in tenderizing the meat during the low temperature cook.
What is the best way to serve this roast for a low carb meal?
Serve over sautéed bok choy or cauliflower rice. This substitution keeps the focus on the rich beef while cutting the carbohydrates found in traditional white rice.
How can I ensure my sauce has enough 'pop' or brightness?
Whisk in an extra splash of rice vinegar just before serving. This sharp acid cuts through the richness of the beef fat, balancing the flavors much like we balance the richness in our Broccoli and Cheddar recipe.
Tasty Korean Pot Roast
Ingredients:
Instructions:
Nutrition Facts:
| Calories | 728 kcal |
|---|---|
| Protein | 47g |
| Fat | 48g |
| Carbs | 26g |
| Fiber | 3g |
| Sugar | 16g |
| Sodium | 1840mg |
