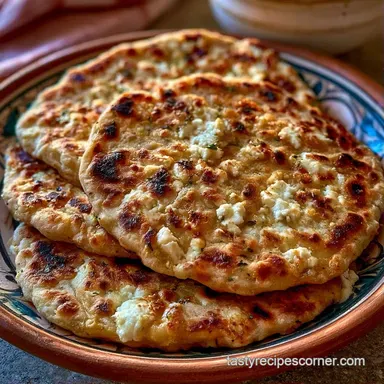
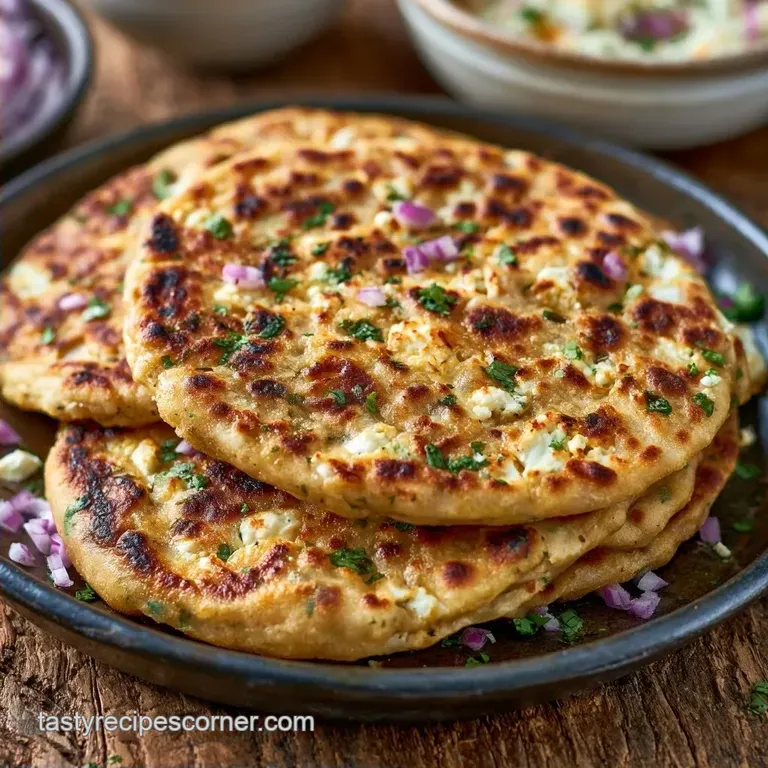
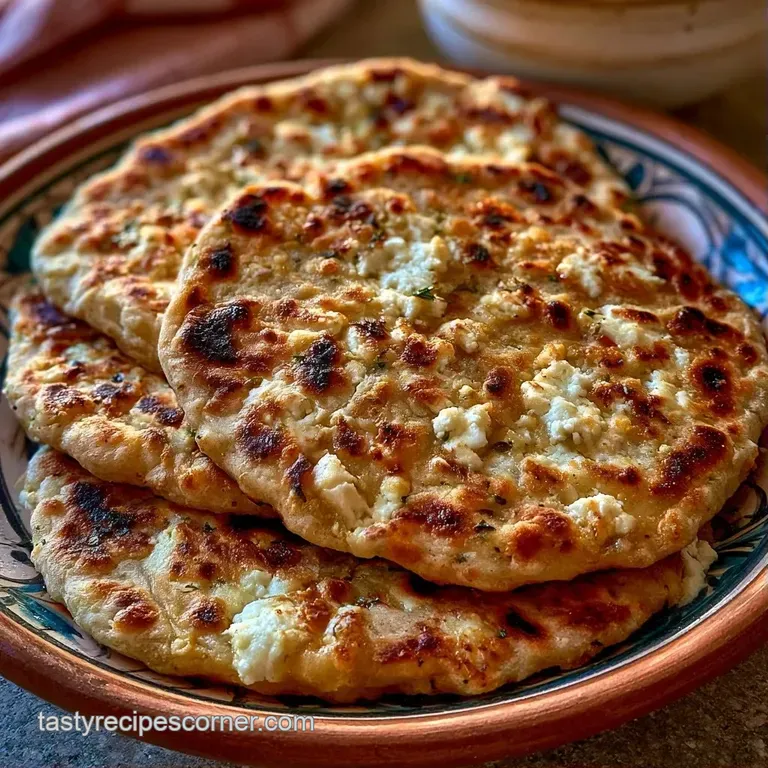
Soft Paneer Paratha with a Golden Crust
- Time: 20 min active + 20 min resting
- Flavor/Texture Hook: Buttery, flaky crust with a spiced, creamy center
- Perfect for: A filling weekday morning breakfast
- How to Actually Nail This Paneer Paratha
- What Each Ingredient Does for Paneer Paratha
- The Shopping List for Paneer Paratha
- Essential Kitchen Gear
- Step by Step Instructions
- Solving Common Paneer Paratha Problems
- Troubleshooting Common Issues
- Adjusting your Paneer Paratha Batch
- Busting Paneer Paratha Myths
- Storage Tips for Paneer Paratha
- Best Paneer Paratha Pairings
- Recipe FAQs
- 📝 Recipe Card
The sound of ghee sizzling on a hot tawa is the only alarm clock I need. There is something about that smell, a mix of toasted whole wheat and melting butter, that makes waking up at 6 AM actually feel worth it. It is the kind of aroma that pulls everyone out of bed and into the kitchen.
I remember the first few times I tried this. I used to press the filling too hard, and the dough would just split open like a broken balloon. Now, I know it is all about the "light touch." You want a soft, pliable shell that hugs the stuffing without fighting it.
Whether you are fueling up for a long day or treating the kids to something special, this Paneer Paratha is a reliable win. It is hearty, filling, and honestly, far cheaper than hitting a cafe for brunch.
How to Actually Nail This Paneer Paratha
The goal is a flatbread that is thin but not translucent, with the filling distributed evenly from edge to edge. Most people struggle with the stuffing leaking out, but the trick is in the pleating. If you pinch the dough tight like a dumpling, the filling stays put during the rolling process.
Right then, let's get into why this specific method works. It isn't about fancy tools, just a few simple rules about temperature and texture.
Lukewarm Water: Using warm water instead of cold helps the flour hydrate faster. This makes the dough more flexible, which is a must for a Soft Paneer Paratha.
Gentle Mixing: If you mash the paneer into a paste, you lose the texture. Keeping it crumbled ensures you get those little pockets of cheese in every bite of your Paneer Paratha.
Ghee Searing: Ghee has a higher smoke point than butter. This lets you get that signature brown crust without the fat burning before the inside is cooked through.
| Method | Time | Texture | Best For |
|---|---|---|---|
| Fast (store-bought dough) | 20 mins | Chewier, less flaky | Extreme rush mornings |
| Classic (Hand kneaded) | 60 mins | Flaky, tender, buttery | Weekend brunch or meal prep |
What Each Ingredient Does for Paneer Paratha
I've found that swapping a few things can save money without ruining the vibe. Whole wheat flour is a staple for its nutty flavor and fiber, as noted by Serious Eats.
| Ingredient | What It Does | Best Swap |
|---|---|---|
| Atta (Whole Wheat) | Provides structure and a nutty base | All purpose flour (makes it softer but less hearty) |
| Paneer | Adds creaminess and protein | Tofu (extra firm, pressed) for a dairy-free version |
| Amchur (Mango Powder) | Gives a sharp, tangy kick | Lemon juice (add at the very end) |
| Ghee | Creates the golden, crisp crust | Unsalted butter or neutral oil |
The Shopping List for Paneer Paratha
Here is exactly what you need. I usually buy my flour in bulk to keep the cost down, and I grate my paneer fresh.
- 2 cups (250g) Whole wheat flour (Atta) Why this? Stronger gluten for better stretching
- ½ tsp (3g) Salt
- 1 tbsp (15ml) Vegetable oil
- ¾ cup (180ml) Lukewarm water
- 14 oz (400g) Paneer, crumbled or finely grated Why this? According to USDA FoodData, paneer provides a dense protein base
- 1 small (30g) Green chili, finely minced
- 1 tbsp (6g) Fresh ginger, grated
- ¼ cup (15g) Fresh coriander leaves, chopped
- ½ tsp (3g) Cumin powder
- ½ tsp (3g) Garam masala
- ½ tsp (3g) Amchur
- ½ tsp (3g) Salt
- 4 tbsp (60ml) Ghee
Essential Kitchen Gear
You don't need a professional setup for this. A heavy bottomed pan is your best friend here.
- Tawa or Cast Iron Skillet: This holds heat evenly so you don't get "pale spots" on your bread.
- Rolling Pin (Belan): A thin one gives you more control over the circle.
- Mixing Bowls: One for the dough, one for the stuffing.
- Damp Cloth: To keep the dough from drying out while it rests.
Step by step Instructions
Let's crack on. Follow these steps and you'll have a stack of hot bread in no time.
Phase 1: Preparing the Dough
- Mix the whole wheat flour and salt in a large bowl to start your Paneer Paratha.
- Pour in the oil and gradually add lukewarm water. Note: Add water slowly so the dough doesn't become a sticky mess.
- Knead for 5 minutes until the dough feels velvety and smooth. If it sticks to your hands, add a pinch of flour; if it's too stiff, add a teaspoon of water.
- Cover the dough with a damp cloth and let it rest for 15-20 minutes. Note: This relaxes the gluten so the dough doesn't spring back when you roll it.
Phase 2: Crafting the Filling
- In a separate bowl, combine the grated paneer, minced chilies, grated ginger, and chopped coriander.
- Stir in the cumin powder, garam masala, amchur, and salt. Mix gently with your fingers until the spices are evenly distributed. Avoid mashing the paneer into a paste.
Phase 3: Assembly and Searing
- Divide the dough and filling into 8 equal portions. Roll a dough ball into a 4 inch circle, place a scoop of filling in the center, pleat the edges, and pinch shut to seal your Paneer Paratha.
- Dust the ball with flour and roll gently into a 7 inch circle. Note: Apply light pressure from the center outwards.
- Place the Paneer Paratha on a medium hot tawa for 30 seconds until tiny bubbles appear on the surface.
- Flip it over and apply ½ tbsp of ghee. Flip again and repeat until the bread is golden brown and crisp on both sides.
Solving Common Paneer Paratha Problems
Even the best of us hit a snag now and then. If your bread is acting up, it's usually one of three things.
Troubleshooting Common Issues
| Issue | Solution |
|---|---|
| Why Your Paneer Paratha Leaks | This usually happens if the dough is too thin or if you didn't pinch the seal tight enough. If you see filling escaping, stop rolling immediately and patch the hole with a tiny bit of dough. |
| Why Your Paneer Paratha is Hard | Rubbery bread comes from over kneading or skipping the resting period. The gluten becomes too tight, making the final result feel like a chew toy instead of a soft breakfast. |
| Why Your Paneer Paratha Burns | If the outside is black but the inside is cold, your tawa is too hot. Turn the heat down to medium and let the heat penetrate the stuffing slowly. |
Adjusting your Paneer Paratha Batch
Sometimes you're just cooking for yourself, and other times you've got the whole family over.
Cutting the recipe in half: Use a smaller skillet to keep the heat concentrated. Since you're dealing with less dough, the resting time can be shortened to 10 minutes. Be careful with the salt; measure it exactly rather than eyeballing it.
Doubling or Tripling: Work in batches. If you roll all 16-24 parathas at once, the last ones will get soggy before they hit the pan. Only roll what you can cook in 10 minutes.
For the spices, I only increase them to 1.5x the original amount; otherwise, the garam masala can become overwhelming.
If you find yourself making these often and want another fast morning option, my veggie grilled cheese is a great way to switch things up.
Busting Paneer Paratha Myths
I've heard a lot of "rules" that just aren't true. Let's set the record straight.
Myth: You must roll the dough as thin as possible. Truth: If you roll a Paneer Paratha too thin, the filling will burst through. You want a sturdy wall that can hold the weight of the cheese.
Myth: Cold water makes a crispier dough. Truth: Cold water actually makes the dough stiffer and harder to work. Warm water is the way to go for that tender, foldable texture.
Myth: You can't use oil instead of ghee. Truth: You can, but you'll lose that specific nutty aroma. Oil works fine for a budget friendly version, but ghee is where the flavor lives.
Storage Tips for Paneer Paratha
You don't have to make these every single morning. They hold up surprisingly well if you store them right.
In the Fridge: Wrap each cooked Paneer Paratha in parchment paper or foil, then put them in an airtight container. They stay fresh for about 2 days.
In the Freezer: You can freeze these for up to 1 month. To do this, freeze them on a tray first so they don't stick together, then move them into a freezer bag.
To Reheat: Don't use the microwave; it makes them rubbery. Toss them back on a medium hot tawa for 2 minutes per side. This brings back the crispiness without drying out the center.
Zero Waste Tip: If you have leftover crumbled paneer filling, don't toss it. Stir it into some scrambled eggs or use it as a stuffing for a quick toasted sandwich.
Best Paneer Paratha Pairings
Eating these plain is fine, but the right sides make the whole meal.
The Classic Punjabi Combo: Serve your Paneer Paratha with a dollop of fresh, salted butter on top and a side of thick Greek yogurt or homemade curd. The coolness of the yogurt balances the heat from the green chilies.
The Tangy Route: A spicy mango or lime pickle is a must. The acidity cuts through the richness of the paneer and ghee, making every bite taste fresh.
The Light Brunch Option: If you want something lighter, pair a Paneer Paratha with a side of sliced cucumbers and carrots. It adds a crunch that goes perfectly with the soft bread.
Honestly, once you get the hang of the rolling technique, this becomes the easiest way to start your day. It's filling, budget friendly, and tastes like a treat. Trust me, your morning routine will thank you for adding a hot Paneer Paratha to the mix.
Recipe FAQs
How to make paratha very soft?
Knead the dough for 5 minutes with lukewarm water and let it rest for 15 20 minutes. This process relaxes the gluten, ensuring the final bread is tender rather than chewy.
How to make paneer soft and fluffy?
Crumble or finely grate the paneer and mix spices gently with your fingers. Avoid over mixing or stirring too vigorously to prevent the filling from mashing into a dense paste.
How to prevent the paratha from becoming hard?
Avoid over kneading the dough and never skip the resting period. Over working the dough makes the gluten too tight, which results in a rubbery texture.
Are Paneer Parathas a good meal idea for a two-year old?
Yes, they are a nutritious and soft option. The combination of whole wheat and paneer provides a balanced mix of proteins and energy suitable for toddlers.
What do Indian parents typically pack in school lunch boxes for kids?
Paneer Parathas are a popular choice. They are filling, easy for children to handle, and maintain their texture well when eaten at room temperature.
How to store parathas to keep them soft?
Wrap each cooked paratha in parchment paper or foil and place them in an airtight container. This prevents them from drying out and keeps them fresh in the fridge for 2 days.
Is it true that microwaving is the best way to reheat frozen parathas?
No, this is a common misconception. Microwaving makes the bread rubbery; instead, reheat them on a medium hot tawa for 2 minutes per side.
Soft Paneer Paratha Recipe