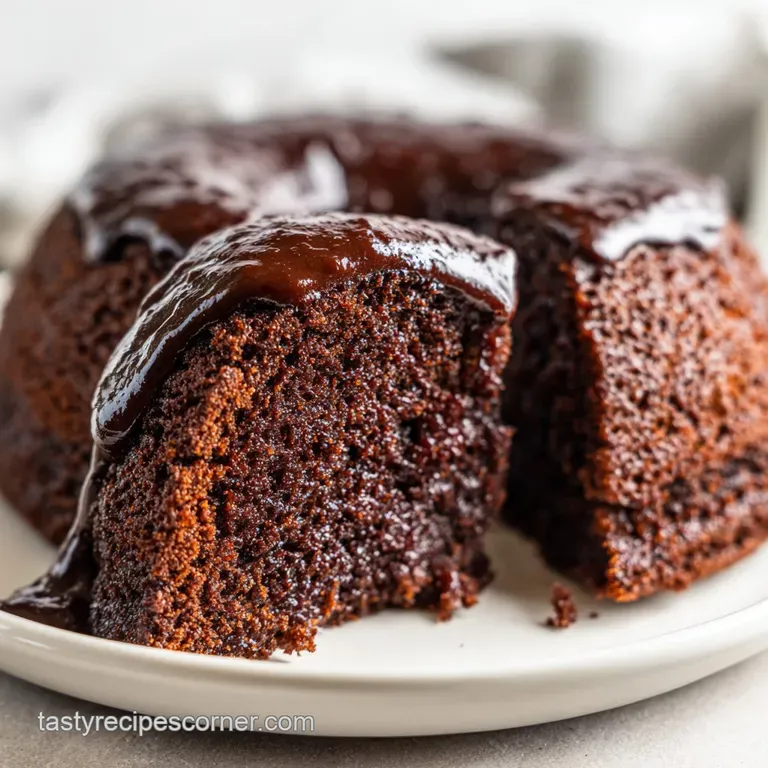
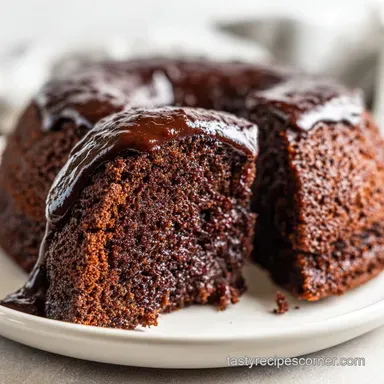
Death by Chocolate Cake: Velvety and Dark

- Time: Active 40 minutes, Passive 35 minutes, Total 1 hours 15 mins
- Flavor/Texture Hook: Velvety crumb with a glossy, snap crisp chocolate finish
- Perfect for: Anniversary dinners, gallery openings, or impressive holiday hosting
- Create the Ultimate Fudgy Death by Chocolate
- The Chemistry of Fudgy Layers
- Essential Recipe Specifications and Yields
- Selecting Quality Cocoa and Fats
- Essential Tools for Silky Batter
- Step-by-Step Baking and Assembly
- Professional Troubleshooting and Fixes
- Creative Dietary and Flavor Swaps
- Proper Storage and Waste Reduction
- Elegant Pairings for Dessert Service
- Recipe FAQs
- 📝 Recipe Card
Create the Ultimate Fudgy Death by Chocolate
I still remember the first time I attempted a true Death by Chocolate for a close friend's engagement party. The kitchen smelled like a high end chocolatier's workshop, with the scent of blooming cocoa and hot espresso hanging heavy in the air.
I had three different bowls of chocolate on the counter, and for a moment, I worried it might be too much. But when the first guest took a bite and went completely silent, I knew the intensity was exactly the point.
This isn't your average supermarket sheet cake. We are going for something that feels more like a decadent truffle than a spongy bread. It's about the contrast between the dark, moist cake and the heavy, mirror like ganache that coats every inch.
If you've ever felt disappointed by a chocolate cake that looked dark but tasted like plain sugar, this version is your redemption.
The secret lies in how we treat our fats and our liquids. We're using sour cream for tang and oil for lasting moisture, ensuring that even three days later, the cake remains supple.
You'll find that the addition of hot coffee doesn't make it taste like java; it simply acts as a magnifying glass for the cocoa, making the chocolate flavor vibrate.
The Chemistry of Fudgy Layers
Building a cake this intense requires a bit of understanding about how ingredients interact under heat. We aren't just mixing things; we're creating a stable emulsion that can support the weight of heavy cocoa solids without collapsing.
- The Bloom Effect: Hot coffee dissolves cocoa particles, releasing trapped flavor oils for a more intense profile.
- Acid Interaction: Sour cream provides the acidity needed to activate the baking soda, creating a fine, tight crumb structure.
- Fat Suspension: Using vegetable oil instead of butter keeps the cake soft even when refrigerated, as oil remains liquid at lower temperatures.
| Prep Method | Time Required | Resulting Texture | Best Application |
|---|---|---|---|
| Hand Whisking | 10 minutes | Dense and fudgy | Small family gatherings |
| Stand Mixer | 5 minutes | Lighter and aerated | High volume party cakes |
| Food Processor | 3 minutes | Ultra smooth, tight crumb | Modern, sharp edged plating |
Using a stand mixer such as a KitchenAid helps incorporate just enough air into the eggs to prevent the cake from becoming a leaden brick. However, don't overwork it once the flour goes in, or you'll end up with a bread like texture rather than a velvety melt.
Essential Recipe Specifications and Yields
When you're aiming for a professional result, the tiny details in the measurements matter. This recipe is designed to yield 12 generous servings, though because it is so rich, you might find people asking for smaller slivers.
I always suggest using a digital scale for the flour and cocoa powder to ensure the crumb isn't dry.
Cocoa Blooming Science Explained
The moment the hot coffee hits the cocoa powder and sugar, you'll see it transform into a glossy, dark slurry. This is the "bloom." It ensures no gritty cocoa pockets remain and that the starch in the cocoa begins to gelatinize early, leading to a much more cohesive crumb.
Sour Cream and Crumb Structure
Standard milk often makes a cake too thin. The 1 cup (240ml) of full fat sour cream adds a thickness that prevents the 2 Large eggs from over expanding, which is why the cake remains dense and fudgy rather than airy.
| Component | Science Role | Pro Secret |
|---|---|---|
| Dutch process Cocoa | Lowers acidity | Sift twice to prevent lumps |
| Hot Brewed Coffee | Dissolves cocoa solids | Use 195°F temp for maximum bloom |
| Semi sweet Chocolate | Provides structural fat | Chop into pea sized bits for even melting |
The sea salt is also non negotiable here. Without that 1 tsp of sea salt, the chocolate flavors stay flat. Salt is the literal "volume knob" for the cocoa beans. For another deep, dark experience, you might also enjoy the technique used in our Chocolate Chunk Cookies recipe.
Selecting Quality Cocoa and Fats
Your results are only as good as the chocolate you start with. Since we are using 16 oz (450g) of semi sweet chocolate, choose a bar that you would actually enjoy eating on its own. Avoid chocolate chips if possible, as they contain stabilizers that prevent them from melting into a perfectly smooth ganache.
- 2 cups (250g) All purpose flour
- 2 cups (400g) Granulated sugar
- 0.75 cup (75g) Dutch process cocoa powder
- 2 tsp Baking soda
- 1 tsp Baking powder
- 1 tsp Sea salt
- 1 cup (240ml) Full fat sour cream Why this? Provides moisture and acidity for a tender, velvety crumb.
- 0.5 cup (120ml) Vegetable oil
- 2 Large eggs
- 1 cup (240ml) Hot brewed strong coffee
- 1 tbsp Pure vanilla extract
- 16 oz (450g) Semi sweet chocolate (60% Cacao) Why this? High cacao percentage ensures a rich, sophisticated flavor.
- 2 cups (480ml) Heavy whipping cream
- 2 tbsp Unsalted butter
- 0.25 tsp Flaky sea salt
| Original Ingredient | Substitute | Why It Works |
|---|---|---|
| Full fat Sour Cream | Greek Yogurt (Plain) | Similar acidity and fat. Note: Crumb may be slightly tangier. |
| Vegetable Oil | Melted Coconut Oil | Same fat ratio. Note: Adds a subtle tropical scent. |
| Semi sweet Chocolate | Bittersweet Chocolate | Lower sugar content. Note: Makes for a much more intense dessert. |
If you find yourself short on Dutch process cocoa, you can use natural cocoa, but be aware that the cake will be lighter in color and slightly more acidic. This selection process is similar to the care taken in our German Chocolate Cake recipe.
Essential Tools for Silky Batter
You don't need a professional kitchen, but two 9 inch round cake pans are a must. I prefer light colored aluminum pans because they distribute heat more evenly than dark, non stick ones, which can cause the edges of this high sugar cake to scorch before the center is set.
A fine mesh sieve is your best friend here. Cocoa powder is notorious for clumping, and those little balls of dry powder will not disappear during baking. Sifting them into the flour and sugar ensures a uniform color and texture throughout the entire Death by Chocolate experience.
step-by-step Baking and Assembly
Preparing the Cake Pans
Preheat your oven to 350°F (180°C). Grease two 9 inch pans and line the bottoms with parchment paper. Note: This prevents the fudgy bottom from sticking.
Mixing the Dry Components
Whisk the 2 cups flour, 2 cups sugar, 0.75 cup cocoa, baking soda, baking powder, and 1 tsp sea salt in a large bowl. Ensure there are no visible white streaks of flour.
Combining the Wet Ingredients
In a separate bowl, whisk the 1 cup sour cream, 0.5 cup oil, 2 eggs, and 1 tbsp vanilla until smooth. The mixture should look pale and creamy.
Incorporating the Hot Coffee
Slowly pour the 1 cup hot coffee into the wet mixture while whisking constantly. Note: This prevents the eggs from scrambling.
Creating the Final Batter
Gradually fold the dry ingredients into the wet ingredients. Mix only until the last bit of flour disappears to keep the texture velvety.
Baking to Proper Doneness
Divide batter between pans and bake for 30 to 35 minutes until a toothpick comes out with a few moist crumbs. Note: Do not wait for it to be completely dry, or it will be overbaked.
Precision Temperature for Ganache
While the cakes cool, heat 2 cups heavy cream and 2 tbsp butter until just simmering. Look for small bubbles around the edges.
Crafting the Silk Ganache
Pour the hot cream over 16 oz chopped chocolate. Let it sit for 5 minutes, then whisk from the center outward until the mixture is glossy and dark.
Cooling and Levelling Layers
Once the cakes are cold, use a serrated knife to trim any domes. Note: This ensures the cake doesn't lean or slide.
Assembling the Final Masterpiece
Place one layer down, spread 1 cup of ganache over it, top with the second layer, and pour the remaining ganache over the top and sides. Sprinkle with 0.25 tsp flaky sea salt.
Professional Troubleshooting and Fixes
Fixing a Broken Ganache
If your ganache looks oily or grainy, the emulsion has broken. This usually happens if the cream was too hot or if you whisked too vigorously before the chocolate had softened.
| Problem | Root Cause | Solution |
|---|---|---|
| Gummy Crumb | Over mixing the batter | Mix only until flour is just incorporated. |
| Sunk Cake Center | Oven door opened too early | Keep door closed until at least 25 minutes pass. |
| Grainy Ganache | Chocolate seized from water | Ensure all bowls are bone dry before starting. |
Preventing Sunk Cake Centers
A common issue with moist chocolate cakes is the center dipping. This usually happens if the leavening agents (baking soda/powder) are expired or if the cake is pulled from the heat too soon.
Chef's Note: Check your baking soda by dropping a pinch in vinegar. If it doesn't fizz aggressively, throw it away and buy a fresh box.
Common Mistakes Checklist
- ✓ Never skip the parchment paper; this cake is too moist to flip without it.
- ✓ Use room temperature eggs to ensure they emulsify properly with the fats.
- ✓ Don't use "Dutch process" and "Natural" cocoa interchangeably without checking your leavening.
- ✓ Let the ganache cool to 80°F before pouring if you want a thick, stable coating.
- ✓ Tap the cake pans on the counter before baking to release large air bubbles.
Creative Dietary and Flavor Swaps
If you need to adjust this for specific needs, focus on maintaining the fat content. This cake relies on fat for its "melt in-the mouth" quality.
gluten-free Flour Adjustments
You can swap the all purpose flour for a high-quality 1:1 gluten-free baking blend. Note: The cake will be slightly more fragile, so let it cool completely before handling.
dairy-free Substitution Options
For a dairy-free version, use coconut cream instead of heavy cream and a plant based sour cream. The chocolate should be at least 70% cacao to ensure it is naturally dairy-free.
| Plating Level | Preparation Tweak | Visual Impact |
|---|---|---|
| Simple | Single slice with a fork | Homey and inviting |
| Polished | Sifted cocoa powder border | Elegant dinner party style |
| Restaurant | Mirror glaze with gold leaf | High end professional look |
If you enjoy a more fluid chocolate experience, you might find the texture of a Chocolate Fondue Recipe to be a great companion for dipping extra cake scraps.
Proper Storage and Waste Reduction
This cake actually tastes better on the second day once the flavors have had time to settle. Store it in an airtight container in the fridge for up to 5 days. If the ganache loses its shine, a 5 second zap in the microwave for an individual slice will bring back that velvety sheen.
You can freeze individual slices by wrapping them in parchment and then foil. They stay fresh for up to 3 months. To use up any cake scraps from levelling the layers, crumble them into a bowl, mix with a spoonful of leftover ganache, and roll them into truffles.
Roll the truffles in extra cocoa powder for a zero waste treat.
Elegant Pairings for Dessert Service
Since this recipe is incredibly dark and rich, it needs something to cut through the fat. I almost always serve it with a side of lightly sweetened whipped cream or a scoop of very cold vanilla bean ice cream.
Classic Tart Berry Accents
Fresh raspberries or a tart cherry compote provide a bright acidity that balances the heavy cocoa. The "snap" of a fresh berry against the soft cake crumb is a sensory delight.
Espresso and Coffee Pairings
A small cup of espresso or a cold brew coffee helps highlight the earthy notes in the Dutch process cocoa. If you want to lean into the sweetness, a small glass of Port wine is a classic "restaurant style" pairing that will wow guests.
| Element | Fresh Dutch Cocoa | Cocoa Mix Shortcut |
|---|---|---|
| Flavor Profile | Deep, earthy, complex | Overly sweet, thin |
| Texture | Silky and dense | Grainy or airy |
| Color | Dark Mahogany | Light Brown |
For those who want a different chocolate profile entirely, you might consider the lighter, fluffier approach found in a Chocolate Angel Food recipe.
Precision Checkpoints
- Oven Temp: Ensure a true 350°F using an oven thermometer.
- Internal Temp: The cake is done when the internal temperature reaches 205°F.
- Ganache Cooling: Wait for the ganache to hit 80°F for the best "pourable" consistency.
If you find yourself in a rush and need a faster chocolate fix, consider the 50 minute bake time of a Chocolate Cobbler Recipe instead.

Recipe FAQs
Why do they call it death by chocolate?
Because of its extreme richness and density. The name signifies an overwhelmingly intense, multi layered chocolate experience meant to satisfy the deepest craving.
What does Death by Chocolate have in it?
It typically contains dark cocoa, strong coffee, and multiple forms of chocolate. This version uses sour cream for moisture and a high cacao percentage semi sweet chocolate for its ganache topping.
Which restaurant owns the trademark Death by Chocolate?
This title is widely used but heavily associated with the restaurant chain known as The Old Spaghetti Factory. However, many independent bakeries use variations of the name for their intensely rich chocolate cakes.
Which Death by Chocolate is best?
The best version prioritizes depth of cocoa flavor over pure sweetness. Look for recipes that use hot coffee to bloom the cocoa, resulting in a velvety crumb, much like the technique used in our Cake Red Cake Recipe for texture control.
Is it true I must use only Dutch process cocoa?
No, this is a common misconception, but Dutch process is preferred here. Dutch process cocoa is alkalized, making it less acidic, which pairs better with baking soda for a darker color and smoother finish.
How to prevent my rich cake from sticking to the pan?
Grease the pan thoroughly, line the bottom with parchment paper, and then lightly dust the sides with cocoa powder instead of flour. Flour leaves white streaks on a dark cake, whereas cocoa ensures a uniform color right up to the edge.
How to achieve a super glossy ganache finish for this cake?
Heat the cream until just simmering, pour it over the chopped chocolate, and let it sit undisturbed for five minutes. Whisk gently from the center outward after the rest period; this careful emulsification process is key to that professional mirror shine.
Death By Chocolate Cake
Ingredients:
Instructions:
Nutrition Facts:
| Calories | 718 kcal |
|---|---|
| Protein | 8.1 g |
| Fat | 46.2 g |
| Carbs | 76.4 g |
| Fiber | 5.8 g |
| Sugar | 51.2 g |
| Sodium | 442 mg |
