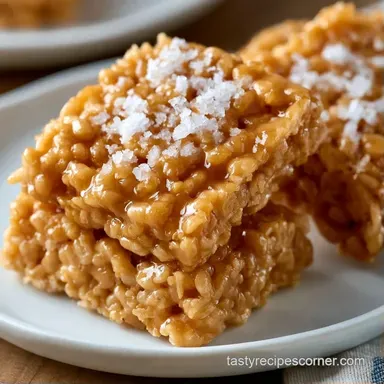
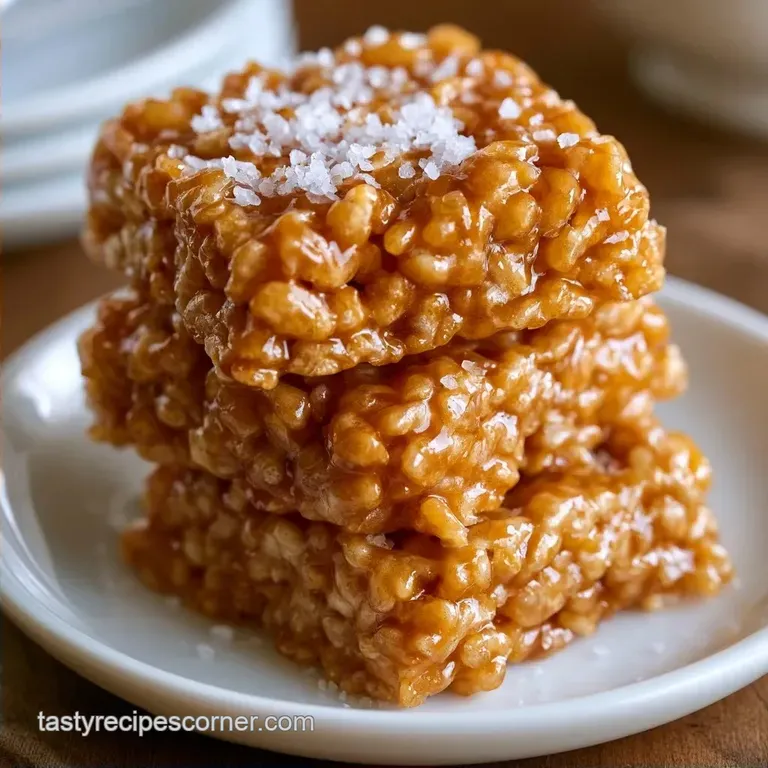
Brown Butter Krispie Treat with Sea Salt
- Time: 5 min active + 10 min cook + 30 min chilling = Total 45 mins
- Flavor/Texture Hook: Toasted hazelnut aroma with a shatter crisp bite
- Perfect for: Dessert platters, baby showers, or an elegant party surprise
- Brown Butter Krispie Treat with Sea Salt
- The Hidden Truth About Texture
- Recipe Specs and Timing
- The Component Breakdown
- Essential Tools and Gear
- Steps From Prep to Plate
- Solving Common Texture Issues
- Troubleshooting Common Issues
- Ways to Customize Treats
- Freshness and Storage Tips
- Elegant Presentation Ideas
- Recipe FAQs
- 📝 Recipe Card
Brown Butter Krispie Treat with Sea Salt
The smell of butter hitting a hot pan is one of my favorite things in the kitchen. It starts with a frantic sizzle, then it foams up, and suddenly the air fills with this deep, toasted hazelnut aroma that makes the whole house smell like a high end bakery.
I remember the first time I tried browning butter for a sweet treat, I almost panicked when the foam subsided, thinking I'd ruined it. But that's exactly when the magic happens.
Forget everything you've heard about needing fancy additives or "secret" syrups to make a gourmet treat. The truth is that the most basic ingredients, when handled with a little patience, are all you need.
Most people just melt butter, but by browning it, we're creating a complex base that transforms a childhood snack into something you'd actually serve at a dinner party.
Here is the ultimate recipe for Brown Butter Krispie Treat with Sea Salt. It's about the contrast between the velvety melted marshmallows and the sharp, crystalline pop of flaky salt. We're aiming for a texture that's chewy but not sticky, and a flavor that isn't just "sugar," but something much deeper.
The Hidden Truth About Texture
Most people think the key to a great treat is packing the mixture firmly into the pan to get clean squares. Honestly, that's the biggest mistake you can make. When you press down too hard, you crush the air pockets in the cereal and squeeze the marshmallow into a dense, rubbery slab.
You want a light, airy structure that yields easily to the bite.
The chemistry here is all about the sugars. When we brown the butter, we're triggering the Maillard reaction, which is the same process that gives seared steak or toasted bread its flavor. According to Serious Eats, this reaction creates hundreds of different flavor compounds. By combining those toasted notes with the salt, we prevent the marshmallows from feeling cloying.
The salt isn't just a garnish, either. It acts as a flavor enhancer, waking up the taste buds so you actually taste the butter and the toasted grain of the cereal rather than just a wall of sweetness.
The Decision Shortcut If you want a chewier treat, add an extra handful of mini marshmallows. If you prefer a crispier bite, toast the cereal in the oven for 5 mins first. If you're serving these at a party, slice them with a hot knife for clean edges.
Recipe Specs and Timing
Before we get into the gear, it's important to understand the timeline. This isn't a "dump and stir" situation. The timing of the heat is everything. If you keep the marshmallows on the stove too long, the sugar crystallizes, and you'll end up with treats that are hard as rocks.
We're looking for a specific window of melt. The moment those last lumps of marshmallow vanish, the pot needs to come off the heat. We use the residual heat of the pan to finish the job. This preserves the "pull" and the silkiness of the center.
| Method | Time | Texture | Best For |
|---|---|---|---|
| Standard Melt | 15 mins | Soft/Sticky | Kids' snacks |
| Brown Butter | 20 mins | Nutty/Complex | Elegant gatherings |
| Overcooked | 25 mins | Hard/Brittle | Avoid this! |
The Component Breakdown
The choice of ingredients here is minimal, but each one plays a specific role. We aren't just using butter for fat; we're using it for flavor. The Rice Krispies provide the structural skeleton, while the marshmallows act as the glue.
- Butter Browning
- Milk solids toast, creating aromatic compounds.
- Sugar Suspension
- Marshmallows create a polymer like web that holds the cereal.
- Salt Equilibrium
- Sodium ions suppress bitterness and enhance sweetness.
| Ingredient | Science Role | Pro Secret |
|---|---|---|
| Unsalted Butter | Fat & Flavor | Brown until "amber" for maximum nuttiness |
| Mini Marshmallows | Binder/Sweetener | Use minis for faster, more even melting |
| Rice Krispies | Structure | Keep the bag sealed until the last second |
| Flaky Sea Salt | Flavor Contrast | Apply immediately while the surface is tacky |
If you love this kind of sweet and salty combo, you might also enjoy my Irish Cream Hot Fudge for an even richer dessert experience.
Essential Tools and Gear
You don't need a professional kitchen, but a heavy bottomed pot is non negotiable. Thin pots create hot spots that will burn your butter before it has a chance to brown evenly. A rubber spatula is also your best friend here, as it allows you to scrape every bit of that brown butter from the sides.
I always line my 8x8 pan with parchment paper, leaving an overhang on two sides. This lets you lift the entire block of treats out of the pan, which makes slicing a breeze and prevents the treats from sticking to the corners.
Steps From Prep to Plate

- Place 6 tbsp (85g) unsalted butter in a large heavy bottomed pot over medium heat. Melt and stir constantly until the butter foams, subsides, and small brown specks form at the bottom with a toasted hazelnut aroma.
- Immediately remove from heat and stir in 1 tsp (5ml) vanilla extract. Note: Adding vanilla now prevents the alcohol from evaporating too quickly.
- Turn the heat to low and add 10 oz (280g) mini marshmallows. Stir gently and consistently until the marshmallows are just melted and smooth.
- Remove from heat the moment the last lump disappears. Note: Overheating here leads to rock hard treats.
- Remove the pot from the heat entirely. Gently fold in 6 cups (1L) Rice Krispies cereal using a rubber spatula until every piece is evenly coated.
- Transfer the mixture to an 8x8 inch baking pan lined with parchment paper.
- Use your fingers to gently press the mixture into the corners without packing it down firmly.
- Sprinkle ½ tsp (3g) flaky sea salt evenly across the top while the mixture is still tacky.
- Allow the treats to set for 30 minutes before slicing into 16 squares.
Chef's Tip: If you want a "shatter" effect on the salt, use Maldon or another pyramid style flaky salt. Fine table salt will just disappear into the sugar.
Solving Common Texture Issues
The most common complaint with these is that they end up too hard. This usually happens because the marshmallows were cooked for an extra minute or two. Sugar is temperamental; once it hits a certain temperature, it transitions from "gooey" to "candy," and there's no going back.
Troubleshooting Common Issues
| Issue | Solution |
|---|---|
| Why Your Treats Are Rock Hard | This is almost always due to over heating the sugar in the marshmallows. When you boil the marshmallow mixture, you're evaporating the moisture, which concentrates the sugar. |
| Why Your Butter Burned | If the heat is too high, the milk solids go from brown to black in seconds. The smell will shift from "nutty" to "acrid. |
| Why They Are Too Sticky | This usually means the marshmallows didn't melt fully, or you didn't let them set for the full 30 minutes. Be patient with the cooling process. |
Quick Success Checklist
- ✓ Butter reached a deep amber color
- ✓ Marshmallows were not boiled
- ✓ Cereal was folded, not stirred aggressively
- ✓ Mixture was pressed gently, not packed
- ✓ Flaky salt was applied before setting
Ways to Customize Treats
Once you've nailed the base, you can start playing with additions. The brown butter is a neutral enough base that it pairs well with almost anything.
The Nutty Crunch Fold in ½ cup of toasted pecans or slivered almonds along with the cereal. This doubles down on the nutty notes of the brown butter.
The Chocolate Drizzle Melt some dark chocolate and drizzle it in a zig zag pattern over the salt. The bitterness of the dark chocolate complements the sea salt beautifully.
The dairy-free Swap You can use a vegan butter substitute, but be careful; not all vegan butters "brown" the same way. Look for one with coconut oil or cashew bases for the best results.
| Original Ingredient | Substitute | Why It Works |
|---|---|---|
| Unsalted Butter | Vegan Butter (High fat) | Similar fat content. Note: May not brown as deeply as dairy butter |
| Rice Krispies | Puffed Rice Cereal | Identical texture and crunch |
| Mini Marshmallows | Large Marshmallows | Same sugar content. Note: Take longer to melt; chop them first |
Freshness and Storage Tips
These treats are best served within 48 hours, but they keep surprisingly well if stored correctly. The enemy here is air, which can make the cereal go stale or the marshmallows dry out.
Keep them in an airtight container at room temperature for up to 3 days. If you're in a humid environment, the fridge is better, though it can make them a bit firmer. For long term storage, you can actually freeze these! Wrap individual squares in parchment paper and toss them in a freezer bag for up to 2 months.
To eat, just let them thaw for 10 minutes.
For a zero waste approach, don't wash your pot immediately. If there are bits of brown butter and marshmallow stuck to the sides, add a splash of milk and heat it up to make a quick, sweet glaze for pancakes.
Elegant Presentation Ideas
Since we're going for an "occasion ready" vibe, don't just serve these in a plastic tub. Cut them into very precise, small rectangles (about 1x2 inches) rather than large squares. This makes them feel like "petit fours" rather than a childhood snack.
Arrange them on a slate board or a white ceramic platter. To really wow your guests, serve each square with a small dollop of creamy pistachio ice cream on the side. The cold, nutty creaminess of the ice cream against the room temperature, salty crunch of the treat is a winning combination.
Recipe FAQs
Are these treats a good choice for a house party or kids' party?
Yes, they are ideal. The addition of sea salt and brown butter transforms a simple childhood snack into a sophisticated treat that appeals to both adults and children.
How to brown the butter without burning it?
Stir constantly over medium heat. Watch for the butter to foam and subside until small brown specks form and a toasted hazelnut aroma develops.
Is it true that boiling the marshmallow mixture makes the treats softer?
No, this is a common misconception. Boiling evaporates the moisture and concentrates the sugar, which actually results in rock hard treats.
How to press the mixture into the pan for the best texture?
Line an 8x8 inch pan with parchment paper and use your fingers. Gently push the mixture into the corners, but do not pack it down firmly or the treats will become too dense.
Why are my treats too sticky to slice?
The marshmallows may not have melted fully. Ensure the mixture is completely smooth before folding in the cereal, and always let them set for the full 30 minutes.
What savory snacks pair well with these for a party platter?
Crispy sausages provide a perfect salty contrast. If you enjoyed mastering the browning process for the butter here, you can use similar heat management to cook turkey sausage for a savory side.
Do I really need to wait 30 minutes before slicing?
Yes, the setting time is mandatory. Slicing too early prevents the sugars from stabilizing, causing the treats to lose their structure and stick to the knife.
Brown Butter Krispie Treats