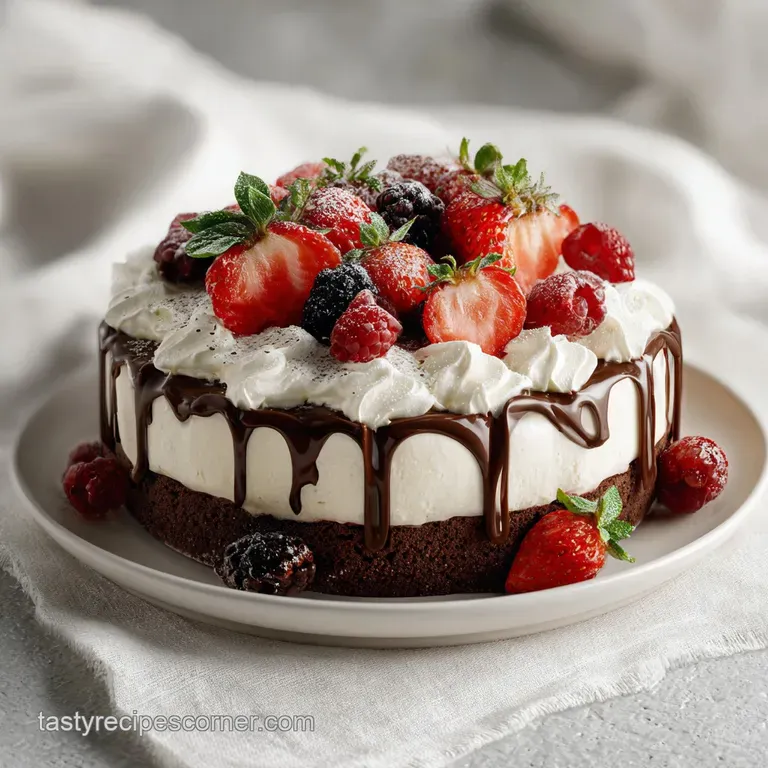
Wicked Espresso Cake: Dark and Moist
- Time: Active 40 minutes, Passive 45 minutes, Total 85 minutes
- Flavor/Texture Hook: Silky, velvety dark chocolate with a sharp espresso punch
- Perfect for: Milestone birthdays, dinner parties, or high end weekend baking
- Mastering the Decadent Wicked Espresso Cake
- Core Specifications for Baking Perfection
- Sourcing the Best Recipe Elements
- Required Tools for Cake Success
- Construction of the Espresso Layers
- Troubleshooting Common Baking Mistakes
- Tailoring Flavors and Dietary Adjustments
- Storage and Zero Waste Methods
- Professional Presentation and Plating Styles
- Baking Myths Debunked
- Recipe FAQs
- 📝 Recipe Card
Mastering the Decadent Wicked Espresso Cake
That first morning I attempted a version of this, my kitchen smelled like a high end Italian coffee bar. I remember the sound of the boiling coffee hitting the dry cocoa powder that distinct fizz and hiss as the chocolate "blooms" and releases its oils.
I used to think adding coffee to cake was just a background trick to make chocolate taste more "chocolaty," but in this wicked espresso cake, the coffee is the main event.
Honestly, don't even bother with low quality instant coffee here; the depth comes from the quality of the roast. The first time I served this to my friends, the room went silent. You know that specific silence? The one where everyone is too busy navigating the velvety ganache to actually speak.
We’ve all had dry, crumbly mocha cakes that taste like dusty beans, but this recipe is different. It's heavy, damp in the best way possible, and has a crumb that almost melts before you can even chew.
We are going for achievable elegance here. It looks like it came from a professional patisserie, but the method is actually quite forgiving if you follow the temperature cues. We'll be using some coffee liqueur to sharpen the edges of the flavor, and I'll show you how to get that mirror like finish on your ganache without losing your mind.
Right then, let's get the oven preheated and talk about why this chemistry actually works.
Core Specifications for Baking Perfection
The Caffeine Cocoa Synergistic Bloom: Using strong hot coffee instead of water triggers a chemical reaction that dissolves cocoa solids instantly, releasing volatile flavor compounds that stay trapped in cold liquid.
This ensures the mocha profile is integrated into every crumb rather than tasting like separate layers of flavor.
- Maillard Enhancement: The high sugar content combined with the acidity of buttermilk creates a rapid browning reaction, resulting in a dark, almost black sponge that remains tender.
- Fat Suspension: Vegetable oil stays liquid at room temperature, which means this cake feels moister on the tongue than butter based cakes, even after being in the fridge.
- Leavening Balance: The combination of 2 tsp baking soda and 1 tsp baking powder neutralizes the acid in the buttermilk and cocoa while providing enough lift to support the heavy cocoa solids.
- Alcohol as a Solvent: The coffee liqueur acts as a solvent for the aromatic compounds in the vanilla and espresso, making the scent of the cake much more pronounced.
| Method | Speed | Control | Best For |
|---|---|---|---|
| Oven Baking | 45 minutes | Moderate | Even crumb structure and consistent rise |
| Stovetop (Ganache) | 5 minutes | High | Maintaining the glossy sheen and avoiding scorched chocolate |
| Microwave (Melting) | 2 minutes | Low | Quick fixes, but risks "breaking" the fat in-protein emulsion |
It's vital to choose the right method for the ganache. While the oven handles the heavy lifting for the sponge, the stovetop is your best friend for the topping. If you're looking for a lighter coffee fix after mastering this, my Espresso Martini Mousse recipe is a fantastic follow up that uses similar flavor profiles.
Sourcing the Best Recipe Elements
| Ingredient | Science Role | Pro Secret |
|---|---|---|
| Dutch process Cocoa | Provides the dark color and mellow flavor by neutralizing natural acidity. | Sift it twice to avoid "cocoa bombs" (unmixed dry pockets) in the finished sponge. |
| Strong Hot Coffee | Hydrates the starches in the flour and blooms the cocoa powder. | Use a dark roast or espresso; the bitterness balances the 400g of granulated sugar. |
| Buttermilk | The acid reacts with baking soda to create a tender, soft crumb. | If you're out, use whole milk with a teaspoon of lemon juice; the fat is non negotiable. |
| Dark Chocolate (60%) | Creates the structural base for the ganache. | Chop it into shards, not chunks, so it melts evenly with the hot heavy cream. |
For the wicked espresso cake base: 375g all purpose flour Why this? Provides enough gluten to hold the moisture without becoming bready. 400g granulated sugar 90g Dutch process cocoa powder 3 tbsp instant espresso powder 2 tsp baking soda 1 tsp baking powder 1 tsp fine sea salt 240ml
buttermilk 120ml vegetable oil 2 large eggs 1 tbsp pure vanilla extract 240ml strong hot coffee 2 tbsp coffee liqueur
For the Espresso Ganache & Frosting: 340g dark chocolate (60% cacao) 360ml heavy cream 1 tbsp instant espresso powder 115g unsalted butter 250g powdered sugar
Required Tools for Cake Success
You'll need two 9 inch round cake pans for this. I highly recommend using light colored aluminum pans. Dark pans absorb too much heat and can make the edges of your wicked espresso cake tough before the center is done. If you only have dark pans, drop your oven temp by 25°F.
A sturdy whisk and a large glass bowl are essential. We aren't using a stand mixer for the cake batter because we want to avoid over developing the gluten. For the frosting, however, a hand mixer or a stand mixer (like a KitchenAid) is a lifesaver to get that 115g of unsalted butter and 250g of powdered sugar into a silky, spreadable state.
Don't forget the parchment paper. This cake is very moist and "tacky," meaning it loves to stick to the bottom of the pan. Cutting circles of parchment to line the bottom is the difference between a beautiful layer cake and a pile of delicious crumbs. Trust me on this I’ve skipped it before and regretted it while scraping the pan with a spoon. For another decadent treat that requires similar precision, try the Death by Chocolate recipe next time.
Construction of the Espresso Layers
1. The Infusion Phase
Preheat your oven to 350°F (180°C). In a large bowl, whisk together the 375g all purpose flour, 400g granulated sugar, 90g Dutch process cocoa, 3 tbsp instant espresso powder, baking soda, baking powder, and salt.
Note: Whisking the dry ingredients first prevents clumps and ensures the leavening is evenly distributed.
2. Building the Batter
Add the 240ml buttermilk, 120ml vegetable oil, 2 large eggs, and 1 tbsp vanilla extract to the dry ingredients. Mix on medium speed or whisk vigorously until the mixture is thick and smooth.
3. The Controlled Bake
Slowly pour in the 240ml strong hot coffee and 2 tbsp coffee liqueur. The batter will be very thin don't panic. Pour evenly into the two prepared pans. Bake for 45 minutes until a toothpick comes out with just a few moist crumbs.
4. Crafting the Wicked Ganache
While the cakes cool, heat the 360ml heavy cream and 1 tbsp espresso powder until it just begins to simmer and steam. Pour this over the 340g chopped dark chocolate. Let it sit for 5 minutes, then stir gently from the center outward until it's a mirror like liquid.
5. The Frosting Base
In a separate bowl, beat the 115g unsalted butter until creamy. Gradually add the 250g powdered sugar and 3 tablespoons of the prepared ganache. Whip until the frosting is pale mocha and fluffy.
6. Assembly and Sealing
Place one cake layer on your stand. Spread a thick layer of the espresso buttercream over the top. Place the second layer on top. Note: If the layers feel too soft, chill them for 20 minutes before stacking.
7. The Final Pour
Pour the remaining liquid ganache over the top of the cake. Use an offset spatula to gently nudge it over the edges until it creates elegant drips down the sides.
8. The Setting Period
Let the cake sit at room temperature for at least 30 minutes before slicing. This allows the ganache to firm up enough to get those clean, sharp cuts.
Troubleshooting Common Baking Mistakes
Avoiding the "Sink Hole"
If your cake rises beautifully and then collapses in the center as it cools, you likely have one of two issues: over beating the eggs or too much baking soda. When we whisk in the hot coffee, we want to be gentle.
If you incorporate too much air, the bubbles will expand too fast in the oven and then pop, leaving you with a crater.
Temperature is Everything
The most common mistake with ganache is "breaking" the sauce. This happens when the cream is too hot or you stir too aggressively, causing the fat to separate from the cocoa solids. If you see oily streaks, don't throw it out!
Add a teaspoon of cold heavy cream and whisk gently; it usually brings the emulsion back together.
The Salt Secret
If the cake tastes "flat" despite all that espresso, you probably skimped on the salt. Fine sea salt is vital because it cuts through the fat of the butter and chocolate, allowing the bitter notes of the coffee to shine. It doesn't make the cake salty; it makes it taste more like itself.
| Problem | Root Cause | Solution |
|---|---|---|
| Grainy Frosting | Cold butter or unsifted sugar | Whip the frosting over a bowl of warm water for 30 seconds to melt the sugar crystals. |
| Dry Crumb | Overbaking by even 5 mins | Brush the warm layers with extra coffee liqueur to restore moisture. |
| Ganache won't set | Not enough chocolate or too much cream | Melt in an extra 30g of chocolate and chill for 15 minutes. |
Common Mistakes Checklist: ✓ Always use room temperature eggs and buttermilk to prevent the batter from curdling. ✓ Bloom your cocoa powder in the hot coffee before adding it to the flour for maximum depth.
✓ Sift your powdered sugar for the frosting; no amount of whisking can remove those tiny white lumps. ✓ Don't overcrowd the oven; bake the two pans on the same middle rack with space between them.
✓ Let the cake cool completely in the pan for 15 minutes before attempting to flip it onto a wire rack.
Tailoring Flavors and Dietary Adjustments
If you want to customize this wicked espresso cake, there are a few ways to play with the intensity. Some people find the 3 tbsp of espresso powder a bit too "grown up." You can easily dial that back to 1 tbsp for a more subtle mocha vibe.
On the flip side, if you're a true caffeine fiend, swap the vanilla extract for more coffee liqueur.
But what about the texture? If you want a denser, more brownie like experience, you can replace the buttermilk with full fat sour cream. This increases the fat content and creates a tighter crumb that holds up exceptionally well if you're planning on doing an elaborate tiered decoration.
| Original Ingredient | Substitute | Why It Works |
|---|---|---|
| Buttermilk (240ml) | Full fat Greek Yogurt (240ml) | Maintains acidity for the baking soda but creates a denser, sturdier crumb. |
| Vegetable Oil (120ml) | Melted Coconut Oil (120ml) | Adds a very subtle nutty note. Note: Cake will be firmer when chilled. |
| Coffee Liqueur (2 tbsp) | Extra Strong Cold Brew (2 tbsp) | Keeps the moisture and flavor without the alcohol content. |
The The Italian Love recipe is another great make-ahead option if you find yourself enjoying the process of layering flavors and textures. When scaling this recipe up for a big party (2x), make sure to only increase the salt and spices by 1.5x. Using a full 2x on salt can make the chocolate taste metallic. For the liquids, reduce the total amount by about 10% to ensure the structure doesn't get too heavy and collapse under its own weight.
Storage and Zero Waste Methods
To keep this cake at its peak, store it in an airtight container at room temperature for up to 3 days. Because of the oil base, it won't dry out as fast as a sponge cake. If you need to keep it longer, the fridge is fine for 5-6 days, but let it sit out for 20 minutes before serving.
Cold ganache is waxy; room temperature ganache is velvety.
For the freezer, wrap individual slices in plastic wrap and then a layer of foil. They stay perfect for 3 months. To thaw, just leave a slice on the counter for about an hour. If you end up with scraps from leveling the cake tops, don't toss them!
Crumble them up, mix with a spoonful of the leftover frosting, and roll them into "espresso truffles." Dip them in the remaining ganache for a zero waste treat.
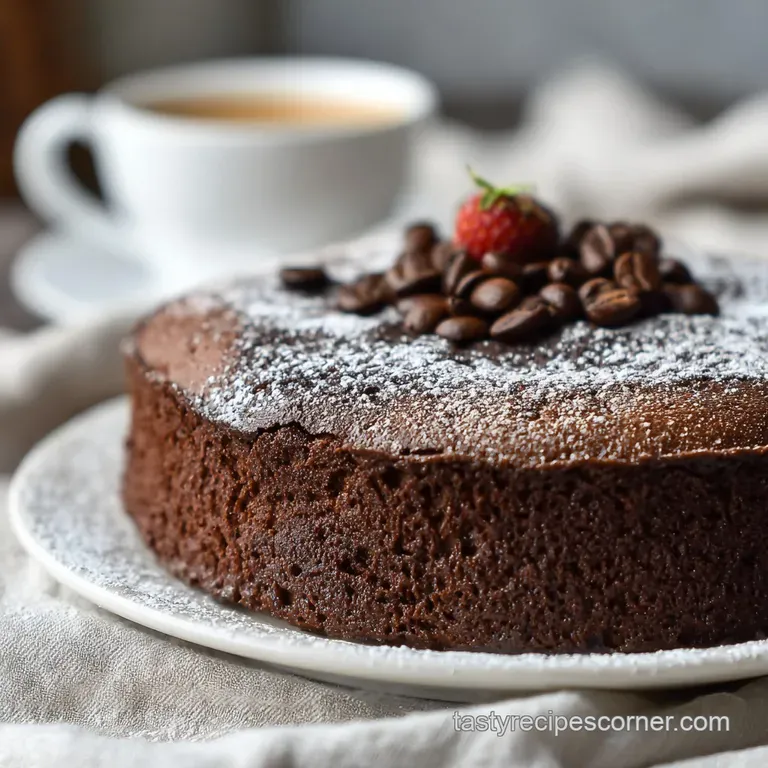
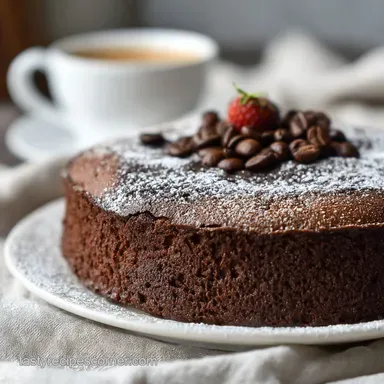
Professional Presentation and Plating Styles
1. The Home Cut
Keep it simple. Slice a generous wedge and serve it on a plain white plate. The dark contrast of the cake against the white ceramic is elegant enough on its own. A light dusting of cocoa powder through a fine mesh sieve adds a matte finish that looks beautiful against the glossy drips of ganache.
2. The Dinner Party
Take that slice and add a dollop of barely sweetened whipped cream on the side. The white cream provides a visual break from the intense darkness of the cake. Top the cream with three chocolate covered espresso beans arranged in a triangle.
It’s a classic look that tells your guests exactly what flavors to expect.
3. The Modern Bistro
For a restaurant style finish, place a thin slice of the cake slightly off center. Use a spoon to "swoosh" a little extra coffee liqueur or a berry coulis across the plate. Add a few shards of shattered dark chocolate brittle and a tiny pinch of flaky sea salt right on top of the ganache.
The salt will make the espresso flavor pop and give the dish a sophisticated, savory edge.
| Level | Main Element | Finishing Touch |
|---|---|---|
| Simple | Large wedge | Dusting of Dutch process cocoa |
| Polished | Clean slices | Whipped cream and espresso beans |
| Restaurant | Thin slice | Coffee liqueur drizzle and flaky salt |
Baking Myths Debunked
One common misconception is that "blooming" cocoa powder is an optional step for people with too much time. In reality, cocoa powder is full of trapped fats and flavors that only release when exposed to heat.
Skipping the hot coffee step means you're only getting about 60% of the flavor potential from your dry ingredients. It’s a small step that makes a massive difference in the final product.
Another myth is that you need a specialized "cake flour" for a tender crumb. While cake flour has less protein, the acidity in our buttermilk and the use of oil in this wicked espresso cake naturally inhibit gluten formation.
You can get a professional grade, tender result using standard all purpose flour as long as you don't over mix the batter once the wet and dry ingredients meet.
Finally, many people think you have to wait for the cake to be cold to apply ganache. Actually, applying a "crumb coat" of thin ganache while the cake is still slightly warm can help seal in moisture.
However, for that thick, luscious drip look we want, the cake must be room temperature so the ganache doesn't just run off and pool at the bottom of the stand. Trust the process and let those layers cool properly!

Recipe FAQs
Does espresso cake have caffeine?
Yes, absolutely. This recipe intentionally uses strong hot coffee and espresso powder to deepen the chocolate flavor, so the caffeine content will be measurable.
What was Winston Churchill's favourite cake?
This specific recipe is not recorded as his favorite. While Churchill enjoyed rich, traditional English desserts, there is no widely documented evidence confirming his definitive favorite cake.
Is Drake's coffee cake a real thing?
No, Drake does not officially endorse a specific coffee cake product. The term often refers generally to any crumb topped coffee cake, though there are many rumored connections on social media.
What is Kamala Harris' favorite cake?
Her favorite is generally cited as lemon cake. While she appreciates a good dessert, this dark, complex espresso recipe is much more bitter and intense than the bright citrus profile she usually prefers.
How to ensure the ganache sets with a glossy sheen?
Heat the cream until it just begins to simmer, then pour over the chopped chocolate. Let it sit undisturbed for five minutes before stirring gently from the center outward to form a stable emulsion.
Why does my cake taste flat despite using so much espresso powder?
You likely didn't bloom the cocoa powder properly. For maximum depth, always mix the espresso powder into the dry ingredients first, then hydrate them with the very hot coffee to release the full volatile flavor compounds.
If I want a taller, sturdier layer, should I substitute the oil?
No, avoid substituting the oil for a taller cake here. The oil keeps the heavy cocoa crumb incredibly moist, which is key to the "wicked" texture; a switch to butter will result in a drier texture if you try to increase the height significantly.
Wicked Espresso Cake Recipe
Ingredients:
Instructions:
Nutrition Facts:
| Calories | 582 calories |
|---|---|
| Protein | 6.5g |
| Fat | 29g |
| Carbs | 74g |
| Fiber | 3.5g |
| Sugar | 52g |
| Sodium | 228mg |
