Rustic Whole Wheat Bread: Tender and Airy
- Time: Active 100 minutes, Passive 35 minutes, Total 135 minutes
- Flavor/Texture Hook: Nutty, floral honey notes with a shatter crisp crust and tender center
- Perfect for: Elegant weekend brunches, impressing dinner guests, or a premium daily toast
- Elegant Results With This Whole Wheat Bread Recipe
- Key Specifications for an Artisanal Wheat Loaf
- Selecting Premium Components for a Velvety Crumb
- The Building Blocks and Smart Substitutions
- Essential Tools for Professional Baking Results
- Master the Art of the Golden Crust
- Pro Baker Strategies for Success and Consistency
- Sophisticated Flavor Profiles and Custom Adaptations
- Preservation Techniques for Maintaining Peak Freshness
- Elegant Pairings to Impress Your Dinner Guests
- Recipe FAQs
- 📝 Recipe Card
Elegant Results With This Whole Wheat Bread Recipe
The first thing you’ll notice when baking this isn't just the smell it's the way the honey begins to caramelize, filling your kitchen with a scent that feels like a warm hug on a cold morning.
For a long time, I struggled with the "brick" factor that often plagues whole grain baking, but the secret was hiding in plain sight: the 42g of honey. This isn't just for sweetness; it’s the hydration hero that fundamentally changes how the flour behaves, creating a loaf that feels high end rather than heavy.
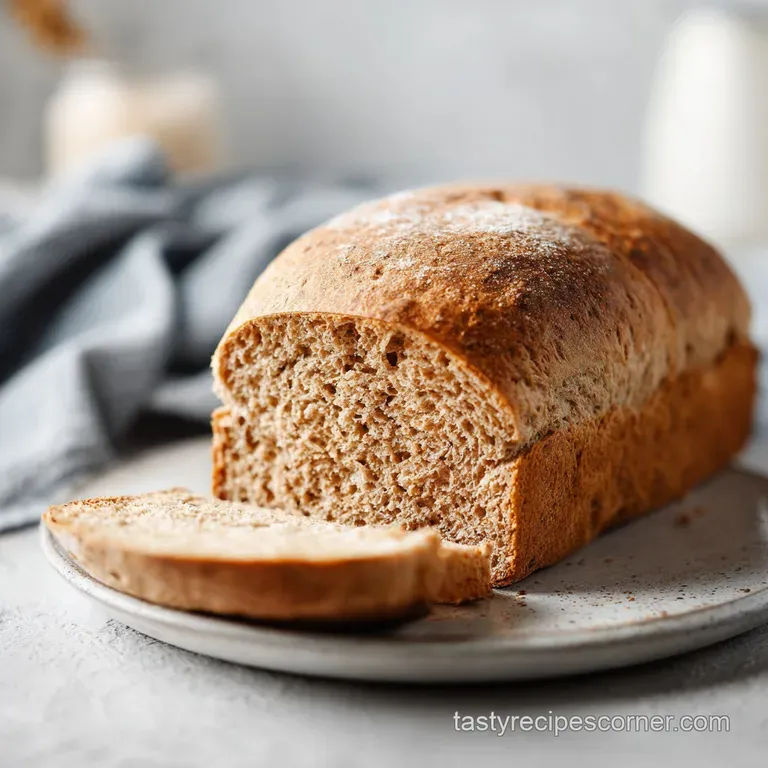
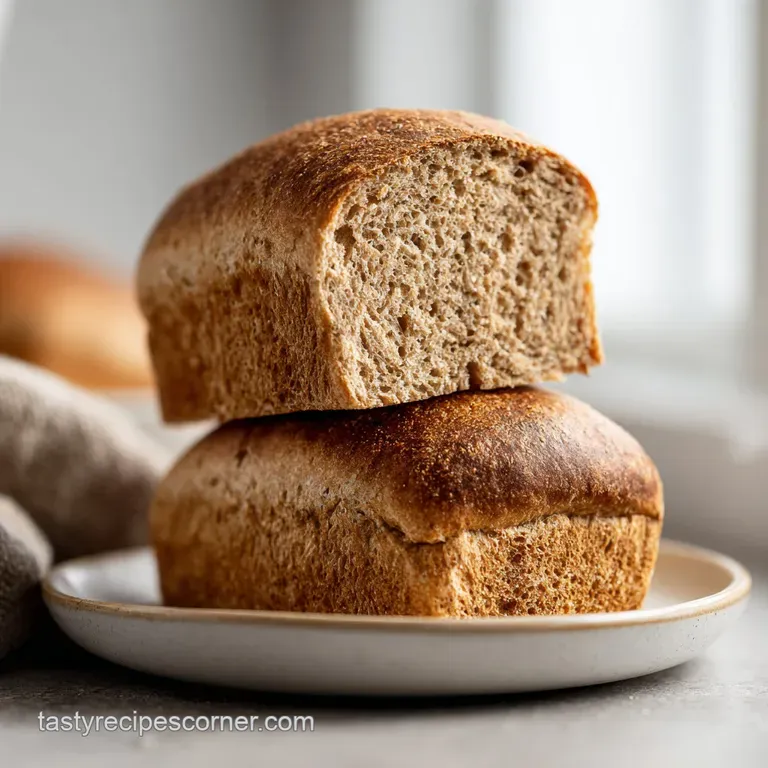
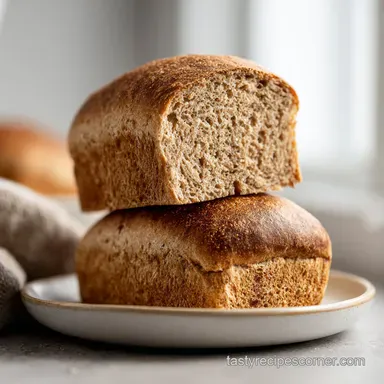
When you pull this loaf from the oven, the crust has this stunning, deep mahogany sheen that looks like it came from a professional patisserie. It’s the kind of bread that demands to be the center of the table, sliced thick and served while the steam still carries that nutty, earthy aroma.
We’re moving away from the dry, crumbly textures of basic loaves and stepping into something far more sophisticated and rewarding for any home baker.
Trust me, once you see how that shaggy mess of flour and water transforms into a silky, elastic dough that bounces back at your touch, you’ll never go back to store-bought. This whole wheat bread recipe is designed to be achievable yet impressive, giving you that "wow" moment when you hear the crust crackle as it cools.
It’s about more than just sustenance; it’s about the craft of creating a velvety crumb that holds up to the richest butter.
Key Specifications for an Artisanal Wheat Loaf
Bran Softening: The 10 minute rest after initial mixing allows the coarse bran particles to absorb water, preventing them from "cutting" the gluten strands later.
Honey Hygroscopy: Honey naturally attracts and holds onto moisture, which ensures the bread stays soft for days rather than drying out immediately.
Thermal Precision: Using water at exactly 110°F provides the ideal environment for the 7g of instant yeast to thrive without being scalded.
Controlled Fermentation: The 1 hour 20 minutes rise time allows the complex sugars in the whole wheat to break down, resulting in a more nuanced, floral flavor.
| Thickness | Internal Temp | Rest Time | Visual Cue |
|---|---|---|---|
| 5 inch height | 190°F-200°F | 20 minutes | Deep mahogany color |
| 1 inch slice | N/A | N/A | Soft, non crumbly center |
| Dough stage | N/A | 10 minutes | Shaggy becomes smooth |
Taking the time to measure your internal temperature is what separates a good baker from a great one. While we often rely on "thumping" the bottom of the bread to hear a hollow sound, using a probe thermometer ensures you never slice into a gummy center.
Selecting Premium Components for a Velvety Crumb
Selecting your elements is the first step toward a successful bake. The 450g of whole wheat flour provides the structural integrity and the distinct, rustic flavor profile we’re after.
Unlike refined flours, this contains the germ and bran, which means it needs more care and more liquid to reach that desired velvety texture.
| Component | Science Role | Pro Secret |
|---|---|---|
| Whole Wheat Flour | Structural base and fiber | Use stone ground for a more rustic, nutty texture |
| Instant Yeast | Biological leavening | Store in the freezer to maintain peak potency |
| Honey | Moisture retention | Provides the sugars for a deeper crust caramelization |
| Olive Oil | Crumb softener | Coats gluten strands for a more tender bite |
I’ve found that the 28g of extra virgin olive oil works beautifully here to add a subtle fruitiness that complements the honey. If you were to swap this for a neutral oil, you'd lose that layer of sophistication.
Similarly, using fine sea salt over table salt ensures it dissolves evenly, preventing any salty pockets in your final 12 servings.
The Building Blocks and Smart Substitutions
When you're gathering your ingredients, remember that precision is everything in baking. We’re looking for a balance between the 300ml of warm water and the 450g of flour to hit that sweet spot of hydration.
If the dough feels too sticky, resist the urge to dump in more flour; a slightly tacky dough often leads to a much lighter, airy result.
- Whole Wheat Flour (450g): The soul of the bread. Why this? Provides the essential structure and deep, earthy flavor profile.
- Fine Sea Salt (9g): Enhances every other flavor. Why this? Regulates yeast activity and strengthens the gluten network.
- Instant Yeast (7g): Our lifting agent. Why this? Eliminates the need for "blooming," making the process much smoother.
- Warm Water (300ml): The catalyst for life. Why this? Must be 110°F to activate yeast without killing it.
- Honey (42g): The secret softener. Why this? Adds floral notes and ensures a long lasting, moist crumb.
- Extra Virgin Olive Oil (28g): For a tender finish. Why this? Provides a supple texture and helps the crust brown beautifully.
| Original Ingredient | Substitute | Why It Works |
|---|---|---|
| Honey | Maple Syrup | Similar sugar profile. Note: Adds a subtle woody, autumnal flavor |
| Olive Oil | Melted Butter | High fat content. Note: Creates a richer, more "brioche like" taste |
| Fine Sea Salt | Kosher Salt | Same flavor impact. Note: Use 1.5x the volume if using Diamond Crystal |
If you find yourself wanting to experiment with a lighter texture, you could replace 100g of the whole wheat with bread flour, though this deviates from the traditional 100% whole grain goal. For those who enjoy a variety of textures, checking out a white sandwich bread recipe can provide a great comparison for how different flours behave under similar conditions.
Essential Tools for Professional Baking Results
You don't need a bakery full of high tech gear to wow guests, but a few specific items will make your life significantly easier. A 9x5 inch loaf pan is the standard here, providing the right walls for the dough to climb during its 1 hour 20 minutes rise.
Without those walls, the dough tends to spread outward rather than upward, resulting in a flat, dense loaf.
A digital scale is perhaps your most important ally. Measuring 450g of flour by weight is infinitely more accurate than using measuring cups, which can vary by up to 20% depending on how tightly you pack the flour. If you want consistency, weigh everything including the 300ml of water.
It's the difference between a loaf that's "pretty good" and one that is consistently elegant.
Master the Art of the Golden Crust
- In a large mixing bowl, whisk together the 450g whole wheat flour, 7g instant yeast, and 9g sea salt. Note: This ensures the salt and yeast are evenly distributed before the liquids hit.
- Create a well in the center of the dry ingredients and pour in the 300ml warm water (110°F), 42g honey, and 28g olive oil. Stir until a shaggy dough forms and no dry flour remains.
- Cover the bowl with a damp cloth and let the dough rest for 10 minutes. Note: This is the critical hydration phase that prevents a dry, "sandy" texture.
- Knead the dough on a lightly floured surface for 8–10 minutes until the surface is smooth and elastic. If using a stand mixer, 5–6 minutes on medium low speed is sufficient.
- Perform the windowpane test by stretching a small piece of dough; it should be translucent without tearing.
- Shape the dough into a tight cylinder and place it into a greased 9x5 inch loaf pan.
- Allow the dough to rise in a warm, draft free environment for 1 hour 20 minutes until it has risen about 1 inch above the pan rim.
- Preheat your oven to 375°F (190°C) during the last 20 minutes of proofing.
- Bake for 35 minutes until the crust is a deep mahogany color and the internal temperature reaches 190°F-200°F.
- Remove from the pan immediately and let cool on a wire rack for at least 1 hour before slicing. Note: Slicing too early lets steam escape, which can lead to a gummy interior.
The Initial Hydration Phase
The 10 minute rest is often skipped by beginners, but it’s the most important step for whole grain. Whole wheat flour is thirsty. By giving it those few minutes to drink up the 300ml of water and the honey, you're ensuring the gluten can develop properly without being hindered by dry bran.
It’s a small pause that yields massive results in the final crumb.
Developing the Structure
When kneading, you’re looking for a transformation. The dough starts as a sticky, slightly frustrating mess, but as you work it, the proteins align. You’ll feel it become stronger and more resilient. Don't be afraid to be firm; whole wheat can handle it.
By the time you reach the 8 minute mark, the dough should feel silky and look slightly shiny.
Pro Baker Strategies for Success and Consistency
One of the biggest hurdles is knowing when the rise is "just right." If you let it go too long, the air bubbles become too large and the structure collapses in the oven. This leads to that dreaded "sunken top" syndrome. Use the finger poke test: gently press the dough with a floured finger.
If the indent fills back in slowly but stays slightly visible, you are ready to bake.
| Problem | Root Cause | Solution |
|---|---|---|
| Dense "Brick" Texture | Insufficient kneading | Knead until it passes the windowpane test |
| Loaf collapsed | Over proofing | Reduce second rise time by 10-15 minutes |
| Crust too hard | Oven was too hot | Tent with foil halfway or check oven calibration |
The "Brick" Result (Dense Bread)
This is almost always a result of under hydration or under kneading. If you didn't measure your 300ml of water precisely, or if you added too much flour during the kneading process, the yeast won't have enough room to expand. Remember, the dough should be soft. If it feels like modeling clay, it’s too dry.
The "Sunken Top" Syndrome
This happens when the yeast has exhausted all its energy before it even hits the oven. If your kitchen is particularly warm, that 1 hour 20 minutes rise might happen faster. Keep a close eye on the dough; once it’s an inch above the rim, get it in the oven regardless of what the clock says.
- ✓ Use a digital scale for the 450g flour (accuracy is key)
- ✓ Ensure water is 110°F (check with a thermometer)
- ✓ Don't skip the 10 minute rest after mixing
- ✓ Let the bread cool completely before slicing (prevents gumminess)
- ✓ Grease your loaf pan thoroughly to avoid sticking
Sophisticated Flavor Profiles and Custom Adaptations
Once you've mastered the base version of this whole wheat bread recipe, you can start to play with textures and flavors. I love adding a tablespoon of caraway seeds for a rye adjacent flavor, or even some chopped walnuts for a crunch that contrasts the velvety crumb.
The Seeded Rustic Loaf
For a truly artisanal look, brush the top of the risen dough with a bit of water and sprinkle a mix of oats, sunflower seeds, and flax seeds before baking. This adds a beautiful texture to the crust that shatters when you bite into it.
The seeds toast in the oven, adding a layer of complexity that pairs perfectly with sharp cheeses.
Bread Machine Adaptation
If you're short on time, this recipe works remarkably well in a bread machine. Simply add the liquids first (water, honey, oil), followed by the salt, flour, and yeast on top. Use the "Whole Wheat" setting.
Just make sure your machine can handle a loaf of this size; it’s a hearty 12 servings, so a 2lb capacity machine is ideal.
| Method | Time | Texture | Best For |
|---|---|---|---|
| Traditional Hand Knead | 135 mins | Artisanal, irregular crumb | Weekend projects |
| Stand Mixer | 125 mins | Uniform, very soft | Regular weekly baking |
| Bread Machine | ~3-4 hrs | Consistent, thick crust | Busy weeknights |
Preservation Techniques for Maintaining Peak Freshness
Because this bread doesn't contain the preservatives found in commercial loaves, it’s best enjoyed within 3 days. However, thanks to the honey, it stays soft much longer than most homemade breads.
Keep it in a paper bag for the first 24 hours to maintain the crust's texture, then move it to a sealed container or beeswax wrap to keep the interior from drying out.
If you have leftovers that are starting to go stale, don't even think about tossing them. Whole wheat makes the most incredible breadcrumbs or croutons. Simply toss cubes in a bit of olive oil and herbs, then bake at 350°F until they are golden and have a satisfying crunch.
Freezing for Future Elegance
This loaf freezes beautifully. I recommend slicing it first, then placing parchment paper between the slices before freezing in a heavy duty bag. This way, you can pull out exactly what you need for a morning toast without thawing the whole loaf. It will stay fresh in the freezer for up to 3 months.
When you're ready, just pop a slice directly into the toaster.
Elegant Pairings to Impress Your Dinner Guests
This bread is a star on its own, but it truly shines when paired with the right accompaniments. A thick slice topped with smashed avocado, a squeeze of lemon, and a sprinkle of red pepper flakes is a classic for a reason. The nuttiness of the wheat provides a sturdy base for the creamy avocado.
For a more sophisticated appetizer, try serving toasted rounds of this bread with a dollop of ricotta and a drizzle of extra honey. It highlights the floral notes we built into the dough. If you’re hosting a brunch, these slices are the perfect side to something sweet, like sugar cookie bars or a fresh fruit platter.
Debunking Baking Myths
- Myth: You must "bloom" instant yeast in water first. Truth: Instant yeast (7g) can be mixed directly with the dry 450g of flour. It’s designed to activate as soon as it hits the liquids, saving you time and a dish.
- Myth: Whole wheat bread will always be heavy. Truth: With the right hydration (300ml) and a proper rest period to soften the bran, you can achieve a loaf that is light, airy, and truly elegant.
- Myth: Salt kills yeast instantly on contact. Truth: While salt can inhibit yeast in high concentrations, whisking it into the flour before adding the wet ingredients is perfectly safe and necessary for flavor.
Using these tips and the specific measurements provided, you're well on your way to a loaf that looks as good as it tastes. The 35 minutes in the oven is the final hurdle be patient, let it reach that deep color, and you'll be rewarded with a professional grade result every single time.

Recipe FAQs
Is wheat bread ok for people with diabetes?
Yes, this whole wheat bread is a suitable choice. Whole grains provide fiber that helps slow down glucose absorption, preventing the sharp blood sugar spikes associated with refined white flours.
What are common problems when making whole wheat bread?
The most common issue is a dense or "brick like" texture. To avoid this, ensure you knead for the full 8 10 minutes to properly develop the gluten and always allow the dough to rest for 10 minutes before kneading to hydrate the bran.
What is the best bread for heart disease?
Whole wheat bread is recommended because it is heart healthy. High fiber content helps maintain healthy cholesterol levels, and using olive oil a source of monounsaturated fat instead of butter further supports cardiovascular health.
What bread is good for GLP 1?
Whole grain bread is ideal because it increases satiety. The combination of fiber and complex carbohydrates keeps you feeling full longer, which aligns well with the metabolic goals of those using GLP-1 medications.
How to troubleshoot a loaf that refuses to rise?
Check your water temperature and ensure it is strictly 110°F. Water that is too cold will not activate the yeast, while water above 120°F will kill it; if you enjoyed mastering this precise temperature sensitive dough handling, you will find similar success with other yeasted recipes.
Is it true that I need to add extra ingredients to get a dark crust?
No, this is a common misconception. You do not need artificial additives; the 42g of honey naturally caramelizes during the 35-minute bake to produce a deep mahogany color without additional browning agents.
How to ensure the bread stays soft after cooling?
Store the loaf in a sealed container once it is completely cool. Keeping the bread airtight prevents moisture loss, ensuring the crust remains tender and the crumb stays moist for several days.
Rustic Whole Wheat Bread
Ingredients:
Instructions:
Nutrition Facts:
| Calories | 160 kcal |
|---|---|
| Protein | 5.2 g |
| Fat | 3.1 g |
| Carbs | 30.1 g |
| Fiber | 4.2 g |
| Sugar | 2.9 g |
| Sodium | 290 mg |
