Murgh Curry: the Proper Punjabi Method
- The Proper Punjabi Murgh Curry: A Weeknight Wonder
- Introducing the Punjabi Murgh Dish: An Overview
- Mastering the Flavor Depth of the Gravy
- Essential Components for Authentic Murgh Curry
- Ingredient Notes and Allergy Swaps
- The Method: Cooking Perfect Murgh Curry from Scratch
- Troubleshooting and Expert Cooking Advice
- Storing, Reheating, and Improving Day-Two Murgh Dishes
- What to Serve Alongside Your Hearty Indian Dish
- Recipe FAQs
- 📝 Recipe Card
The Proper Punjabi Murgh Curry: A Weeknight Wonder
Introducing the Punjabi Murgh Dish: An Overview
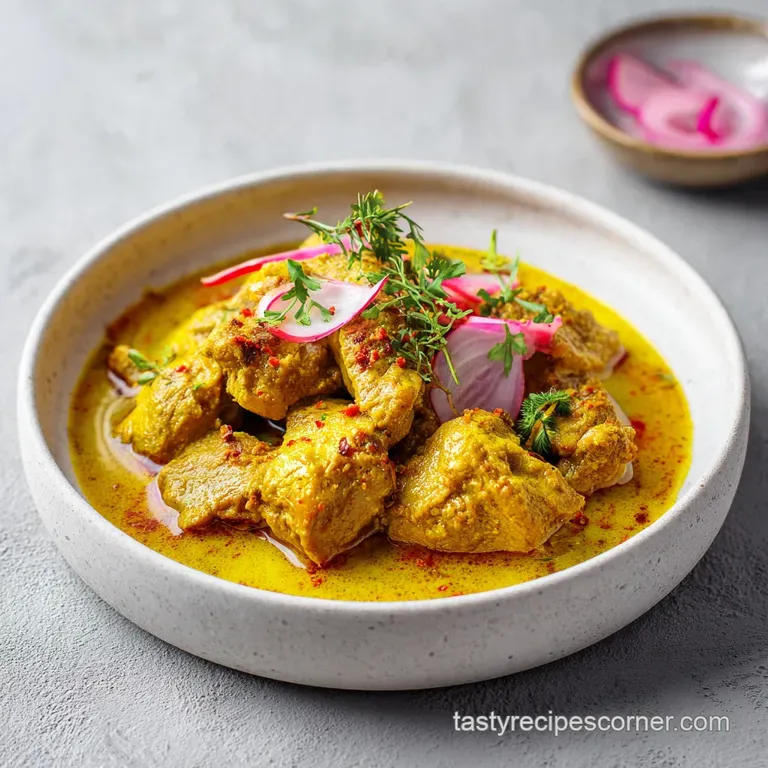
Okay, stop everything. When the bay leaves hit the hot oil and the cumin starts to sizzle, that’s when you know magic is truly beginning. The aroma of a truly authentic Punjabi kitchen deep, earthy, and warm that’s what greets you when you start this Murgh Curry .
This isn't your usual rushed meal or a watery imitation; it's a profound flavour experience that demands respect and delivers massive satisfaction.
I know you think a proper Indian dish takes hours of slaving over a stove, but trust me, this simple technique strips away all the complexity without sacrificing flavour. We focus on depth, not duration, making this easy Murgh Curry accessible even after a nightmare Monday.
It’s comforting, relatively cheap, and tastes infinitely better the next day, which is always a bonus for meal prep.
We've all made mistakes before (hello, burnt cumin and raw ginger!), but this recipe fixes all of them by focusing on the core building blocks. Let's dive into the fundamental principles that make this specific Murgh Curry recipe a guaranteed winner every single time.
Mastering the Flavor Depth of the Gravy
This specific method of making Murgh Curry works beautifully because we prioritise building the base the masala —over everything else.
The true secret isn't some complex, impossible spice blend; it's simple patience with the onions, which we caramelize slowly to provide natural sweetness and foundational body. That deep brown colour you achieve translates directly into that sophisticated, restaurant quality depth we all crave in a magnificent Murgh Curry .
The key to a truly unforgettable Murgh Curry lies in understanding the stages of cooking the aromatic base. You can’t just chuck everything in and hope for the best; you need intentional, layered steps to develop flavour that feels slow cooked, even though it’s quick.
The History and Heart of Punjabi Cuisine
This style of curry, often called tari (meaning gravy or fluid), comes straight from Northern India, where rich, hearty, and robust flavours dominate the table. Punjabi food relies heavily on slow frying techniques and often incorporates dairy, like the yoghurt we use in the marinade.
We are channeling those earthy, comforting flavours that define classic, traditional Murgh Curry dishes. It's food that warms you from the inside out.
Defining the Signature Bhuna Technique
Bhuna literally translates to 'to fry' or 'to roast.' This technique is absolutely non-negotiable for this Murgh Curry recipe; it involves slowly frying the onions and aromatics until the oil visibly separates and the spices have toasted perfectly.
If you skip this critical step, your gravy will inevitably taste raw, like dusty water, and nobody wants that.
Is This Truly a Weeknight Curry?
Honestly, yes! I promise you it is. While the onion frying takes 15 minutes, which might sound long, it’s mostly passive stirring time. The actual active cooking time required for this amazing Murgh Curry is less than 45 minutes, meaning you can have dinner on the table faster than calling for delivery and waiting for the driver.
It's smart cooking.
The Maillard Reaction and Spice Activation
When you commit to cooking the onions until they are deeply browned and almost jammy, you’re hitting the Maillard reaction jackpot. This process creates intense, savoury flavour compounds that are essential for depth.
Crucially, when you add the ground spices to this hot, browned base (the bhuna ), they immediately release their fat-soluble flavour molecules. This action, known as "blooming," gives your Murgh Curry incredible aromatic intensity and complexity.
Achieving the Velvety Gravy Texture
The full fat yoghurt in the marinade serves a crucial dual purpose in this recipe: it tenderizes the Murgh pieces beautifully, and it provides natural body to the gravy. When this cooked yoghurt base combines with the caramelized onions and tomatoes, it naturally thickens the sauce without needing any added starches or cream.
That process is how you achieve that rich, velvety mouthfeel which is critical for a top-tier Murgh Curry .
Optimal Marinade Time for Tender Murgh
Look, if you are genuinely short on time, 30 minutes is the absolute minimum you need to tenderize the Murgh effectively. However, if you can manage it, four hours or, even better, an overnight soak gives the mild acid in the yoghurt time to really work its magic and break down the proteins.
That long, slow overnight soak is the simple secret weapon for unbelievably tender, falling apart Murgh Curry .
Essential Components for Authentic Murgh Curry
We really need to talk about the ingredients because sourcing and prepping the right ones makes all the difference in this incredible Murgh Curry . Don't be tempted to skimp on fresh ginger and garlic paste; the pre-bottled or dried stuff just won't cut it here if you are aiming for true depth.
This dish is built on fresh flavour.
Ingredient Notes and Allergy Swaps
The ingredient list for making classic Murgh Curry often looks long and intimidating, but most items are common pantry spices that you likely already have. Your main focus should be on freshness, especially for your aromatics.
Building the Holy Trinity: Ginger, Garlic, and Onion
These three ingredients form the literal backbone of nearly every North Indian curry dish. They must be finely processed either grated, blended into a paste, or minced impossibly small.
Tip: Use equal parts ginger and garlic paste for the most balanced flavour, and ensure your onions are practically dissolving into the oil before you move to the next stage. If your onions are chunky, your final Murgh Curry will unfortunately be chunky.
Selecting the Key Ground and Whole Spices ( Tadka )
The tadka (tempering) starts with the whole spices cinnamon, cardamom, and bay leaf. These are fried briefly to release background notes of warmth. The main body of the flavour, however, comes from coriander and cumin powders, which should always be toasted in the hot oil (Step 6) to remove that characteristic dusty, raw flavour.
The final sprinkle of Garam Masala is pure fragrance insurance for your amazing Murgh Curry .
Managing Acidity: Selecting Your Tomato Base
I generally prefer chopped canned tomatoes for their consistency and depth of colour, but if you have access to excellent, ripe fresh tomatoes, use two medium ones blended smooth. Remember that tomato paste (purée) concentrates the acid and umami, so only use that small spoonful to balance the rich flavour of the onion bhuna .
Recommended Oils and Fats for Flavor Infusion
A neutral, over high heat oil (like vegetable or rapeseed) works perfectly for the initial fry of the whole spices. If you desire a richer, more luxurious flavour, swap half of the neutral oil for ghee (clarified butter) when building the initial tadka .
This small substitution gives your finished Murgh Curry a beautiful, deep, buttery nuance that is absolutely divine.
| If you don't have... | You can use... | Notes |
|---|---|---|
| Yoghurt for Marination | Lemon juice (2 tbsp / 30 ml) | This still tenderizes the meat, though the final sauce will be slightly thinner. |
| Fresh Ginger/Garlic Paste | Dried granulated ginger/garlic powder | Use half the amount listed, as dry spices are much more concentrated. |
| Chopped Canned Tomatoes | 10 oz (300g) jar of passata | Provides a smoother gravy texture immediately, requiring less simmering time. |
| Kasuri Methi | Maple syrup (1 tsp) | This adds a crucial note of earthy sweetness if you must omit the fenugreek. |
The Method: Cooking Perfect Murgh Curry from Scratch
Right then, let's stop talking and start cooking. Follow these steps meticulously, particularly paying attention to the low and slow bhunao stage, to achieve that gorgeous depth in your Murgh Curry .
Stage One: Preparing the Aromatic Paste
The marinade is entirely non-negotiable, even if you only have 30 minutes to spare. Vigorously mix the yoghurt, pastes, and spices into the Murgh pieces until everything is coated. While the Murgh is relaxing and tenderizing in the fridge, take the time to dice your onions impossibly small.
I cannot stress this enough: finely diced onions are the silent hero for achieving truly smooth, integrated gravy.
Stage Two: Developing the Masala Base ( Bhunao )
This is where the magic happens and, tragically, where most home cooks fail when making Murgh Curry . Heat the oil until shimmering, add the whole spices, and fry for 30 60 seconds until they are intensely aromatic.
Then, the onions go in medium low heat, 15 minutes minimum. The slower you cook the onions, the sweeter and deeper your final dish will taste. When the onions are dark brown and glossy, add the dry spice powders and the tomato paste, frying until you smell a rich, nutty aroma about two minutes.
If the pan gets too dry, throw in a teaspoon of water to keep the spices from burning.
Stage Three: Adding the Murgh and Simmering to Perfection
Once the base is absolutely perfect, toss in the marinated Murgh pieces. Increase the heat to medium high and sear them quickly for 3– 4 minutes, scraping in all that beautiful creamy yoghurt marinade into the sauce. Add the stock (or water).
Bring the sauce to a full boil, then immediately turn the heat right down to the barest minimum setting. Cover the pan and let it cook gently for 20 minutes, or until the Murgh is tender and cooked through.
That gentle heat is what keeps the Murgh super juicy while the flavours deepen and meld into a flawless Murgh Curry .
Pro-Tip: When to Add the Fresh Herbs and Finishers
Never add Garam Masala or Kasuri Methi early in the cooking process. Garam Masala contains highly volatile essential oils that will simply evaporate under prolonged high heat. Add it during the final five minutes, right after you remove the lid, for maximum aromatic impact.
Also, remember to crush the dried fenugreek leaves (Kasuri Methi) vigorously between your hands that herbaceous fragrance is vital for achieving authentic Murgh Curry flavour.
Chef's Note: If your pan is large enough, avoid overcrowding when searing the Murgh. Overcrowding lowers the pan temperature dramatically, causing the Murgh to steam instead of sear, which negatively compromises the texture of the final Murgh Curry .
Troubleshooting and Expert Cooking Advice
We all mess up sometimes! I once burned a batch of cumin so badly the whole house smelled like acrid smoke for days. Here are the common pitfalls when making Murgh Curry and exactly how to fix them immediately without panicking or throwing the whole batch away.
Preventing the Gravy from Splitting or Curdling
This disaster usually happens if you try to add plain yoghurt or cold cream straight into a boiling, acidic sauce. Since we marinated the Murgh in the yoghurt and cooked it off during the sear, the risk is lower here.
However, if you see slight separation, stir the sauce vigorously off the heat for 30 seconds, then immediately reduce the heat back to the lowest setting possible and stir in a teaspoon of neutral oil. Never add cold dairy to a hot simmer.
Fixing Overly Spicy or Under Seasoned Dishes
If your finished Murgh Curry is tasting too spicy, the simplest fix is to add a tablespoon of sugar and a splash of whole milk or cream to temper the immediate heat sensation. If it’s tasting flat and under seasoned, salt is your first fix.
If it still tastes dull, simmer in another teaspoon of fresh tomato paste and maybe a pinch more Garam Masala for five minutes. Flatness often means the bhuna wasn't fried long enough or it needs more acid to brighten the flavour.
Ensuring the Murgh Remains Juicy and Tender
The key here is two-fold and absolutely crucial for your Punjabi Murgh Curry : marinate properly (that acid tenderizes the proteins!), and critically, do not overcook .
Once the Murgh Curry has simmered gently for 20 minutes, check the doneness. If it’s done, stop cooking and turn off the heat immediately. Overcooked Murgh is always tough Murgh, no matter how magnificent the gravy base is.
Storing, Reheating, and Improving Day-Two Murgh Dishes
Does Murgh Curry taste better the next day? Absolutely! This is not just old wives' tale wisdom; it’s scientific fact. The overnight rest allows the spices to fully hydrate and infuse the gravy compounds, creating a dramatically richer, deeper dish that feels completely unified.
Safety Guidelines for Refrigeration
You must cool the Murgh Curry quickly after cooking to ensure food safety. I recommend dividing it into two shallow containers to speed the process, then refrigerate the containers within two hours of cooking.
It will keep beautifully in the fridge for up to 4 days, meaning you get multiple nights of incredible dinners.
The Best Way to Freeze Cooked Curry
This specific dish freezes exceptionally well! Portion the cooled Murgh Curry into air-tight, freezer safe containers, leaving about half an inch of headspace because liquid expands as it freezes. It remains excellent quality for up to 3 months.
Thaw it overnight in the fridge before attempting to reheat. Freezing is a brilliant way to ensure you always have a fantastic Quick Murgh Curry Recipe ready to go.
Reheating Without Compromising Texture
Avoid using the microwave for reheating large portions, as high heat quickly dries out the Murgh and makes it tough. Gently reheat the Murgh Curry on the stovetop instead, over very low heat, stirring occasionally to prevent sticking.
If the sauce has thickened too much overnight (which it almost certainly will), add a splash of stock or water during reheating to restore the perfect, luscious consistency.
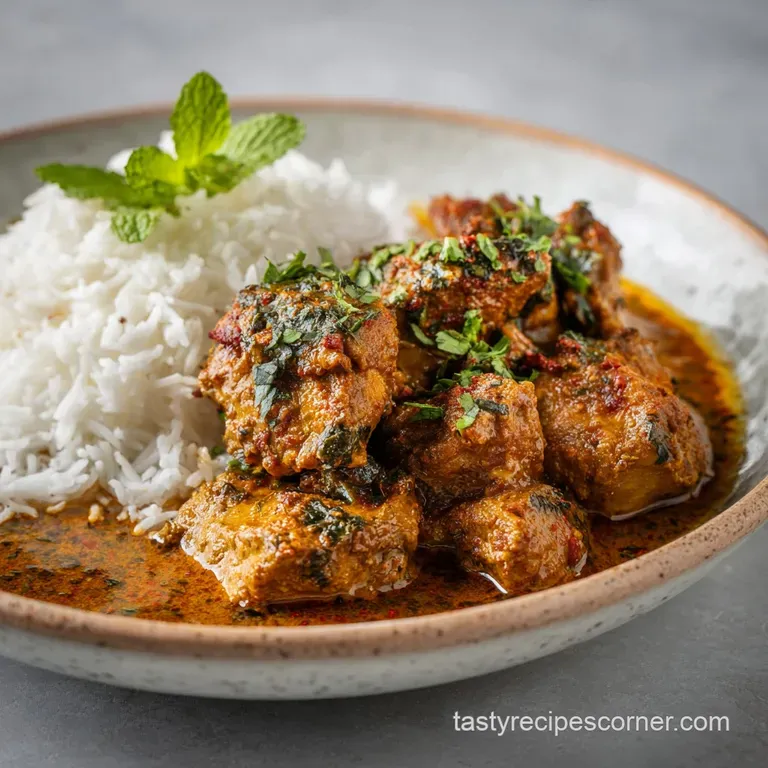
What to Serve Alongside Your Hearty Indian Dish
A great, authentic Murgh Curry demands worthy, complementary companions. You need something starchy to soak up the glorious gravy and something cool and fresh to balance the robust, warm spices.
We always serve this with fluffy Basmati rice, cooked perfectly so the grains remain separate and ready to absorb every single drop of that beautiful gravy. Don't forget the bread!
A warm, buttered naan, or even a crispy tandoori roti, is essential for scooping and sweeping up the final delicious smears of this hearty Punjabi Murgh Curry . Finish the meal with a cooling Raita (yoghurt mixed with grated cucumber and mint) to refresh the palate. Enjoy!

Recipe FAQs
Why did my chicken turn out tough or rubbery?
This common issue usually happens if the chicken is cooked too quickly at a high heat, or if the gravy hasn't simmered long enough. Ensure you cook the final curry on a very low simmer, as gentle heat allows the proteins to tenderize and absorb the moisture properly within the sauce.
Also, avoid using large hunks of chicken breast, which tend to dry out quickly.
My gravy looks watery, not thick and velvety. How can I fix this?
The key to a thick, cohesive gravy is achieving proper reduction during the bhuna stage (sautéing the onion and tomato base). If it’s too late in the process, simply simmer the curry uncovered for an additional 10-15 minutes to allow excess water to evaporate.
Alternatively, stir in 1-2 tablespoons of plain yogurt or cashew paste at the very end to achieve immediate richness and thickness.
Can I substitute boneless chicken breast for the traditional bone-in pieces?
Absolutely, though bone-in chicken adds greater depth of flavor due to the marrow and fat, boneless meat is excellent for a quicker cook. If using breast meat, add it later in the process about 10 minutes before the end as it cooks very quickly and can become dry and stringy if over simmered in the gravy.
Thigh meat is always the superior boneless choice for curry.
The recipe emphasizes the "bhuna" technique. Why is this frying step so crucial?
Bhuna refers to the process of slow sautéing the aromatic base (onions, ginger, garlic) with the powdered spices until the oil visibly separates from the masala. This crucial step deepens the overall flavor profile, removes the raw, earthy taste of the spices, and ensures you develop a smooth, richly colored, and non-acidic gravy base.
Skipping this step leads to a dull, lackluster curry.
How can I easily adjust the heat level of this Murgh Curry?
The primary source of heat usually comes from chili powder and any fresh green chilies used. For a milder curry, halve the amount of powdered chili and remove the seeds from any fresh chilies.
To intensify the heat, incorporate a slit Serrano chili or a small dash of cayenne pepper during the simmering phase, allowing the capsaicin to infuse into the sauce.
What are the best accompaniments to serve with this rich Punjabi Murgh Curry?
This robust curry pairs beautifully with starches designed to soak up the luxurious gravy, such as basmati rice, flaky laccha paratha, or soft butter naan bread. To balance the richness, serve a simple, cooling raita (yogurt mixed with grated cucumber and cumin) or a fresh kachumber salad (diced tomato, cucumber, and onion).
Can I freeze leftover Murgh Curry, and how should I reheat it?
Murgh Curry freezes exceptionally well, and often tastes even better the next day as the spices marry further; store the cooled curry in an airtight container for up to three months.
To reheat, thaw the curry overnight in the refrigerator and warm it gently on the stovetop, adding a splash of water or stock if the sauce has become too thick during cooling.
Proper Punjabi Murgh Curry

Ingredients:
Instructions:
Nutrition Facts:
| Calories | 450 kcal |
|---|---|
| Fat | 20 g |
| Fiber | 5 g |
