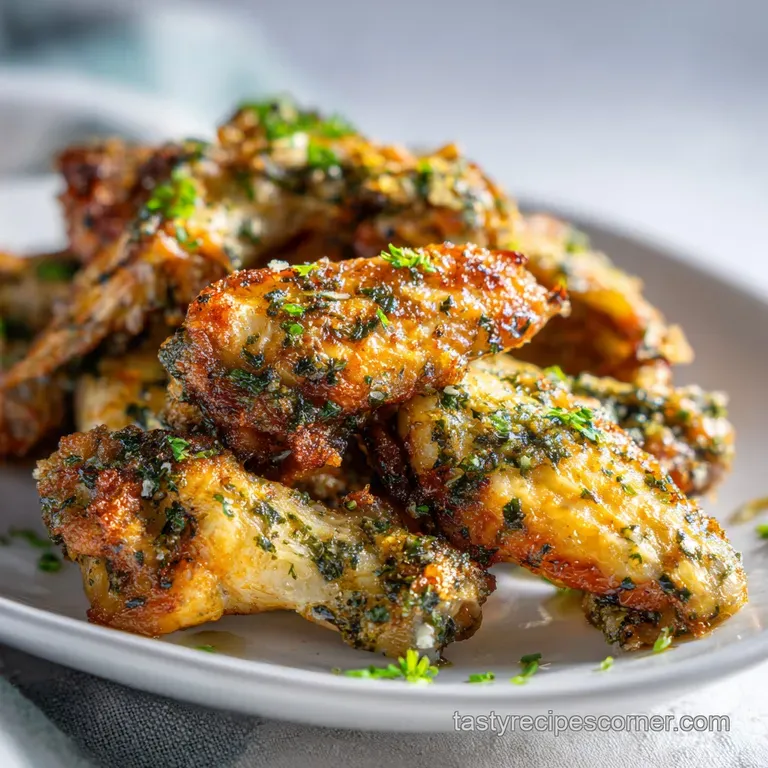
Oven-Cooked Chicken Wings with Garlic and Herbs

- Time: Active 15 minutes, Passive 45 minutes, Total 60 minutes
- Flavor/Texture Hook: Shatter crisp skin with a velvety, herb infused garlic finish
- Perfect for: Game day gatherings or a hearty weeknight family treat
- Perfect Oven Cooked Chicken Wings with Garlic and Herbs
- Essential Timing and Preparation Data
- Choosing Quality Flavor Layer Ingredients
- Necessary Tools for Crispy Success
- The Multi Step Flavor Layering Process
- Solving Common Texture and Temperature Issues
- Regional Herbs and Dietary Swaps
- Leftover Storage and Reheating Methods
- Hearty Pairings for Your Wings
- Solving Kitchen Myths
- Very High in Sodium
- Recipe FAQs
- 📝 Recipe Card
Perfect Oven Cooked Chicken Wings with Garlic and Herbs
Forget every lecture you have ever heard about needing a bubbling vat of oil to get a decent wing. There is a common myth floating around modern kitchens that says "oven baked" is just a polite way of saying "soggy and sad," but I am here to tell you that is absolute nonsense.
Discover our amazing Oven Cooked Chicken Wings with Garlic and Herbs, a must try recipe for your next meal that will make you swear off the deep fryer for good. In my Tennessee kitchen, we believe in food that sticks to your ribs and warms your soul, and these wings do exactly that by focusing on how we build those flavor layers from the bone up.
The first time I tried making these, I expected the usual rubbery skin that haunts most home cooked wings. I was wrong. The secret isn't in the heat alone; it is in the preparation of the skin itself. When you pull these out of the oven, the skin doesn't just sit there it crackles.
The aroma of roasted garlic and fresh rosemary will fill your home, promising a meal that feels like a warm hug on a plate. We aren't just cooking meat here; we are engineering a sensory experience that starts with a crunch and ends with a lingering, herbaceous glow.
Trust me on this, once you see that mahogany colored skin bubbling under the oven light, you will realize that the deep fryer was just an unnecessary middleman. We are going for a result that is hearty, comforting, and undeniably honest.
These wings are the centerpiece of what I call "honest cooking" simple ingredients treated with respect to produce a result that feels far more elegant than it has any right to be.
Essential Timing and Preparation Data
The beauty of this dish lies in its simplicity, but don't let that fool you into thinking the details don't matter. To get that soul warming result, we have to respect the clock. We are looking at a precise 15 minutes of hands on work, mostly involving the "tacky dry" prep and the final herb toss.
The rest of the hour is spent letting the oven do the heavy lifting, transforming the poultry from pale to spectacular.
Texture Synthesis: The combination of baking powder and high heat creates tiny CO2 bubbles on the skin's surface, increasing the surface area for maximum crunch.
Moisture Management: A wire rack elevation allows hot air to circulate 360 degrees, preventing the bottom of the wing from steaming in its own juices.
Aromatic Infusion: Adding the garlic and herbs at the very end prevents the delicate oils in the rosemary and thyme from scorching, keeping the flavor bright and punchy.
Collagen Breakdown: The 425°F (220°C) temperature is high enough to melt the fat and soften the connective tissue while the skin dehydrates into a crisp shell.
| Method | Total Time | Texture Result | Best For |
|---|---|---|---|
| oven-roasted | 1 hour | Shatter crisp skin | Easy cleanup and deep flavor |
| Traditional Fry | 30 mins | Uniformly crunchy | Classic bar style experience |
| Slow Cooker | 4 hours | Fall off-the bone | Tender meat, no crisp skin |
Choosing the oven method isn't just about avoiding a mess; it's about the way the flavor develops. In a fryer, the oil can sometimes mask the natural taste of the chicken. In the oven, the fat renders out slowly, essentially "confiting" the wing in its own flavor before the skin crisps up.
It is a more soulful way to cook that honors the ingredient.
| Ingredient | Science Role | Pro Secret |
|---|---|---|
| Baking Powder | pH Alteration | Use aluminum free to avoid a bitter metallic aftertaste. |
| Sea Salt | Protein Denaturation | Draws moisture to the surface where it can evaporate more quickly. |
| Olive Oil | Heat Conduction | Acts as the vehicle for the herb aromatics to coat every crevice. |
| Garlic Paste | Surface Adhesion | Mincing into a paste ensures it sticks to the crispy skin better than chunks. |
When you are working with these components, think of them as your toolkit. The baking powder is your secret weapon it’s the difference between a wing that is just "cooked" and one that has that incredible, glass like crunch. If you're a fan of this flavor profile, you might also love my Garlic Butter Chicken which uses a similar velvety sauce technique to achieve that hearty finish.
Choosing Quality Flavor Layer Ingredients
Building a hearty meal starts with the shopping basket. For the best Oven Cooked Chicken Wings with Garlic and Herbs, you want to look for wings that are plump and have a clear, pinkish hue.
If you can find them already separated into flats and drumettes, you'll save yourself some knife work, but I often buy them whole and do it myself to ensure the joints are cut cleanly.
- 3 lbs chicken wings: Flats and drumettes separated. Why this? Fresh, high-quality poultry provides the best natural fat for rendering.
- Substitute: Chicken thighs cut into bite sized pieces for a "boneless" version.
- 1 tbsp aluminum free baking powder: The secret to the crunch. Why this? Breaks down the peptide bonds in the skin for superior crispness.
- Substitute: Cornstarch (though it won't be quite as airy).
- 1 tsp fine sea salt: For deep seasoning. Why this? Fine grains dissolve faster into the skin during the dry brine.
- Substitute: Kosher salt (increase to 1.5 tsp).
- 1/2 tsp cracked black pepper: For a subtle warmth. Why this? Adds a foundational layer of spice that cuts through the fat.
- Substitute: White pepper for a more floral, hidden heat.
- 3 tbsp extra virgin olive oil: The base for our herb toss. Why this? Carries the fat soluble flavors of the herbs across the wings.
- Substitute: Avocado oil for a higher smoke point.
- 6 cloves garlic, minced into a fine paste: The star aromatic. Why this? A paste distributes more evenly than chopped garlic.
- Substitute: 1.5 tsp garlic powder (add to the dry rub instead).
- 1 tbsp fresh rosemary, finely chopped: For piney, earthy notes. Why this? Rosemary stands up well to the heat of the hot wings.
- Substitute: 1 tsp dried rosemary (crush it between your fingers first).
- 1 tbsp fresh thyme leaves: For a subtle, citrusy herbal layer. Why this? Thyme adds a "garden fresh" complexity to the heavy garlic.
- Substitute: 1 tsp dried thyme.
- 1/2 tsp red pepper flakes: For a tiny bit of soul warming kick. Why this? Balances the richness of the chicken and olive oil.
- Substitute: A pinch of cayenne pepper.
- 1 tsp fresh lemon juice: To brighten the finish. Why this? The acid cuts through the richness and wakes up the herbs.
- Substitute: Apple cider vinegar.
Necessary Tools for Crispy Success
You don't need a kitchen full of gadgets, but a few specific items are non negotiable for this recipe. First and foremost is a rimmed baking sheet paired with a wire cooling rack. This setup is the "elevated convection" method that mimics a commercial air fryer.
Without that rack, the wings will sit in their own rendered fat, leading to a soggy bottom that no amount of heat can fix.
I also recommend a large stainless steel bowl for the final toss. Why stainless steel? It conducts the heat from the wings into the oil and garlic mixture almost instantly, helping to release the aromatic oils from the herbs the second the hot wings hit the bowl.
You’ll also want a good pair of silicone tipped tongs to flip the wings halfway through without tearing that precious skin we worked so hard to dehydrate.
Finally, don't underestimate the power of a simple paper towel. We need the wings bone dry. I usually go through quite a few towels to make sure there isn't a drop of moisture left on the surface. It might seem wasteful, but it is the single most important step for achieving that shatter crisp texture we are after.
The Multi Step Flavor Layering Process
1. The "Bone Dry" Preparation
Pat the 3 lbs of wings with paper towels until they are completely dry and actually feel tacky to the touch. Note: Any surface moisture will turn to steam in the oven, which is the enemy of crispy skin.
2. The Powder Coating
In a large bowl, whisk together the 1 tbsp baking powder, 1 tsp salt, and 1/2 tsp pepper. Toss the wings in this mixture until every single wing has a very thin, almost invisible layer coating it.
Note: You aren't looking for a thick breading; a light dust is all that's required for the chemistry to work.
3. The Cold Cure
Place the wings on a wire cooling rack set over a rimmed baking sheet and refrigerate them uncovered for 1 to 4 hours. Note: This "dry brining" phase allows the salt to penetrate the meat while the fridge's low humidity further dehydrates the skin.
4. The Initial Roast
Preheat your oven to 425°F (220°C) and slide the tray onto the middle rack for 20 minutes. Note: You'll start to hear a gentle sizzle as the fat begins to render out of the skin.
5. The Flip and Finish
Flip each wing using tongs and roast for another 20–25 minutes until the skin is mahogany colored and crackling. Note: This is where the magic happens and the skin transforms into a crisp shell.
6. The Herb Infusion
While those wings are finishing their roast, whisk together the 3 tbsp olive oil, 6 cloves of garlic paste, rosemary, thyme, red pepper flakes, and lemon juice in a large stainless steel bowl. Note: The residual heat of the bowl will slightly "bloom" the garlic without cooking it through.
7. The Fragrant Finishing Toss
Dump the hot, crispy wings directly into the garlic herb mixture and toss vigorously until they are thoroughly coated. Note: The heat from the wings will wilt the herbs and mellow the raw garlic bite just enough.
8. The Immediate Serve
Plate them up immediately while they are still piping hot and the garlic is fragrant. Note: The longer they sit in the oil, the more they will eventually soften, so eat them while they're loud!
Solving Common Texture and Temperature Issues
Even the most seasoned home cook can run into a snag now and then. The most common complaint with oven wings is that they didn't get "crunchy enough." Usually, this comes down to one of two things: moisture or temperature.
If your oven isn't truly hitting 425°F (220°C), that fat won't render fast enough to crisp the skin before the meat overcooks.
Why Your Wings Are Rubbery
If the skin feels chewy rather than crispy, it’s almost always because the wings weren't dry enough before they went into the oven. That "tacky" feeling I mentioned earlier is vital. If they are even slightly damp, they will steam. Another culprit is overcrowding.
If the wings are touching on the rack, they create pockets of steam between them. Give them space to breathe!
| Problem | Root Cause | Solution |
|---|---|---|
| Bitter Aftertaste | Using standard baking powder | Switch to aluminum free baking powder for a clean flavor. |
| Soggy Bottoms | Cooking directly on the pan | Always use a wire rack to allow air circulation underneath. |
| Burnt Garlic | Adding garlic too early | Only toss wings in the garlic herb mix after they are fully roasted. |
Common Mistakes Checklist
- ✓ Never skip the paper towel step; those wings need to be bone dry.
- ✓ Ensure your baking powder is fresh and specifically labeled "aluminum free."
- ✓ Don't use a silicone mat; it traps moisture and prevents the bottom side crunch.
- ✓ Resist the urge to peek; every time you open the oven, the temperature drops significantly.
- ✓ Let the wings sit in the fridge uncovered the air circulation is your best friend here.
For a full sheet pan meal that uses similar heat principles, check out how to Bake Chicken and Potatoes for that same crispy skin result on a larger scale.
Regional Herbs and Dietary Swaps
Sometimes you want to change the "soul" of the dish. While the garlic and herb combination is a Tennessee kitchen classic, you can easily pivot based on what's in your pantry. If you are looking to keep things lower in fat, you can reduce the olive oil in the final toss, though you'll lose some of that velvety mouthfeel that makes these so comforting.
Flavor Variations
- The Smoky South: Swap the rosemary for 1 tsp of smoked paprika and a dash of liquid smoke in the oil toss.
- The Spicy Orchard: Add 1 tbsp of honey and an extra 1/2 tsp of red pepper flakes for a sweet heat finish.
Dietary Adjustments
- Low Sodium: Reduce the salt in the coating to 1/2 tsp and use a salt free herb blend like Mrs. Dash for the final toss.
- Keto Friendly: This recipe is naturally very low in carbs, but ensure your lemon juice is fresh and not a sweetened concentrate.
Leftover Storage and Reheating Methods
If you somehow end up with leftovers (a rare occurrence in my house!), you need to store them properly to maintain as much of that "soul" as possible. Place the cooled wings in an airtight container. They will stay good in the fridge for up to 4 days.
In the freezer, they'll last about 3 months, though the texture of the skin will never be quite as "shatter crisp" after freezing.
To reheat, avoid the microwave at all costs! It will turn your beautiful wings into rubber. Instead, pop them back onto a wire rack in a 375°F (190°C) oven for about 8–10 minutes.
This will re render some of the fat and bring back a good portion of the crunch. For a zero waste tip: take any leftover herb oil from the bottom of the bowl and drizzle it over roasted potatoes or use it as a base for a hearty chicken soup the next day.
| Premium | Budget | Flavor Impact | Savings |
|---|---|---|---|
| Fresh Herbs | Dried Herbs | Fresh is brighter; dried is more concentrated and earthy. | Save $4-6 |
| EV Olive Oil | Vegetable Oil | Olive oil adds a peppery richness; veg oil is neutral. | Save $3-5 |
| Whole Wings | Pre Cut Wings | No flavor difference; whole wings just require more prep. | Save $2 per lb |
Hearty Pairings for Your Wings
These Oven Cooked Chicken Wings with Garlic and Herbs are a star on their own, but they love company. To keep the meal hearty and soul warming, I love serving these alongside a big pile of creamy coleslaw or some thick cut potato wedges.
The coolness of a dip can also provide a beautiful contrast to the warm garlic and herbs.
- Cooling Dip: A homemade buttermilk ranch or a garlicky blue cheese dressing works wonders.
- Side Dish: A simple garden salad with a sharp vinaigrette helps cleanse the palate between those rich, savory bites.
- Beverage: A cold, crisp lager or a sparkling apple cider cuts through the fat of the wings perfectly.
Solving Kitchen Myths
There is a persistent myth that "baking powder makes wings taste like soap." This only happens if you use way too much or if your powder contains aluminum. At 1 tablespoon for 3 pounds of wings, you won't taste the powder at all; you’ll only experience the light, airy texture it creates.
Another myth is that you must flip the wings every 10 minutes. Honestly, flipping them once at the 20 minute mark is more than enough. Constantly opening the oven door ruins the convection effect and lowers the ambient heat, which actually prevents the skin from crisping up properly.
Trust the process, let them roast, and let the flavor layers build in peace. Finally, searing meat or wings doesn't "lock in" moisture it's all about surface dehydration for crunch and internal temperature for juiciness. Follow the timing, and you'll have the juiciest wings of your life.

Very High in Sodium
885 mg 885 mg (38% 38%)
The American Heart Association recommends a limit of about 2,300mg per day, ideally moving toward 1,500mg for most adults.
Tips to Reduce Sodium
-
Eliminate Added Salt-25%
The 1 tsp of fine sea salt contributes significantly to the sodium content. Removing it entirely will drastically cut down on sodium.
-
Boost Acidity and Aromatics-5%
Increase the amount of fresh lemon juice and consider adding a touch more of the garlic, rosemary, thyme, and red pepper flakes to enhance flavor without salt.
-
Embrace Fresh Herbs and Spices
You're already using fresh herbs and spices! Continue to rely on ingredients like garlic, rosemary, thyme, and red pepper flakes to build complex flavors.
Recipe FAQs
Are chicken wings good for diabetics?
Yes, they can be part of a diabetic friendly diet. Since wings are a pure protein source and this recipe uses no sugars or starches, they have a low impact on blood glucose levels.
What is the best method for cooking wings in the oven?
Use a wire rack set over a rimmed baking sheet. This promotes 360-degree air circulation, ensuring the skin becomes crispy rather than soggy from sitting in rendered fat. If you enjoy mastering this kind of texture control, the same principle applies to our juicy turkey sausage technique.
How long do chicken wings take at 425°F in the oven?
Roast for a total of 40 45 minutes. Start with 20 minutes on the first side, then flip the wings and roast for another 20 25 minutes until they achieve a mahogany color.
Should I cover chicken wings when baking them in the oven?
No, never cover the wings. Covering them traps steam, which prevents the skin from dehydrating and turning crispy. You want the dry heat of the oven to remove as much moisture as possible from the surface.
Is it true I should skip the fridge step to save time?
No, this is a common misconception. The 1 to 4 hours in the refrigerator uncovered is vital because it dries out the skin, which is the secret to achieving that signature crispy texture.
How to ensure the garlic paste adheres to the wings?
Toss the wings while they are piping hot. The residual heat from the freshly roasted wings helps the olive oil and garlic paste emulsify and stick to the surface of the skin effectively.
How to tell if the baking powder is effective?
Check that your baking powder is labeled aluminum free. Using standard baking powder can sometimes leave a metallic, bitter aftertaste that ruins the delicate flavor of the rosemary and thyme.
Oven Cooked Garlic Herb Wings

Ingredients:
Instructions:
Nutrition Facts:
| Calories | 642 kcal |
|---|---|
| Protein | 58 g |
| Fat | 44 g |
| Carbs | 2.5 g |
| Fiber | 0.4 g |
| Sugar | 0.1 g |
| Sodium | 885 mg |
