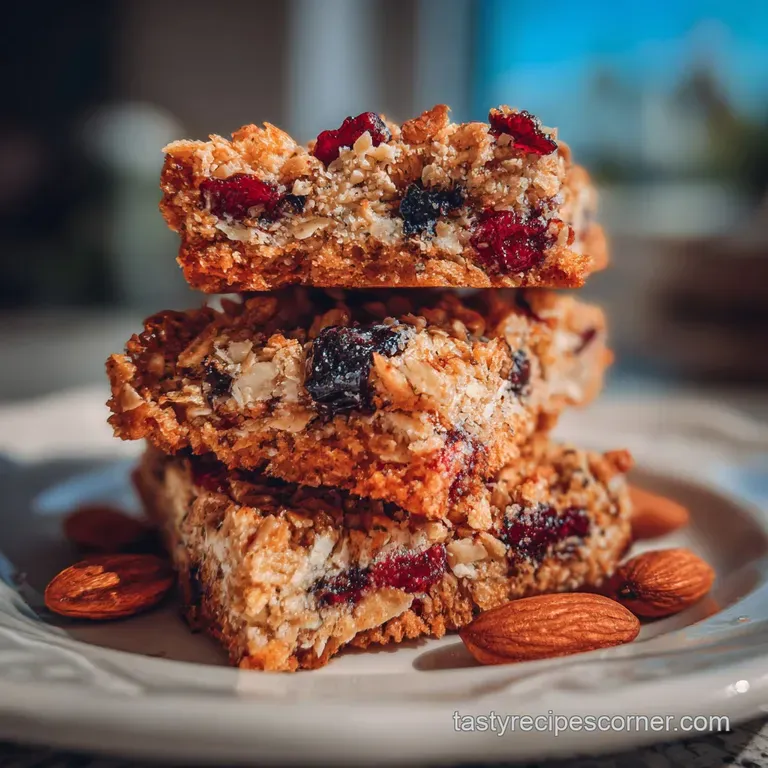
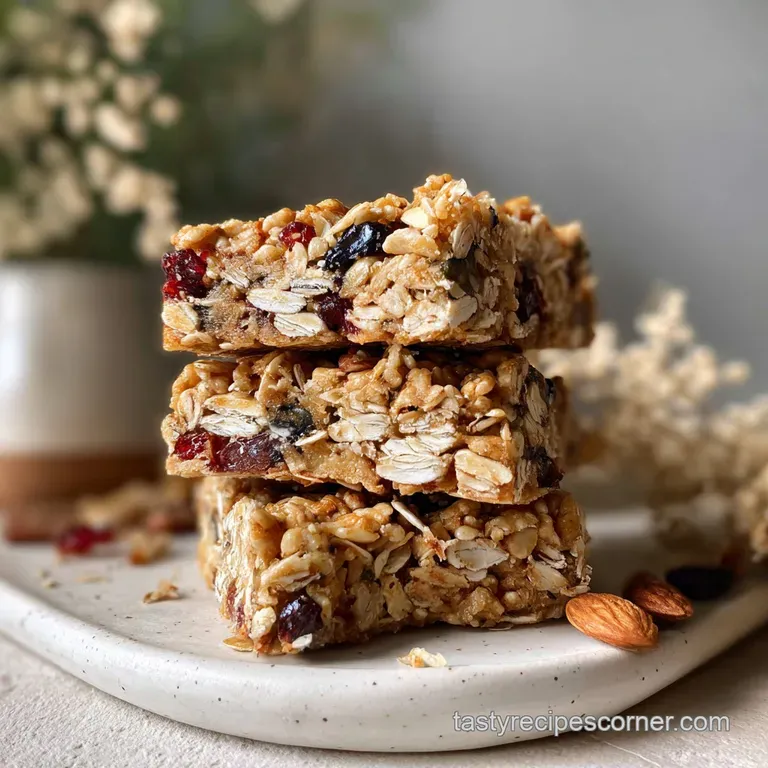
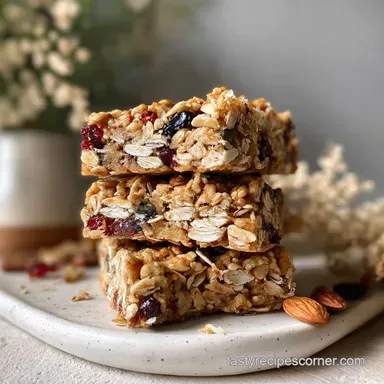
Homemade Granola Bars
- Time: Active 15 minutes, Passive 15 minutes, Total 30 minutes
- Flavor/Texture Hook: Chewy, nutty, and slightly tart from cranberries
- Perfect for: Speedy weekday mornings or post gym refueling
- The Science of Structural Integrity
- Component Analysis for Optimal Results
- Essential Elements and Substitutions
- Minimal Tools for Maximum Efficiency
- Step-by-Step Construction Guide
- Solutions for Structural Failures
- Calculations for Batch Adjustments
- Granola Bar Myths Debunked
- Storage and Sustainable Practices
- Serving Ideas for Every Occasion
- Homemade Granola Bars FAQs
- 📝 Recipe Card
The Science of Structural Integrity
Getting the right "cling" in your homemade granola bars isn't luck, it's chemistry. We are essentially building a delicious edible glue that needs to stay flexible enough to bite but strong enough to hold heavy mix ins like chocolate chips and cranberries.
- Sugar Recrystallization: Heating the honey allows it to coat every single oat flake, then firm up as it cools to create a solid, stable hold.
- Lipid Lubrication: Coconut oil and almond butter provide essential fats that prevent the bars from becoming rock hard bricks, maintaining a soft bake feel.
- Starch Gelatinization: The small amount of moisture in the binder interacts with the oat starches during the brief bake, helping them "grip" each other.
- Thermal Compression: Cooling the bars under pressure (or just letting them set in the fridge) allows the fat and sugar molecules to lock into a dense, portable matrix.
| Method | Total Time | Texture | Best For |
|---|---|---|---|
| No Bake | 10 mins (plus chill) | Extra chewy / Soft | Summer days / Quick prep |
| Quick Toast | 15 minutes | Nutty / Sturdy | Maximum flavor / Lunchboxes |
| Deep Bake | 25 minutes | Crunchy / Golden | Dipping in coffee |
Toasting your oats is a step I never skip anymore. Much like the way we sear meat in a Beef Sausage Recipe to develop deep savory notes, toasting grains initiates the Maillard reaction. This transforms the raw, bland flavor of plain oats into something reminiscent of toasted popcorn or browned butter. If you're looking for a speedy morning, you can toast a large batch of oats over the weekend and keep them in a jar so they're ready to go whenever the craving hits.
Component Analysis for Optimal Results
Every ingredient here serves a purpose beyond just flavor. We are balancing dry bulk with liquid binders and textural pops to create the ultimate bite. If you’ve ever tried making a Korean Beef Bowls recipe, you know that the balance of sweet and salty is what makes the dish sing, and it’s no different here.
| Ingredient | Science Role | Pro Secret |
|---|---|---|
| old-fashioned oats | Provides structural bulk and fiber | Use rolled oats, never "instant" which turn into mush |
| Honey | Primary "glue" and humectant | Heat until it bubbles to ensure it reaches the right tackiness |
| Ground flaxseed | Secondary binder and nutrient boost | Acts as a "vegan egg" when it meets the liquid ingredients |
| Almond butter | Emulsifier and healthy fat source | Use "drippy" natural almond butter for better integration |
Using sea salt might seem optional, but it is the key to waking up all the other flavors. Without it, the bars can taste one dimensionally sweet. The salt cuts through the richness of the almond butter and makes the dark chocolate chips taste even more intense. It's the same principle that makes a Buttermilk Ranch recipe so addictive; you need that salty savory punch to balance the creamy elements.
Essential Elements and Substitutions
Gather these items before you start. Having everything measured out makes the process much more speedy and less stressful when the honey is hot.
- 2.5 cups (225g) old-fashioned rolled oats: The hearty base.
- 1/2 cup (30g) Puffed rice cereal: Adds a "shatter" and lightness to the bar.
- 1/4 cup (40g) Ground flaxseed meal: Helps with binding and adds omega-3s.
- 1/2 tsp Sea salt: To balance the sweetness.
- 1/2 cup (120g) Creamy almond butter: The fat source and flavor base.
- 1/3 cup (115g) Honey: The sticky glue.
- 1/4 cup (55g) Virgin coconut oil: Keeps the bars moist.
- 1/2 cup (80g) Mini dark chocolate chips: For that necessary hit of decadence.
- 1/2 cup (75g) Dried cranberries: For a tart, chewy contrast.
- 1/2 tsp Pure vanilla extract: For that bakery style aroma.
| Original Ingredient | Substitute | Why It Works |
|---|---|---|
| Almond Butter (1/2 cup) | Sunflower Seed Butter (1/2 cup) | Similar fat content. Note: Perfect for making nut free homemade granola bars |
| Honey (1/3 cup) | Brown Rice Syrup (1/3 cup) | Very sticky binder. Note: Better for "crunchy" style bars than maple syrup |
| Coconut Oil (1/4 cup) | Unsalted Butter (1/4 cup) | Provides fat for moisture. Note: Adds a richer, dairy forward flavor |
Minimal Tools for Maximum Efficiency
You don't need a high end stand mixer such as a KitchenAid for these. In fact, a simple wooden spoon and a bit of elbow grease work much better for keeping the texture intact.
- Large mixing bowl: Give yourself plenty of room to toss the ingredients without oats flying everywhere.
- Small saucepan: To gently melt the honey, oil, and almond butter together.
- 8x8 inch baking pan: This size creates the perfect thickness for 12 substantial bars.
- Parchment paper: This is non negotiable. You want a "sling" so you can lift the whole block out once it’s set.
- Heavy bottomed glass or measuring cup: For pressing the mixture firmly into the corners.
Chef Tip: If you find the mixture is sticking to your spoon or hands, lightly coat them with a tiny bit of coconut oil. It creates a barrier that lets you press the bars flat without a sticky mess.
step-by-step Construction Guide
Follow these steps closely to ensure your homemade granola bars don't turn into loose granola. The pressing and cooling phases are just as important as the mixing.
- Toast the grains. Spread 2.5 cups old-fashioned rolled oats on a baking sheet. Bake at 350°F for 10 minutes until they smell nutty and look pale golden.
- Prep the pan. Line an 8x8 inch pan with parchment paper, leaving an overhang on two sides. Note: This allows you to lift the bars out easily later.
- Combine dry base. In a large bowl, mix the toasted oats, 1/2 cup puffed rice, 1/4 cup flaxseed, and 1/2 tsp sea salt.
- Heat the binder. In a small saucepan over medium low heat, whisk together 1/2 cup almond butter, 1/3 cup honey, and 1/4 cup coconut oil.
- Emulsify the liquids. Stir the mixture until it is velvety and begins to bubble slightly at the edges. Remove from heat.
- Infuse flavor. Stir in 1/2 tsp vanilla extract to the warm liquid. Note: Adding vanilla at the end prevents the flavor from evaporating.
- Integrate the mixture. Pour the warm liquid over the dry ingredients. Stir well until every oat flake is shiny and coated.
- Fold in mix ins. Let the mixture cool for 2-3 minutes, then fold in 1/2 cup mini chocolate chips and 1/2 cup dried cranberries. Note: If the oats are too hot, the chocolate will melt completely (which is fine, but less pretty).
- The big press. Transfer the mix to your prepared pan. Use a flat bottomed cup to press down with significant force until the surface is completely flat and packed tight.
- Set and chill. Refrigerate for at least 2 hours (or overnight). Lift by the parchment, slice into 12 bars, and serve.
Solutions for Structural Failures
The most common frustration with this recipe is the bars falling apart. This usually happens because the binder didn't get "tacky" enough or the pressing wasn't firm enough. If you’re having trouble, it’s usually a quick fix.
Bars are Crumbly and Dry
If your bars resemble loose granola rather than a solid snack, the ratio of dry to wet was likely off. Perhaps the oats were extra thirsty, or the honey wasn't measured accurately.
You can actually save a crumbly batch by tossing it back into a bowl, adding an extra tablespoon of melted almond butter, and re pressing it into the pan.
The Texture is Too Sticky
If the bars are leaving a film on your fingers, the honey and oil might not have been heated long enough to reach that "binding" stage. This often happens if you just stir them cold. Always ensure the binder hits a light simmer before you pour it over the oats.
| Problem | Root Cause | Solution |
|---|---|---|
| Bars fall apart | Not enough pressure | Use a heavy weight to press the mixture into the pan harder |
| Chocolate is smeared | Added to hot oats | Wait 5 mins for the oat mixture to cool before adding chips |
| Bottom is soggy | Too much coconut oil | Measure oil carefully; don't "eyeball" the liquid fats |
Common Mistakes Checklist:
- ✓ Skipping the parchment paper (you'll never get them out of the pan in one piece).
- ✓ Using "instant" oats (they lack the structural integrity for a chewy bar).
- ✓ Forgetting to chill (the bars need time for the fats to solidify and "lock" the shape).
- ✓ Cutting them while they are still warm (wait until they are cold from the fridge for clean lines).
- ✓ Not pressing into the corners (this is where the first "break" usually happens).
Calculations for Batch Adjustments
This recipe is very forgiving when you need to change the yield, but you have to be careful with the binder ratios.
- For a Half Batch (6 bars): Use a standard loaf pan instead of the 8x8. Reduce all ingredients by half, but use a full 1/4 teaspoon of salt to keep the flavor popping.
- For a Double Batch (24 bars): Use a 9x13 inch baking pan. Increase the oats and rice cereal 2x, but only increase the honey and almond butter by 1.75x to prevent the bars from becoming overly greasy.
- Scaling the Spices: If you are doubling the recipe, don't double the salt. Use about 1.5x the original amount (3/4 tsp) to avoid an overly salty snack.
| Yield | Pan Size | Honey Amount | Almond Butter |
|---|---|---|---|
| 6 Bars | 9x5 Loaf Pan | 2.5 tbsp | 1/4 cup |
| 12 Bars | 8x8 Square | 1/3 cup | 1/2 cup |
| 24 Bars | 9x13 Rectangle | 2/3 cup | 3/4 cup + 2 tbsp |
Granola Bar Myths Debunked
Many people think you need corn syrup to get a bar to stick together. That is simply not true. While corn syrup is a powerful invert sugar, honey works just as well if you heat it properly. The heat changes the viscosity of the honey, allowing it to act as a more effective adhesive.
Another misconception is that granola bars have to be "baked" to be sturdy. While a quick toast of the oats is great for flavor, the actual "setting" happens in the refrigerator. Cold temperatures solidify the coconut oil and almond butter, which act like a mortar between the oat "bricks." If you leave them on the counter on a hot day, they will naturally soften, but they shouldn't disintegrate if they were pressed correctly.
Storage and Sustainable Practices
Once your bars are sliced and ready, you need to keep them in the right environment to maintain that perfect texture.
- Fridge Storage: Keep the bars in an airtight container with pieces of parchment paper between the layers. They will stay fresh and chewy for up to 1 week.
- Freezing: These are amazing for meal prep. Wrap individual bars in compostable wax paper and freeze them in a bag for up to 3 months. They thaw in about 20 minutes at room temperature perfect for a morning commute.
- Zero Waste Tip: Don't throw away the "crumbs" at the bottom of the pan! Save those little nutty bits and use them as a topping for your morning yogurt or a smoothie bowl. You can even stir them into a batch of muffins for extra texture.
Serving Ideas for Every Occasion
While these are great on their own, I love finding ways to make them part of a bigger morning routine. If you have kids, try making homemade granola bars for kids by swapping the cranberries for mini marshmallows or colorful candies once in a while.
For a high energy morning, pair a bar with a hard boiled egg or a few slices of turkey. The combination of complex carbs from the oats and extra protein from the meat keeps your energy levels stable for hours.
If you're feeling fancy, you can even drizzle a little extra melted dark chocolate over the top of the bars and sprinkle them with flaky sea salt. It makes them look like something you’d buy at a high end cafe, but for a fraction of the price.
Whenever I'm hosting a brunch, I like to cut these into smaller "bites" rather than full bars. They look great on a platter next to fresh fruit and a big pot of coffee. People always ask if they're store-bought because the texture is so consistent, and it’s always fun to tell them it only took 15 minutes of hands on work.

Homemade Granola Bars FAQs
Are homemade granola bars actually healthy?
Yes, generally, they are healthier than store-bought. Homemade versions allow you to control sugar, fat, and ingredient quality, avoiding preservatives and excessive sweeteners common in commercial products.
How do I get my homemade granola bars to stick together?
Heat your binder until it bubbles slightly at the edges. This includes honey or syrup, oil, and nut butter, which creates the necessary tackiness to hold the dry ingredients together once cooled and pressed firmly.
What are the 4 core ingredients in a basic granola bar recipe?
Old-fashioned rolled oats form the base. You'll also need a sticky binder like honey or maple syrup, a fat source like almond butter or coconut oil, and a bit of salt to enhance flavor.
How to make homemade granola bars at home?
Toast your oats first for best flavor. Then, gently heat your wet ingredients (binder, fats) until combined, mix with dry ingredients including oats, fold in mix-ins, press very firmly into a lined pan, and chill until solid.
Why are my homemade granola bars crumbly?
Likely due to insufficient binder or not pressing hard enough. Ensure your wet ingredients are heated sufficiently and mixed thoroughly into the dry components, and then press the mixture into the pan with considerable force for solid bars.
Can I make homemade granola bars without baking?
Absolutely, no-bake is the most common method. The bars set in the refrigerator as the fats and binders solidify, similar to how we achieve a stable emulsion in our Whipped Butter Recipe: Make Yours in 5 Minutes.
What's the best way to store homemade granola bars?
Store them in an airtight container in the refrigerator. This keeps them firm and prevents them from becoming too sticky or soft, ensuring they hold their shape for up to a week.
Homemade Granola Bars
Ingredients:
Instructions:
Nutrition Facts:
| Calories | 282 kcal |
|---|---|
| Protein | 6.4 g |
| Fat | 14.5 g |
| Carbs | 34.7 g |
| Fiber | 4.6 g |
| Sugar | 15.8 g |
| Sodium | 104 mg |
