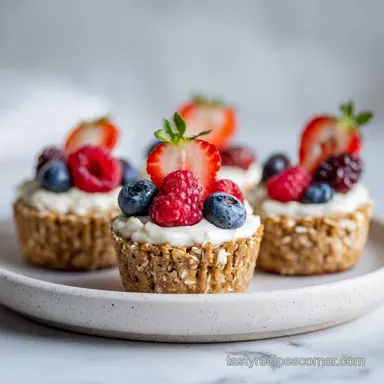
Breakfast Oatmeal Cupcakes: Tender and Nutrient-Dense

- Time:10 minutes prep + 10 minutes resting + 20 minutes baking = 40 minutes total
- Flavor/Texture Hook: Tender, cinnamon spiked crumb with melty chocolate pockets
- Perfect for: Busy weekday mornings, school lunchboxes, and pre workout fuel
- Master Your Breakfast Oatmeal Cupcakes To Go
- Why the Hydration Window Changes Everything
- Ingredient Deep Dive for Better Texture
- Essential Components and Smart Substitutes
- What You Need for Seamless Morning Prep
- Transforming Your Batter into Portable Baked Goods
- Common Mistakes and How to Avoid Them
- Simple Swaps for Dietary Needs and Flavor
- Storage Tips to Maintain Peak Freshness
- Debunking Morning Baking Misconceptions
- How to Plate and Pair Your Oats
- Recipe FAQs
- 📝 Recipe Card
Master Your Breakfast Oatmeal Cupcakes To Go
We have all been there, standing in the kitchen at 7:00 AM, staring at a bowl of soggy instant oatmeal that looks more like gray paste than a meal. Or maybe you have grabbed one of those "healthy" store-bought bars only to realize it has as much sugar as a candy bar and the texture of a shingle.
Waking up shouldn't feel like a chore, and your food shouldn't be the hardest part of your morning. I used to struggle with finding something that was actually portable but didn't fall apart into a million crumbs the second I sat down on the train or in the car.
The specific failure I used to face was the "rubbery oat" syndrome. I would bake these little cups, and they would come out so dense you could use them as hockey pucks. They were either too wet in the middle or so dry they required a gallon of water to swallow.
After playing around with the liquid to oat ratio, I realized the secret isn't just what you put in, but how long you let it sit before it hits the heat. This recipe for breakfast oatmeal cupcakes to go is the result of that discovery, providing a sturdy, muffin like structure that stays moist for days.
Think of these as the reliable, speedy friend of the breakfast world. They are packed with fiber from the rolled oats and natural sweetness from maple syrup and applesauce. When you pull these out of the oven, the aroma of toasted walnuts and warm cinnamon fills the house, making the whole "getting out of bed" thing a lot more tolerable.
You get the comfort of a cupcake with the nutritional profile of a balanced bowl of oats. It is a win win that has saved my sanity more than a few times during hectic weeks.
Why the Hydration Window Changes Everything
The secret to why this recipe produces a tender crumb instead of a gummy mess lies in the resting period. Most people rush their batter into the oven, but oats are thirsty. By giving them ten minutes to soak up the milk and eggs, you ensure the moisture is locked inside the grain rather than just sitting on the surface.
- Osmotic Absorption: Letting the oats sit for 10 minutes allows the liquid to penetrate the tough outer husk of the rolled oats, softening them before the heat sets the structure.
- Pectin Binding: The unsweetened applesauce acts as a natural fat replacer that provides a "velvety" mouthfeel without the need for heavy oils.
- Starch Gelatinization: As the baking powder reacts with the moisture, it creates tiny air pockets that are reinforced by the pre hydrated oats, preventing the cupcakes from collapsing.
- Protein Coagulation: The eggs provide a structural framework that holds the heavy oats together, making them resilient enough to be tossed into a bag without crumbling.
| Servings | Ingredient Adjustments | Pan Size | Cook Time |
|---|---|---|---|
| 6 people | 1.5 cups oats, 1 egg, 1/2 cup milk | 6 cup muffin tin | 18-20 minutes |
| 12 people | 3 cups oats, 2 eggs, 1 cup milk | 12 cup muffin tin | 20 minutes |
| 24 people | 6 cups oats, 4 eggs, 2 cups milk | Two 12 cup tins | 22-25 minutes |
Choosing the right amount to bake depends entirely on your weekly plan. If you are meal prepping for a solo mission, the standard 12 serving batch is perfect because these freeze beautifully.
However, if you have a house full of hungry kids, doubling the recipe is a smart move since they tend to disappear before Monday is even over.
Ingredient Deep Dive for Better Texture
Using the right components is the difference between a "good" breakfast and one you actually look forward to eating. I always tell my friends that if you use instant oats here, you'll end up with a mushy mess. You need the hearty texture of old-fashioned rolled oats to provide that satisfying bite.
| Ingredient | Science Role | Pro Secret |
|---|---|---|
| Old Fashioned Oats | Structural Base | Use certified gluten-free oats if you have sensitivities; they behave exactly the same. |
| Unsweetened Applesauce | Moisture Agent | This keeps the cupcakes "soft" even after three days in the refrigerator. |
| Pure Maple Syrup | Natural Humectant | Syrup holds onto moisture better than granulated sugar, preventing that "stale" feeling. |
| Sea Salt | Flavor Enhancer | Don't skip this; it cuts through the sweetness and makes the cinnamon pop. |
The combination of maple syrup and cinnamon creates a flavor profile that feels classic and cozy. Using high-quality vanilla extract also adds a layer of aromatic sweetness that reduces the need for extra sugar. It's these small choices that make the breakfast oatmeal cupcakes to go stand out from a generic muffin.
Essential Components and Smart Substitutes
To get started with these breakfast oatmeal cupcakes to go, you will need a few pantry staples. I have listed the exact measurements from my kitchen to ensure yours turn out exactly like mine.
- 3 cups (270g) Old Fashioned Rolled Oats: Why this? Provides the chewy, sturdy texture needed for a portable "to go" snack.
- 1 tbsp Ground Cinnamon: Why this? Adds warmth and masks the lack of heavy fats.
- 1 tsp Baking Powder: Why this? Gives the dense oats a necessary lift for a lighter crumb.
- 1/2 tsp Sea Salt: Why this? Balances the sugars and awakens the nutty oat flavor.
- 2 Large Eggs: Why this? The primary binder that keeps the cupcake from falling apart.
- 1 cup (240ml) Milk: Why this? Hydrates the oats; use whole milk for richness or almond milk for lightness.
- 1/2 cup (120ml) Pure Maple Syrup: Why this? Provides a deep, earthy sweetness that pairs perfectly with oats.
- 1/3 cup (80ml) Unsweetened Applesauce: Why this? Adds moisture and bulk without adding unnecessary oil.
- 1 tsp Pure Vanilla Extract: Why this? Elevates the flavor profile with a floral, sweet aroma.
- 1/2 cup (80g) Dark Chocolate Chips: Why this? Offers little "pockets" of indulgence in every bite.
- 1/4 cup (30g) Chopped Walnuts: Why this? Adds a necessary crunch to contrast the soft oats.
| Original Ingredient | Substitute | Why It Works |
|---|---|---|
| Pure Maple Syrup (1/2 cup) | Honey (1/2 cup) | Similar viscosity and sweetness. Note: Honey is slightly sweeter, so you may use a bit less. |
| Unsweetened Applesauce | Mashed Banana (1/3 cup) | Provides similar moisture and binding. Note: Adds a distinct banana flavor. |
| Chopped Walnuts | Sunflower Seeds | Keeps the recipe nut free while maintaining that essential crunch factor. |
When swapping ingredients, keep in mind that the "wetness" of the substitute matters. If you use a very watery fruit puree instead of applesauce, the cupcakes might take an extra few minutes to set in the oven. Always aim for a consistency that mimics the original ingredient as closely as possible.
What You Need for Seamless Morning Prep
You don't need a professional kitchen to make these, but having the right tools makes the process much faster. I prefer using a large glass mixing bowl so I can see if any dry oats are hiding at the bottom.
- 12 cup standard muffin tin: The essential vessel for shaping your breakfast.
- Large mixing bowl: Plenty of room to whisk the liquids and fold in the heavy oats.
- Whisk and silicone spatula: For emulsifying the eggs and gently folding the mix ins.
- Paper liners or non stick spray: Crucial for ensuring you don't leave half the cupcake stuck to the pan.
- Measuring cups and spoons: Precision is key for the hydration ratio.
- Wire cooling rack: Prevents "soggy bottoms" by allowing air to circulate after baking.
Chef's Tip: If you find that your paper liners always stick to your muffins, try lightly spraying the inside of the paper liners with a tiny bit of non stick spray before filling them. It sounds redundant, but it's a game changer for clean peeling!
Transforming Your Batter into Portable Baked Goods

The process is straightforward, but the order of operations matters. We want to build the flavor in the liquid phase before introducing the dry elements. This ensures every oat is coated in cinnamon and sweetness.
- Preheat your oven to 350°F (175°C). Line a 12 cup standard muffin tin with paper liners or grease generously with non stick spray. Note: A hot oven is necessary for that immediate "spring" in the batter.
- Whisk the wet ingredients. In a large mixing bowl, combine the eggs, milk, maple syrup, unsweetened applesauce, and vanilla extract. Whisk until the mixture is uniform and slightly frothy.
- Incorporate the dry base. Fold in the rolled oats, cinnamon, baking powder, and sea salt. Use your spatula to ensure no dry pockets of cinnamon remain.
- Add the textures. Stir in the dark chocolate chips and chopped walnuts until evenly distributed throughout the batter.
- The Hydration Window. Allow the batter to sit undisturbed for 10 minutes. This is the one step most people skip, but it is vital for a sturdy structure.
- Fill the tin. Divide the batter evenly among the 12 muffin cups. They will be quite full, which is fine as they don't rise as much as traditional cake.
- Bake the cupcakes. Place in the center rack and bake for 20 minutes. Bake until the tops are firm to the touch and a toothpick comes out clean.
- Cool in the pan. Let the cupcakes sit in the tin for 5 minutes. Wait until they "shrink" slightly from the edges before moving them.
- Final cooling. Transfer to a wire rack to finish cooling completely. This prevents steam from softening the bottom crust.
- Store properly. Once cold, place them in an airtight container. They will stay fresh for up to 5 days.
| Method | Time | Texture | Best For |
|---|---|---|---|
| Standard Oven (350°F) | 20 minutes | Firm exterior, tender heart | Batch prepping for the week |
| Stovetop (Steamed) | 25 minutes | Very moist, pudding like | If you don't have an oven |
| Air Fryer (325°F) | 12-15 minutes | Crispier edges, faster | Quick small batches |
I have tried the air fryer method when I only wanted to make four of them, and it works surprisingly well. The edges get a little more "toasted" which some people actually prefer over the traditional oven baked version.
Common Mistakes and How to Avoid Them
Even with a simple recipe, things can go sideways if you aren't paying attention to the details. The most common complaint I hear is that the cupcakes are "mushy" in the middle.
Why Your Cupcakes Are Too Wet
If your breakfast oatmeal cupcakes to go feel soggy even after 20 minutes, it is usually because the applesauce or the fruit you used had too much water content. Some brands of applesauce are more like juice than puree.
Another culprit could be skipping the cooling rack; if they sit in the hot pan for too long, they "sweat" and the bottoms get damp.
Why the Texture is Crumbly
If they fall apart the moment you peel the liner, you likely didn't let the batter rest for the full 10 minutes. That hydration window is what allows the oats to bind with the egg and syrup. Without it, the oats remain separate entities that don't want to stick together.
| Problem | Root Cause | Solution |
|---|---|---|
| Stuck to Liner | low-fat content in batter | Spray the liners or use high-quality silicone cups. |
| Too Dense | Using Quick Oats | Stick to Old Fashioned Rolled Oats for a better "crumb." |
| Burnt Bottoms | Oven rack too low | Move the tray to the middle or top third of the oven. |
✓ Mistakes to Avoid Checklist: - ✓ Never substitute instant/quick oats; the texture will become gummy and lose its "cupcake" feel. - ✓ Do not skip the 10 minute rest; this is the structural foundation of the recipe.
- ✓ Ensure your baking powder is fresh; if it's over six months old, the cupcakes will be heavy. - ✓ Let them cool completely before bagging them; trapped steam is the enemy of a good oat muffin. - ✓ Avoid "over mixing" once the oats are in; just fold until combined to keep things light.
Simple Swaps for Dietary Needs and Flavor
One of the reasons I love these is how easy they are to customize. If you are looking for a bit more variety, you can easily turn these into healthy breakfast oatmeal muffins by adding different fruits or spices. While I love the chocolate chip and walnut combo, sometimes I want something a bit more vibrant.
- Berry Blast: Swap the chocolate chips for 1/2 cup of fresh or frozen blueberries. If using frozen, don't thaw them first or they will turn your batter purple!
- Tropical Vibes: Use coconut milk instead of dairy and swap walnuts for shredded coconut and dried pineapple bits.
- Protein Boost: Add a scoop of your favorite vanilla protein powder to the dry mix, but be sure to add an extra tablespoon of milk to compensate for the powder's absorption.
- Savory Twist: Believe it or not, you can omit the syrup and vanilla, and instead add shredded cheddar cheese and chives for a savory "muffin" that pairs well with eggs.
If you are cooking for a crowd and need to adjust the recipe, scaling is quite simple. When cutting the recipe in half, use one large egg and just slightly less than half of the maple syrup to keep the moisture balanced.
When doubling the batch, I recommend using two separate bowls rather than one massive one, as it ensures the baking powder is distributed evenly and the oats hydrate at the same rate.
Storage Tips to Maintain Peak Freshness
Since these are designed as meal prep breakfast muffins, knowing how to store them is just as important as knowing how to bake them. I usually keep a few on the counter for the first 24 hours, but after that, they need to be chilled.
- Refrigerator: Keep in an airtight container for up to 5 days. I find that they actually get a little fudgier after a day in the fridge.
- Freezer: These are the kings of the freezer. Wrap each one individually in plastic wrap and then place them in a freezer bag. They stay good for 3 months.
- Reheating: To get that "just baked" feel, pop one in the microwave for 20-30 seconds. If you have an air fryer, 2 minutes at 300°F will make the outside crispy again.
Zero Waste Tip: If you have a few walnuts left at the bottom of the bag that aren't enough for a full recipe, toast them and sprinkle them over your yogurt. Also, don't throw away that last bit of maple syrup in the bottle; pour a little milk into the bottle, shake it up, and use that "maple milk" in the recipe!
Debunking Morning Baking Misconceptions
There are a few myths floating around about oatmeal baking that often discourage people from trying recipes like this. Let's clear those up so you can bake with confidence.
- Myth: "Oatmeal muffins are always dry." This only happens if you overbake them or miss the hydration step. Because this recipe uses applesauce and maple syrup (both liquid heavy sweeteners), they stay moist much longer than traditional flour based muffins.
- Myth: "You can't freeze oats." Oats actually handle the freezing and thawing process better than wheat flour because they don't have a delicate gluten structure that breaks down.
- Myth: "Healthy muffins don't taste like cupcakes." While these aren't loaded with butter and frosting, the "cupcake" moniker comes from the tender crumb and the hit of dark chocolate. It's about the experience, not just the calorie count.
How to Plate and Pair Your Oats
While these are designed to be "to go," if you do have five minutes to sit down, you can really make them feel like a gourmet brunch. I love splitting one open while it's still warm and smearing a bit of almond butter right in the center.
- The High Protein Pairing: Serve two cupcakes alongside a side of greek yogurt or a couple of hard boiled eggs for a massive protein hit that will keep you full until lunch.
- The "Nut Butter" Topper: A drizzle of peanut butter or cashew butter over the top adds healthy fats and makes it feel incredibly indulgent.
- Brunch Style: If you are hosting a weekend breakfast, serve these on a platter next to my Cottage Cheese Breakfast Biscuits for a spread that offers both sweet and savory options.
- The Coffee Companion: These are robust enough to stand up to a dark roast coffee. Dip them if you're feeling adventurous the oats soak up the coffee beautifully!
Ultimately, the goal is to make your morning easier. Whether you are running out the door with a cupcake in one hand and a leash in the other, or sitting down for a quiet moment before the chaos starts, these breakfast oatmeal cupcakes to go are the reliable, delicious companion you need. They have completely changed my morning routine from one of stress to one of cinnamon scented ease. Give them a try this Sunday, and I promise your Monday morning self will thank you. For more speedy morning ideas, you might also enjoy checking out Sheet Pan Pancakes which are another great way to feed a crowd without standing over a stove.

Recipe FAQs
Why do my oatmeal cupcakes turn out mushy in the middle?
Skipping the 10-minute hydration window is usually the culprit. The rolled oats need this time to absorb the liquid from the eggs, milk, and applesauce, which creates a stable structure rather than a loose, wet batter.
Can I bake these at a different temperature to speed up the process?
No, stick to 350°F (175°C) to ensure even cooking. If you increase the heat, the outsides will firm up before the center has enough time to set, resulting in an uneven texture.
How to properly store these for a busy work week?
Keep them in an airtight container in the refrigerator for up to 5 days. If you need to store them longer, wrap each cupcake individually in plastic wrap and place them in a freezer bag for up to 3 months.
Is it true I can skip the applesauce and add more milk?
No, this is a common misconception. The applesauce provides necessary density and binding properties that simple liquid milk cannot replicate, which would result in your cupcakes falling apart.
How to tell if the cupcakes are fully cooked?
Check that the tops feel firm to the touch and a toothpick inserted into the center comes out clean. This visual and physical cue confirms the structure has set, similar to the precision needed when mastering our crispy golden crust technique.
Can I use instant oats instead of rolled oats?
No, instant oats will turn to mush. Old Fashioned rolled oats provide the essential structural integrity required for these muffins to hold their shape during the 20-minute bake time.
How to prevent the muffins from sticking to the liners?
Allow them to cool in the tin for 5 minutes before transferring them to a wire rack. This brief resting period allows the structure to firm up slightly, ensuring the muffins release from the liners without tearing.
Healthy Oatmeal Breakfast Cupcakes
Ingredients:
Instructions:
Nutrition Facts:
| Calories | 195 kcal |
|---|---|
| Protein | 5.4 g |
| Fat | 6.2 g |
| Carbs | 30.3 g |
| Fiber | 3.2 g |
| Sugar | 14.8 g |
| Sodium | 168 mg |
