Bran Muffins Healthy Recipe: Proper Golden Molasses Spice
- The Proper Golden Bran Muffin: A Breakfast Champion Reimagined
- The Secret to Supreme Moistness: Why Soaking the Bran Matters
- Essential Components for Your Golden Bran Muffins
- Baking Mastery: Step-by-Step Bran Muffin Instructions
- Pro Tips for the Best Bran Muffins (Troubleshooting Guide)
- Keeping Your Bran Muffins Fresh: Storage and Longevity
- The Perfect Pairing: What to Serve with Bran Muffins
- Recipe FAQs
- 📝 Recipe Card
The Proper Golden Bran Muffin: A Breakfast Champion Reimagined
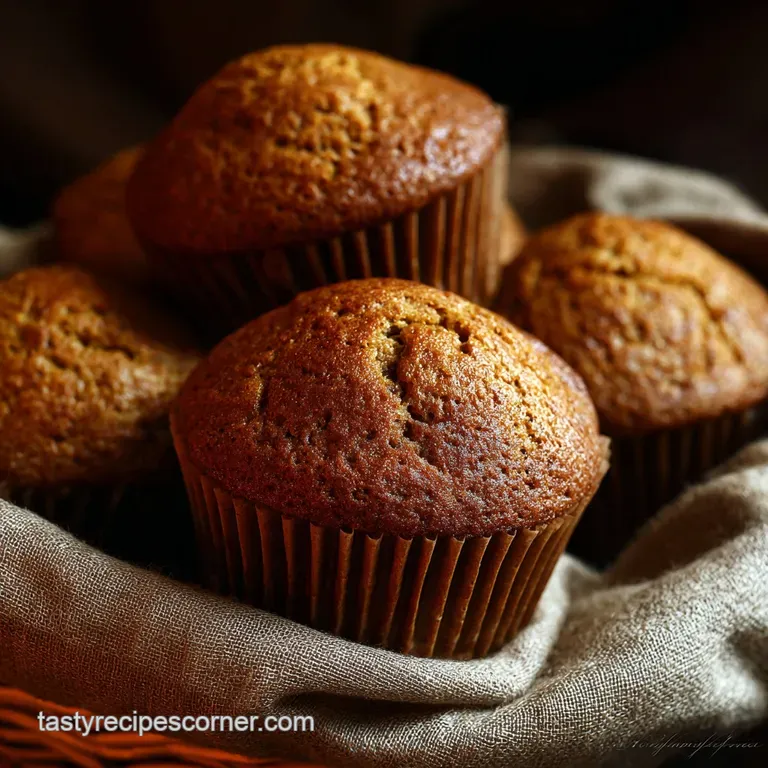
There is truly nothing better than the smell of baking spices and brown sugar that fills your kitchen when a tray of warm bran muffins is coming out of the oven. These aren't those dusty, cardboard textured health muffins you had one sad time at a corporate coffee shop.
This recipe delivers a crumb that is deeply moist , rich with molasses, and unbelievably tender.
I swear these golden bran muffins are a lifesaver for busy mornings; they take minimal active prep time and are way healthier than anything store-bought. Plus, making a big batch on Sunday means you have a grab and go breakfast for the whole week. It saves money and means you never have to panic about breakfast again.
Ready to toss the recipe card that gave you dry, tough bricks? We're going to ditch the myths and talk about the two simple secrets that guarantee bakery level results every single time. Trust me, once you nail this bran muffin recipe, you'll never look back.
The Secret to Supreme Moistness: Why Soaking the Bran Matters
If you've ever experienced a dry, crumbly bran muffin, the fault lies entirely with the bran itself. Wheat bran is essentially a tiny sponge. If you toss it into batter without pre-hydrating, it will suck up every drop of liquid from your batter during baking. That's what leaves you with sand in a cup.
Escaping the Dry Bran Stereotype
The single most important step in this bran muffin recipe is letting the unprocessed wheat bran soak in buttermilk for at least 30 minutes. This creates a soft, almost porridge like mash before the flour even gets involved.
Once the bran has soaked up its fill, it acts as a moisture retainer, contributing to the incredible texture of the final muffin. This is the difference between "healthy cardboard" and a genuinely delicious, healthy bran muffin.
What Makes These Muffins 'Golden'?
The deep, satisfying golden hue and the complex flavour profile come from using brown sugar and, crucially, molasses. Brown sugar retains more moisture than white sugar because of its molasses content, giving the crumb an extra layer of tenderness.
The molasses, especially blackstrap, adds that rustic, earthy complexity that makes these muffins taste like they came straight from an old-school bakery.
Quick Overview: Ease and Timing
This recipe is incredibly straightforward; it uses the standard 'muffin method' of mixing wet and dry ingredients separately, which is simple. The only tricky part is the passive soaking time, so plan for 30 minutes before you actually start mixing. It’s worth the wait, I promise.
Buttermilk’s Role in Tenderizing Bran
Buttermilk is slightly acidic, and that acidity helps tenderize the gluten in the flour, resulting in a softer muffin. When buttermilk meets baking soda, it causes a powerful lift, giving us those lovely high domes.
If you don't have true buttermilk, don't worry you can easily fake it with milk and a splash of vinegar!
Achieving the Perfect Crumb Texture
We use a combination of melted butter and oil in some variations, but melted butter here adds fantastic flavour without sacrificing moisture. The key to the perfect crumb, though, is how gently you mix.
Stop folding the moment the streaks of flour disappear, because over mixing develops gluten and gives you a tough, chewy muffin instead of a tender one.
The Power of Molasses and Spice Pairing
The combination of molasses and warm spices like cinnamon and nutmeg makes these taste cozy and complex. They move far beyond just being a vessel for fibre. This warm spice profile also helps mask some of the bitterness sometimes associated with wheat bran, making these muffins a truly craveable treat.
Essential Components for Your Golden Bran Muffins
You don’t need a huge pantry, but getting the right type of bran and the right dairy makes a big difference. Don't skip the quality checks here; the ingredients list might look standard, but the specifics matter!
Decoding Different Types of Wheat Bran
For this recipe, you want unprocessed, raw wheat bran (sometimes called bran flakes, but ensure they are the small, unprocessed kind, not the large cereal flakes).
If you only have actual bran cereal (like Raisin Bran, without the raisins), you can use it, but you might need to crush the flakes slightly and reduce the sugar since the cereal already contains sweeteners.
Selecting the Right Molasses (Blackstrap vs. Regular)
Regular (light) molasses is sweeter and milder, great if you prefer a less intense flavour. I highly recommend using blackstrap molasses here. It is less sweet, much darker, and provides a robust, almost smoky, earthy depth that pairs perfectly with the bran.
Plus, it’s packed with extra iron and minerals, making these even healthier bran muffins.
Flour Choices: Whole Wheat vs. All-Purpose
I use all-purpose (plain) flour to ensure a light, fluffy texture that combats the heaviness of the bran. You can substitute up to half a cup of the all-purpose flour with whole wheat flour if you want a deeper flavour and more complex texture.
However, sticking mostly to AP flour helps maintain that soft crumb.
Dairy Swaps: Kefir or Yogurt for Buttermilk
| Ingredient | Substitute Option | Ratio/Notes |
|---|---|---|
| Buttermilk | Milk + Vinegar/Lemon | 1 cup milk + 1 Tbsp acid. Let sit 10 min. |
| Buttermilk | Plain Kefir or Yogurt | Use kefir 1:1. Thin yogurt slightly with water/milk. |
| Blackstrap Molasses | Maple Syrup or Honey | Use an equal amount, but note the flavour will be lighter. |
Chef's Note: If you swap buttermilk for regular milk, you must increase the soaking time slightly to ensure the bran is fully hydrated, maybe closer to 45 minutes.
Baking Mastery: step-by-step Bran Muffin Instructions
Let's crack on and get these incredible, high fibre muffins ready for the oven! Remember: patience during the soaking step is mandatory.
Preparing the Soaked Bran Base
- The Mash: In your largest bowl, combine the 1 cup of wheat bran, the buttermilk, and the molasses. Give it a good, thorough stir until everything is saturated.
- The Wait: Cover the bowl and let it sit at room temperature for at least 30 minutes. Go have a cup of coffee or prepare your other ingredients. This soaking time is not optional!
- Oven Prep: Preheat your oven to a piping hot 400°F (200°C) and line your 12 cup muffin tin.
The Muffin Method: Combining Wet and Dry
- Dry Whisk: In a separate medium bowl, whisk together the flour, baking soda, cinnamon, nutmeg, and salt. Make sure the rising agents are perfectly distributed; this ensures an even rise.
- Wet Addition: After the bran has soaked, whisk the melted butter, brown sugar, eggs, and vanilla extract directly into the bran mash until everything is just incorporated.
The Ideal Baking Temperature and Timing
- The Merge: Dump the dry ingredients and any add-ins (like those plump golden raisins!) directly onto the wet mixture.
- The Fold: Using a rubber spatula, fold the batter gently until just combined. You should see a few streaks of flour; do not worry about lumps. Stop folding when 90% of the flour has disappeared.
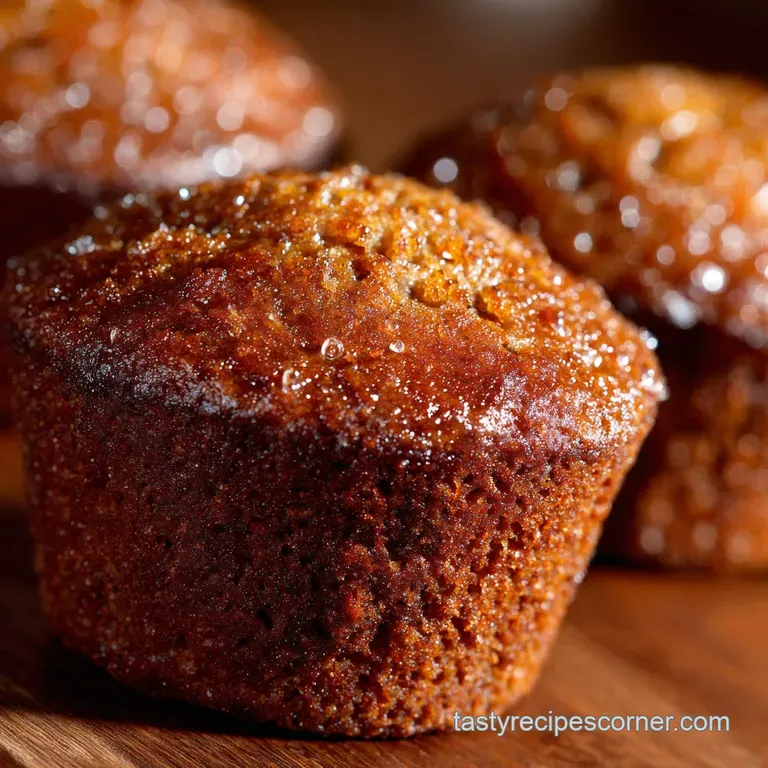
- Portion and Bake: Scoop the batter evenly into the muffin cups, filling them about three quarters full. Bake for 18– 22 minutes.
The Toothpick Test for Doneness
The muffins are done when they are deeply golden brown and smell absolutely incredible (that nutty aroma is irresistible!). Insert a clean wooden skewer or toothpick into the centre of a muffin; it should come out clean or with a few moist, not wet, crumbs attached.
If it comes out with wet batter, give them another 2- 3 minutes.
Pro Tips for the Best Bran Muffins (Troubleshooting Guide)
I’ve made every bran muffin mistake possible, from bricks to dry dust. These three points are where most bakers fail, and they are easy to fix.
Avoiding Over Mixing (The Tunnelling Effect)
If your finished muffins have weird tunnels running through the crumb, you mixed them too much. Over mixing develops gluten, which makes the batter elastic, and as the muffin rises, that elastic structure traps air unevenly, causing tunnels. The fix? Fold gently and embrace the lumps.
How to Get High, Dome Topped Muffins
We use a high baking temperature (400°F/200°C) for the entire bake. This initial blast of heat causes the baking soda and steam to activate aggressively before the crust sets, forcing the batter upward. Filling the muffin liners at least three quarters full also helps them achieve that beautiful bakery dome. If you need tips on other high dome recipes, check out my Banana Nut Muffin Recipe: Bakery Style Incredibly Moist — the same over high heat principle applies!
Customizing with Add-Ins (Raisins, Zest, Nuts)
Feeling fancy? Go ahead and customize! If you’re adding dried fruit like raisins or cranberries, toss them with a tablespoon of the dry flour mixture first. This prevents them from sinking to the bottom of the muffin.
Chopped pecans or walnuts add a great crunch, and a tablespoon of orange or lemon zest brings a wonderful brightness.
Keeping Your Bran Muffins Fresh: Storage and Longevity
These bran muffins are incredibly moist, which means they stay fresh longer than most. But how you store them is key to preventing sogginess or drying out.
Short Term Counter Storage
Once cooled completely, place them in an airtight container lined with a paper towel. The paper towel absorbs any excess moisture that might cause the tops to get sticky. They will stay perfectly fresh at room temperature for 3 to 4 days.
The Best Way to Freeze Baked Muffins
But does it freeze well? You bet! Allow the muffins to cool entirely, then place them on a baking sheet and flash freeze for about an hour. Once solid, transfer them to a freezer safe zip-top bag, squeezing out as much air as possible. They will keep beautifully for up to 3 months.
Reheating for That Fresh Out-of-the-Oven Feel
To serve frozen muffins, simply grab one from the freezer and microwave it for 30 60 seconds, or wrap it loosely in foil and reheat in a toaster oven at 350°F (175°C) for 10 minutes. The exterior gets that lovely crispness again.
The Perfect Pairing: What to Serve with Bran Muffins
Honestly, these are so good you can eat them plain and be happy, but a little something extra makes breakfast feel special.
Serve these warm, split open, and slathered with softened, salted butter or a smear of high-quality cream cheese. They also pair wonderfully with tangy additions. If you have some homemade lemon curd sitting around, they make a surprisingly perfect match.
A bowl of plain Greek yogurt drizzled with honey is a simple, healthy companion.

Recipe FAQs
Why did my bran muffins turn out dry or dense?
This is the most common troubleshooting issue, and it usually results from under hydrating the bran or overmixing the batter. Ensure you allow the oat bran to fully soak in the buttermilk for the specified time (typically 10-15 minutes) before combining the other ingredients.
Overmixing causes gluten development, which prevents the muffins from rising properly and results in a tough, dense crumb.
I don't have buttermilk. What is the best substitute?
The acidity in buttermilk is crucial for reacting with the leavening agents and tenderizing the bran, so a suitable acidic replacement is necessary. You can easily create a substitute by adding one tablespoon of white vinegar or lemon juice to one cup of regular milk, stirring it, and letting it curdle for five minutes.
Alternatively, thinned plain yogurt or kefir can also work well in a pinch.
Can I skip the blackstrap molasses or use a lighter alternative?
While you can substitute honey, maple syrup, or regular unsulphured molasses 1:1, the muffins will lose the specific depth and rich earthiness characteristic of blackstrap molasses. Blackstrap also adds minerals and a darker color, so the final product will look and taste noticeably lighter if it is omitted.
If substituting, ensure your batter maintains the required liquid ratio.
Can I use wheat bran instead of oat bran in this recipe?
Yes, you may substitute wheat bran for oat bran, but be aware that wheat bran tends to be coarser and absorbs liquid slightly differently. Monitor your batter closely to ensure it does not become too stiff, as you might need to add one or two extra tablespoons of buttermilk to maintain the correct consistency.
Both types provide excellent fibre, but oat bran usually yields a slightly softer finished muffin.
How should I store these muffins, and how long do they last?
Once the muffins have cooled completely, store them in an airtight container at room temperature for up to three days. To keep them exceptionally moist, place half a slice of sandwich bread inside the container with the muffins; the bread will absorb any excess humidity and prevent the muffins from drying out.
Are these bran muffins suitable for freezing?
These muffins freeze beautifully, making them ideal for meal prep. Once they are fully cooled, transfer them to a freezer safe bag or container, removing as much air as possible, and they will retain quality for up to three months.
To enjoy, thaw them overnight at room temperature or microwave them for 30 60 seconds for a quick, warm treat.
How can I make this recipe vegan or dairy-free?
To make the muffins vegan, replace the buttermilk with a non-dairy milk (like oat or soy) soured with a tablespoon of apple cider vinegar, and substitute the eggs with flax eggs (one tablespoon ground flaxseed plus three tablespoons water per egg).
Ensure any butter or fat used is swapped out for a solid vegan butter alternative or neutral oil like canola.
Golden Bran Muffins With Molasses
Ingredients:
Instructions:
Nutrition Facts:
| Calories | 191 kcal |
|---|---|
| Protein | 3.7 g |
| Fat | 7.3 g |
| Carbs | 31.4 g |
