Sheet Pan Pancakes: Fluffy and Golden

- Time: Active 10 minutes, Passive 15 minutes, Total 25 minutes
- Flavor/Texture Hook: Golden brown buttery crust with a light, cloud like crumb
- Perfect for: Stress free family brunch or high volume meal prep
- The Ultimate Fluffy Sheet Pan Pancakes
- Exploring the Rich Texture and Flavor Profiles
- Essential Preparation and Total Cooking Time Specs
- Component Analysis of Key Ingredients
- Sourcing Quality Components and Smart Ingredient Swaps
- Minimalist Kitchen Tools Needed for Breakfast Success
- Master the Complete Baking Process Step by Step
- Professional Solutions for Common Sheet Pan Obstacles
- Creative Flavor Additions and Healthy Recipe Variations
- Smart Storage Tips and Zero Waste Kitchen Hacks
- Beautiful Serving Ideas for the Perfect Morning Spread
- Recipe FAQs
- 📝 Recipe Card
The Ultimate Fluffy Sheet Pan Pancakes
There is a specific kind of morning chaos that involves three frying pans, a spatula that is never quite thin enough, and a stack of pancakes where the first one is cold by the time the last one hits the plate.
I remember one specific Saturday when the steam from the griddle was fogging up my glasses and the kids were getting restless. I decided then that there had to be a way to feed a crowd without the individual flip and fail cycle.
The solution was right in my pantry the humble rimmed baking sheet. By moving the process from the stovetop to the oven, I discovered that you could get a much more consistent, velvety texture that a skillet just cannot replicate.
It is about waking up and knowing that in exactly twenty five minutes, everyone is eating at the exact same time.
We are talking about a massive, golden sheet of breakfast glory that you can slice into perfect squares. No more standing. No more grease splatters on your shirt. Just the aroma of vanilla and toasted butter filling the kitchen while you actually sit down and enjoy your coffee.
This is the method that changed how I view weekend hosting forever.
Exploring the Rich Texture and Flavor Profiles
The magic of this method lies in the uniform heat distribution. Unlike a pan where the heat only comes from beneath, the oven surrounds the batter, causing a vertical lift that makes these incredibly airy. You get a consistent crumb that is ideal for soaking up maple syrup without turning into a soggy mess.
- Chemical Leavening: The significant amount of baking powder reacts twice once when hitting the wet ingredients and again under the high heat of the oven, creating massive air pockets.
- Lactose Caramelization: The sugars in the whole milk and the granulated sugar react with the high 425°F heat to create a deeply bronzed, flavorful crust.
- Starch Hydration: Resting the batter for five minutes allows the flour particles to fully absorb the liquid, which prevents a grainy texture and ensures the squares hold their shape.
- Fat Emulsification: Whisking the melted butter into the eggs and milk before adding to the flour creates a stable fat in-water emulsion that yields a silky mouthfeel.
Stovetop Versus Oven Baking Comparison
| Feature | Stovetop Griddle | Sheet Pan Oven |
|---|---|---|
| Cooking Style | Individual flips | Single batch bake |
| Edge Texture | Soft and pillowy | Shatter crisp and buttery |
| Effort Level | High (constant attention) | Low (set and forget) |
Using the oven method provides a unique structural integrity. While a traditional pancake can sometimes feel limp, these baked squares have a slight resistance when you bite into them, followed by an immediate dissolve.
This happens because the parchment lined pan helps the bottom "fry" in the butter while the top stays light.
Essential Preparation and Total Cooking Time Specs
Precision is the key to avoiding a dense or rubbery outcome. When we talk about a 15 minute bake time, it is not a suggestion it is the sweet spot where the center is set but the moisture remains trapped inside. If you go too long, you lose that velvety interior that makes this recipe special.
| Servings | Ingredient Adjustments | Pan Size | Total Cook Time |
|---|---|---|---|
| 4 People | Half ingredients, 1 egg | 9x13 inch | 12-14 minutes |
| 8 People | Standard recipe | 18x13 inch | 15 minutes |
| 16 People | Double recipe | Two 18x13 pans | 18-20 minutes |
If you are cooking for a larger crowd, you will need to rotate your pans halfway through. Even the most reliable ovens have hot spots, and shifting the pans ensures that the batch on the bottom rack gets the same golden finish as the one on top. If you are waking up to a crowd, these squares pair beautifully with my Cottage Cheese Scrambled Eggs for a protein boost that keeps everyone full.
Component Analysis of Key Ingredients
Understanding why we use specific ingredients helps you become a more intuitive cook. It is not just about a list; it is about how these components interact under heat to create the final structure.
| Ingredient | Science Role | Pro Secret |
|---|---|---|
| All Purpose Flour | Provides the gluten framework | Sift it first to avoid heavy, leaden squares |
| Baking Powder | Primary leavening agent | Ensure it is fresh; it loses potency after 6 months |
| Whole Milk | Liquid hydration and fat | Use room temperature milk to keep butter from seizing |
| Unsalted Butter | Flavor and fat barrier | Brush the pan extra thick for a "fried" bottom crust |
Using room temperature eggs is one of those small steps that most people skip, but it is vital here. Cold eggs will immediately cause your melted butter to clump back into solid bits, leading to an uneven distribution of fat and a speckled, greasy texture rather than a smooth, cohesive batter.
Sourcing Quality Components and Smart Ingredient Swaps
When gathering your items, look for the freshest possible dairy. Since the ingredient list is short, the quality of the butter and vanilla will be very apparent in the final bite. I prefer using a high-quality vanilla extract over imitation, as the alcohol cooks off and leaves a floral, warm scent that defines the "pancake" smell we all love.
- 3 cups (375g) all purpose flour: Why this? Provides enough protein for structure without being too tough like bread flour.
- 3 tbsp (45g) granulated sugar: Why this? Assists in browning and provides a subtle sweetness that balances the salt.
- 2 tbsp (24g) baking powder: Why this? The heavy lift needed to make a thick sheet pan batter rise.
- 1/2 tsp (3g) salt: Why this? Sharpens the flavor of the butter and vanilla.
- 2.5 cups (600ml) whole milk: Why this? The fat content ensures a tender, moist crumb.
- 2 large eggs: Why this? Acts as the binder and provides the necessary lift.
- 1/2 cup (113g) unsalted butter, melted: Why this? Adds richness and creates the crispy edges when brushed on the pan.
- 1 tbsp (15ml) vanilla extract: Why this? Essential for that classic, nostalgic breakfast aroma.
Substitution Table
| Original Ingredient | Substitute | Why It Works |
|---|---|---|
| Whole Milk | Buttermilk | Adds a tangy flavor and increases tenderness. Note: Add 1/2 tsp baking soda. |
| All Purpose Flour | Cup for-cup gluten-free | Provides similar structure. Note: May require 2 extra minutes of baking. |
| Granulated Sugar | Honey or Maple Syrup | Adds moisture and a different floral note. |
For those mornings when you want a grab and-go option alongside these, try my Cottage Cheese Breakfast Biscuits which also use minimal tools and provide a savory counterpoint to the sweet pancakes.
Minimalist Kitchen Tools Needed for Breakfast Success

You do not need a fancy stand mixer for this. In fact, a hand whisk is actually better because it prevents you from over working the gluten. The only "special" tool is the 18x13-inch rimmed baking sheet, often called a half sheet pan.
I highly recommend using parchment paper. Even with a well buttered pan, the high sugar content in pancake batter can cause it to stick in the corners. The parchment acts as a safety net and makes it incredibly easy to lift the entire giant pancake out onto a cutting board for clean slicing.
Chef's Tip: If you don't have a large enough bowl, you can whisk the wet ingredients directly in your large glass measuring cup. It saves one dish and makes pouring into the "well" of the dry ingredients much easier.
Master the Complete Baking Process step-by-step
Preheat your oven to 425°F (220°C). Line an 18x13-inch rimmed baking sheet with parchment paper, leaving a slight overhang. Brush the parchment generously with a tablespoon of the melted butter until the surface is slick and glistening.
Note: This creates a "fried" texture on the bottom.
In a large mixing bowl, whisk together the all purpose flour, granulated sugar, baking powder, and salt. Create a well in the center of the dry ingredients to prepare for the wet mixture.
In a separate jug or bowl, whisk the milk, eggs, remaining melted butter, and vanilla extract until the eggs are fully emulsified and the liquid is pale yellow.
Pour the wet mixture into the well of the dry ingredients. Use a spatula to gently fold the mixture together until just combined. Note: Small lumps are perfectly fine and actually help with fluffiness.
Pour the batter into the prepared sheet pan, spreading it evenly to the edges until the surface is level.
Let the batter rest for 5 minutes in the pan. This allows the baking powder to activate and the flour to hydrate.
Bake for 15 minutes until the top is golden brown and the edges have pulled away slightly from the sides.
Test for doneness by inserting a toothpick into the center; it should come out clean with no wet batter clinging to it.
Remove from the oven and let it sit for 2 minutes to allow the internal steam to settle.
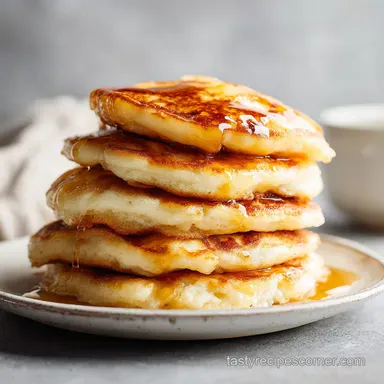
Slice into squares using a pizza cutter or sharp knife and serve hot with a generous drizzle of syrup.
Professional Solutions for Common Sheet Pan Obstacles
The most common issue people face is a pancake that looks great on the outside but feels heavy or "gummy" in the middle. This usually happens because of temperature fluctuations or over mixing. If your oven doesn't hold heat well, the batter won't get that initial "jump" it needs to stay light.
Troubleshooting Your Bake
| Problem | Root Cause | Solution |
|---|---|---|
| Dense/Rubber Texture | Over mixing the batter | Fold until just combined; stop as soon as white streaks vanish. |
| Pale Top/Burnt Bottom | Oven rack too low | Move the rack to the center or top third of the oven. |
| Sunken Center | Underbaked or old baking powder | Bake until a toothpick is dry; check leavening expiration date. |
Common Mistakes Checklist
- ✓ Ensure the oven is fully preheated before the pan goes in; a cold oven leads to a flat bake.
- ✓ Do not skip the 5 minute rest; this is the secret to a uniform rise.
- ✓ Avoid over greasing with oil; butter provides the best flavor and browning.
- ✓ Use a metal baking sheet; glass or ceramic takes too long to heat up and will change the texture.
Creative Flavor Additions and Healthy Recipe Variations
Once you have the base down, you can treat this like a blank canvas. The beauty of the sheet pan is that you can actually divide the toppings. One half can be chocolate chips for the kids, while the other half is fresh berries and zest for the adults.
Customizing Your Batter
If you want to add mix ins, sprinkle them on top after you have poured the batter into the pan but before the 5 minute rest. This prevents the fruit or chocolate from sinking to the very bottom and burning against the hot metal.
- Blueberry Lemon: Add 1 cup of fresh berries and the zest of one lemon.
- Cinnamon Swirl: Mix 2 tbsp melted butter with 1/4 cup brown sugar and 1 tsp cinnamon; drizzle over the batter and swirl with a knife.
- Savory Style: Omit half the sugar and add chopped cooked bacon and shredded cheddar cheese.
Decision Shortcut
- If you want extra crispy edges, preheat the empty baking sheet for 2 minutes before buttering and adding batter.
- If you want a healthier twist, swap half the flour for whole wheat pastry flour for added fiber.
- If you want maximum fluff, separate the egg whites, whip to soft peaks, and fold them in at the very end.
Smart Storage Tips and Zero Waste Kitchen Hacks
These squares are a meal prepper's dream. Unlike traditional pancakes that get floppy in the fridge, the structure of these baked squares holds up incredibly well to reheating.
- Fridge
- Store in an airtight container for up to 5 days. Place a piece of parchment paper between layers to prevent sticking.
- Freezer
- Flash freeze the squares on a tray for 1 hour, then transfer to a freezer bag. They stay fresh for up to 3 months.
- Reheating
- Avoid the microwave if possible, as it can make them chewy. Instead, pop them in a toaster oven or the big oven at 350°F (180°C) for 5 minutes to restore the crispy edges.
Zero Waste Tip: If you have leftover scraps or edges that didn't get eaten, don't toss them! Chop them into cubes, toss with a little cinnamon sugar, and bake them at a low temp until they are crunchy. They make incredible "pancake croutons" for a yogurt bowl or a fun snack for the kids.
Beautiful Serving Ideas for the Perfect Morning Spread
The visual appeal of a perfectly sliced grid of pancakes is hard to beat. I like to use a pizza cutter for this it gives you those clean, sharp lines that look professional. Dust the whole sheet with powdered sugar through a fine mesh sieve right before you bring it to the table for a "snow covered" effect.
Achieving the Perfect Presentation
Instead of just putting a bottle of syrup on the table, try warming the syrup in a small saucepan with a sprig of rosemary or a cinnamon stick. This small touch changes the entire aroma of the meal. Serve the squares on a large wooden board with bowls of fresh fruit, Greek yogurt, and maybe some nut butter for dipping.
Cutting and Portioning Techniques
For the best look, trim a very thin sliver off the four outer edges of the giant pancake. This reveals the beautiful internal crumb structure. Then, cut the remaining rectangle into 8 large squares or 16 smaller "pancake sticks." The sticks are particularly great for dipping into small ramekins of maple syrup or fruit compote.

Recipe FAQs
Can I make pancakes on a sheet pan in the oven?
Yes, it is the most efficient way to serve a crowd. Preheat your oven to 425°F and bake the batter in a parchment lined 18x13-inch rimmed baking sheet for 15 minutes until golden brown.
Can you have pancakes with CKD?
Consult your nephrologist or registered dietitian for personalized advice. Dietary needs for CKD vary widely depending on your lab values, particularly regarding phosphorus and potassium intake from milk and flour.
Can a prediabetic have pancakes?
Yes, but portion control and pairing matter. Since this recipe uses all-purpose flour and sugar, consider serving a smaller portion alongside high protein or high fiber foods to manage your blood glucose response.
Do sheet pan pancakes taste the same as stove top pancakes?
Yes, they share the exact same flavor profile. The primary difference is texture; because you are baking at 425°F on a buttered surface, you get a more consistent, slightly crispier edge across the entire batch compared to pan-frying.
How to avoid a rubbery texture in my pancakes?
Fold the batter until just combined, stopping as soon as white streaks vanish. Over mixing develops excess gluten, which turns the batter tough; if you enjoyed mastering this gentle folding technique, it is the same principle used to keep our Zebra Layer Cake light and airy.
Why did my pancakes end up with a pale top and burnt bottom?
Move your oven rack to the center or top third of the oven. The heat source may be too close to the bottom of the pan, causing the butter to darken before the top has a chance to turn golden.
How to fix a sunken center after baking?
Verify your baking powder is not expired and ensure the pancake is fully baked. If a toothpick inserted into the center does not come out clean after the 15-minute bake time, the leavening agent may have failed or the batter needs more time to set.
Fluffy Sheet Pan Pancakes
Ingredients:
Instructions:
Nutrition Facts:
| Calories | 362 kcal |
|---|---|
| Protein | 8.8 g |
| Fat | 15.6 g |
| Carbs | 45 g |
| Fiber | 1.2 g |
| Sugar | 9.4 g |
| Sodium | 448 mg |
