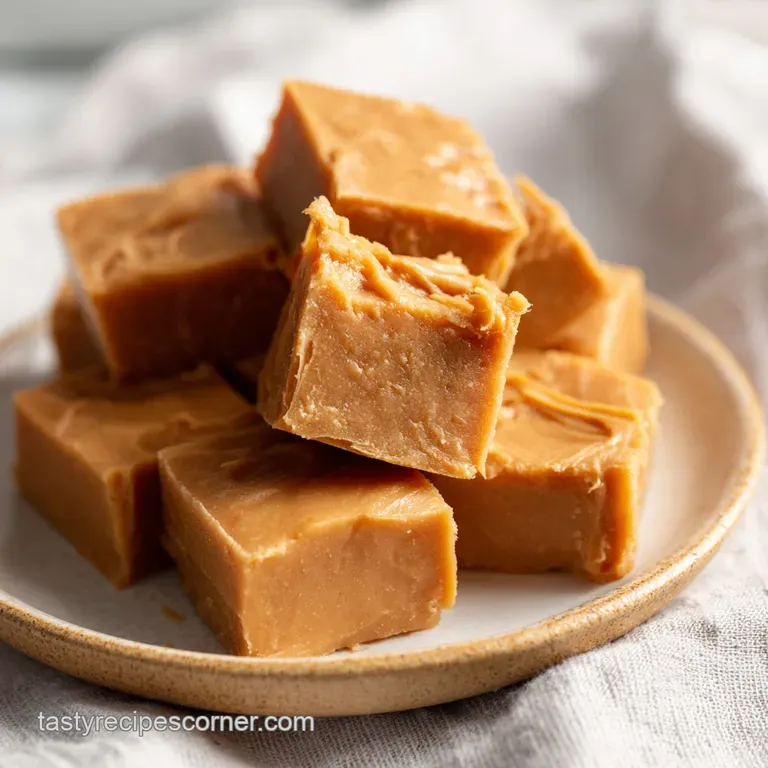
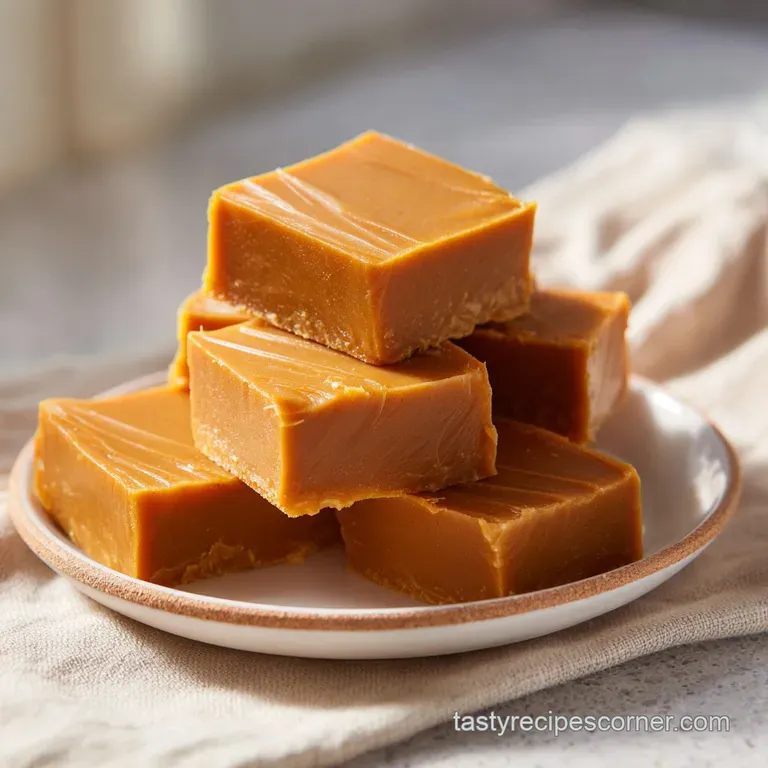
Peanut Butter Fudge: Velvety & Simple
- Time: Active 10 minutes, Passive 2 hours, Total 2 hours 10 mins
- Flavor/Texture Hook: Deeply nutty with a velvety, melt away finish
- Perfect for: Holiday gifting, last minute gatherings, or beginner confectioners
- Why This Peanut Butter Fudge Works
- Critical Recipe Specs and Checkpoints
- Selecting the Best Ingredients
- Necessary Tools and Gear
- The Step-by-Step Method
- Avoiding Common Cooking Blunders
- Simple Ingredient Adaptations
- Storage and Sustainability Tips
- Creative Serving Suggestions
- Recipe FAQs
- 📝 Recipe Card
Why This Peanut Butter Fudge Works
Imagine the heavy, sweet scent of warm nut butter swirling into a pool of golden, melted butter. It’s that specific aroma that hits you the second the heat touches the pan, signaling something truly decadent is on the way.
I remember the first time I attempted a fudge without a plan; I thought I could just wing the sugar ratios. I ended up with a tray of gritty, crumbly blocks that tasted like sweet sand. It was a disaster, but it taught me that the secret isn't just in the stirring it's in the chemistry.
This specific version is my go to because it removes the "anxiety" factor of traditional candy making. We’ve all been there, hovering over a bubbling pot with a thermometer, praying for the "soft ball stage" to arrive before the whole thing burns.
By using sweetened condensed milk, we’re starting with a sugar that is already dissolved and stabilized. It creates a foolproof bridge between the fats and the solids, resulting in a slab that is firm enough to slice but soft enough to dissolve on your tongue.
We're aiming for that signature "shatter" when you first bite into a chilled piece, followed immediately by a silky, buttery transition. It’s the kind of treat that makes people ask for the recipe before they’ve even finished their first square.
Trust me, once you see how easy it is to get that professional finish at home, you’ll never look at store-bought fudge the same way again.
Molecular Bonding: The condensed milk provides a concentrated sugar syrup that prevents the peanut butter proteins from seizing, ensuring a smooth suspension.
Fat Stabilization: Using 115g of unsalted butter introduces milk solids that coat sugar crystals, effectively "lubricating" the mixture so it feels velvety rather than gritty.
Thermal Inertia: The high fat content from the 540g of peanut butter allows the fudge to set gradually at room temperature, which prevents the formation of large, crunchy sugar jaggedness.
| Thickness | Set Time | Texture | Visual Cue |
|---|---|---|---|
| 1.5 cm | 1 hours | Soft/Chewy | Matte surface |
| 2.5 cm | 2 hours | Firm/Fudgy | No fingerprint dent |
| 4.0 cm | 4 hours | Dense/Traditional | Clean knife pull |
Choosing the right thickness changes the entire experience of the candy. A thinner slab feels more like a snack, while a thick, 4 cm block feels like a luxury confection you'd find in a high end boutique. If you're looking for something with a bit more chew, you might even find that this base reminds you of the texture in my Peanut Butter Cookies recipe, though much more concentrated.
Critical Recipe Specs and Checkpoints
| Component | Science Role | Pro Secret |
|---|---|---|
| Peanut Butter | Emulsifier & Flavor | Use shelf stable brands to avoid oil separation during the heating process. |
| Condensed Milk | Crystalline Inhibitor | Scrape the can completely; the residual sugar at the bottom is vital for the set. |
| Confectioners’ Sugar | Structural Body | Sift twice to remove any compacted lumps that won't dissolve in the warm base. |
Getting the specs right is the difference between a treat that stays firm at room temperature and one that turns into a puddle. For instance, the 115g of butter needs to be unsalted so you can control the seasoning perfectly with that 2g of sea salt.
If you use salted butter, the flavor becomes one dimensional and overly sharp.
Selecting the Best Ingredients
- 540g creamy peanut butter: Choose a standard commercial brand (like Jif or Skippy) rather than "natural" styles. Why this? Natural oils separate too easily, causing a greasy film on your finished fudge.
- 396g sweetened condensed milk: This is exactly one standard can. Why this? It provides the moisture and pre dissolved sugar needed for a silky, non grainy set.
- 115g unsalted butter: high-quality European style butter works best here. Why this? Lower water content means a more stable, rich emulsion in every single bite.
- 450g confectioners’ sugar: Must be sifted before measuring. Why this? This provides the structure that allows the fudge to hold its shape when sliced.
- 10ml pure vanilla extract: Avoid artificial vanillin if possible. Why this? The alcohol in pure extract helps carry the aroma of the nut butter further.
- 2g fine sea salt: Don't use coarse kosher salt here. Why this? Fine grains dissolve instantly, highlighting the sweetness without leaving salty "hot spots."
| Original Ingredient | Substitute | Why It Works |
|---|---|---|
| Creamy Peanut Butter | Smooth Almond Butter | Similar fat profile. Note: Result will be slightly less firm and more oily. |
| Confectioners’ Sugar | Powdered Swerve | Good for low carb needs. Note: Has a cooling aftertaste and sets much harder. |
| Pure Vanilla Extract | Maple Syrup | Adds a woodsy depth. Note: Increases moisture slightly; may need longer chill time. |
When you're choosing your ingredients, remember that the shortcut method relies on the stability of processed goods. While I usually love fresh ground nut butter for my Peanut Butter Banana recipe, here it’s actually a hindrance. The stabilizers in commercial peanut butter are what keep this fudge from weeping oil on a warm day.
Necessary Tools and Gear
You don't need a massive laboratory for this, but a few specific items make the process seamless. A heavy bottomed saucepan is non negotiable. Thin pans create hot spots that can scorch the milk solids in the butter, giving your fudge a burnt, bitter aftertaste.
You’ll also want a sturdy silicone spatula the kind that is one solid piece so you can really scrape the corners of the pan as the mixture thickens.
Prepare an 8x8 inch (20x20 cm) baking pan by lining it with parchment paper. Leave an extra inch of paper hanging over the sides; these "handles" are your best friend when it comes time to lift the set slab out for slicing.
Without them, you’re stuck digging pieces out with a knife, which ruins those beautiful, clean edges we're aiming for.
The step-by-step Method
- Line the pan. Place parchment paper in an 8x8 inch pan with overhang on two sides. Note: This ensures the fudge doesn't stick and allows for easy removal later.
- Melt the butter. Place 115g butter in a heavy saucepan over medium low heat until completely liquid and bubbling slightly.
- Add the milk. Pour in 396g sweetened condensed milk and whisk until the mixture is uniform and shimmering.
- Heat the base. Stir constantly for 2 minutes until tiny bubbles form around the edges. Note: Do not let it reach a rolling boil or the texture will become tough.
- Incorporate the nut butter. Remove from heat and fold in 540g creamy peanut butter until no streaks of brown remain.
- Add aromatics. Stir in 10ml vanilla extract and 2g sea salt until the fragrance is released.
- Sift the sugar. Gradually fold in 450g confectioners’ sugar one third at a time. Note: Folding gently prevents the sugar from flying out of the pot and keeps the mixture airy.
- Smooth the surface. Transfer to the prepared pan and use an offset spatula to press it flat until the top is level and glossy.
- Chill to set. Refrigerate for at least 2 hours until the center is firm to the touch.
- Slice with precision. Lift the parchment handles and cut into 36 squares using a warm, dry knife.
Chef's Tip: For an incredibly smooth finish, pass your confectioners' sugar through a fine mesh sieve twice. It seems tedious, but it eliminates those tiny white "polka dots" that sometimes appear in the finished fudge.
Avoiding Common Cooking Blunders
If your fudge feels a bit oily on top, don't panic. This usually happens if the mixture was stirred too vigorously while it was too hot, which can "break" the emulsion of the peanut butter. You can often fix this by gently patting the surface with a paper towel before it fully sets.
Another common hiccup is graininess, which usually stems from the sugar not being fully incorporated or the milk being boiled for too long.
Fix Grainy Candy Mixtures
Graininess is the enemy of any good Peanut Butter Fudge. It happens when sugar crystals find a "seed" and start growing. To avoid this, make sure your saucepan is clean and you aren't scraping any dried bits from the sides of the pan back into the main mixture.
If it’s already grainy, you can sometimes save it by adding a teaspoon of warm water and stirring gently over very low heat to re dissolve the crystals, though the set might be slightly softer.
| Problem | Root Cause | Solution |
|---|---|---|
| Oily Surface | Mixture got too hot | Let it cool for 2 mins before adding the sugar. |
| Crumbly Texture | Too much sugar | Add 1 tbsp of condensed milk and stir over low heat. |
| Won't Set | Under heated milk | Return to pan and heat until it just starts to bubble. |
To keep things running smoothly, here is a quick checklist of things to keep in mind:
- ✓ Always sift your sugar; never assume it's lump free from the bag.
- ✓ Use medium low heat only; patience prevents scorching the dairy.
- ✓ Work quickly once the sugar is in, as it begins to firm up fast.
- ✓ Wipe your knife clean between every single cut for professional squares.
- ✓ Ensure the peanut butter is at room temperature before adding to the pot.
Simple Ingredient Adaptations
If you're looking to change things up, this recipe is surprisingly flexible. For those with a sweet and salty craving, topping the wet fudge with crushed pretzels or a handful of roasted peanuts provides a fantastic contrast to the velvety base. It reminds me of the crunch you get in a Peanut Butter Cornflake recipe, but with a much denser, richer foundation.
If you need a dairy-free version, you can substitute the butter with a high-quality vegan butter stick and use sweetened condensed coconut milk. Just be aware that the coconut version has a much lower melting point, so the fudge will need to stay in the fridge until the very moment you serve it.
The flavor will also have a distinct tropical note that pairs beautifully with the nut butter.
If you want X, do Y: If you want a crunchy texture, swap 100g of the creamy peanut butter for extra crunchy style. If you want a darker flavor, substitute the vanilla for 5ml of espresso concentrate.
If you want a cleaner snap, store the sliced fudge in the freezer for 20 minutes before serving.
Storage and Sustainability Tips
Storing this Peanut Butter Fudge is incredibly easy because the high sugar and fat content act as natural preservatives. In the fridge, it will stay fresh and fudgy for up to 3 weeks, provided it’s in an airtight container.
If you leave it uncovered, it will pick up "fridge smells" and the edges will start to dry out and become unpleasantly hard.
For long term storage, this treat freezes beautifully. Wrap the whole slab (or individual squares) in plastic wrap, then place them in a freezer bag. They’ll keep for 3 months. To eat, just let a square sit at room temperature for 10 minutes.
From a zero waste perspective, don't throw away the "scraps" from leveling the edges! You can crumble those off cuts over vanilla ice cream or fold them into a batch of brownie batter. Even the leftover condensed milk in the can can be swirled into your morning coffee or used as a binder for a 4 Ingredient Energy recipe.
| Fresh Method (Boiled) | Shortcut Method (Condensed Milk) | Outcome Difference |
|---|---|---|
| Requires thermometer | No special tools needed | Shortcut is more consistent. |
| High risk of graininess | Virtually impossible to grain | Shortcut is much smoother. |
| Longer cooling time | Sets in half the time | Fresh method has a deeper caramel note. |
Creative Serving Suggestions
Presentation is where you can really show off your personality. While I love a simple square, there's something so satisfying about dressing these up for guests. The way the light catches the slight oily sheen of a perfectly cut piece of fudge is pure food photography gold.
Plating Levels Table:
| Level | Style | Added Elements |
|---|---|---|
| Simple | Rustic | Served on a dark wooden board with a few loose peanuts. |
| Polished | Modern | Stacked in a "Jenga" tower on a white marble plate with sea salt. |
| Restaurant | Gourmet | Thin slices served with a dark chocolate ganache dip and gold leaf. |
For a truly elegant finish, try the "Restaurant" style. Slice the fudge into long, thin rectangles rather than squares. Place two on a plate, slightly overlapping. Drizzle a very thin line of melted dark chocolate across them and finish with a single flake of Maldon salt.
It transforms a simple home cooked candy into a sophisticated dessert that wouldn't look out of place at a high end bistro.
Chef's Note: If you want those razor sharp edges you see in bakeries, freeze the set fudge for 30 minutes before cutting. Use a long carving knife dipped in hot water and wiped dry between every single slice. The heat melts the fats just enough to let the blade glide through without dragging.
There's a common myth that you need to stir fudge constantly until it's cold. This actually introduces too much air and can cause premature crystallization. In reality, once the sugar is folded in and the mixture is smooth, you should stop.
Over working the fudge at this stage will lead to a dull, matte finish rather than the beautiful glossy sheen we want. Searing the butter or "browning" it also isn't necessary here; the goal is a clean, pure peanut flavor, not the nutty complexity of a beurre noisette.

Recipe FAQs
What do I need for peanut butter fudge?
Creamy peanut butter, sweetened condensed milk, unsalted butter, and confectioners' sugar. You also need vanilla and salt for flavor balance. Using creamy commercial peanut butter, not natural style, ensures the best texture for this no-fail method.
What are the common mistakes when making fudge?
Boiling the condensed milk mixture too vigorously or stirring after the sugar is added. Boiling too hard scorches the sugars, leading to a tough texture, while over stirring after the sugar is incorporated introduces air and encourages graininess.
What is the secret to making good fudge?
Stabilizing the sugar using sweetened condensed milk instead of relying on a candy thermometer. This technique pre-dissolves the necessary sugar, removing the risk of crystallization common in traditional candy making.
Is it true you must use a candy thermometer for this recipe?
No, this specific recipe is designed to avoid one. By using condensed milk, the heat time is significantly reduced, achieving the correct consistency by visual cues rather than precise temperature readings.
What is cowboy fudge?
Cowboy fudge typically refers to quick, no-fail fudge recipes often made without a thermometer. These often rely on evaporated milk or condensed milk bases, similar to this one, making it popular for camping or fast dessert needs.
How do I get perfectly clean, non-greasy slices?
Chill the fully set fudge in the refrigerator for at least two hours, then use a hot knife. Dip a long knife into hot water, wipe it dry, and use a steady, downward pressure for each cut. This process ensures a smooth glide through the fats and solids, similar to the precision needed for carving meat in our Garlic Butter Chicken recipe.
Can I substitute the creamy peanut butter with a natural style?
No, stick with shelf stable creamy peanut butter. Natural peanut butter has un-emulsified oil that separates when heated, leading to a greasy layer on top of your finished fudge.
Easy Peanut Butter Fudge

Ingredients:
Instructions:
Nutrition Facts:
| Calories | 196 kcal |
|---|---|
| Protein | 4.7 g |
| Fat | 11.1 g |
| Carbs | 21.5 g |
| Fiber | 0.9 g |
| Sugar | 19.8 g |
| Sodium | 99 mg |
