2-Ingredient Chocolate Mousse: Silky and Elegant
- Time: Active 10 minutes, Passive 120 minutes, Total 130 minutes
- Flavor/Texture Hook: Velvety, melt on-the tongue dark chocolate with a silky finish
- Perfect for: Sophisticated dinner parties, date nights, or effortless entertaining
- Mastering This Easy 2 Ingredient Mousse Recipe
- Understanding The Secret Science Of Aeration
- Selecting The Finest High Quality Components
- Essential Tools For A Flawless Finish
- The Step By Step Execution Process
- Resolving Common Texture And Stability Issues
- Elegant Variations For Sophisticated Palates
- Proper Storage And Freshness Guidelines
- Professional Presentation And Plating Techniques
- Recipe FAQs
- 📝 Recipe Card
Mastering This Easy 2 Ingredient Mousse Recipe
Chocolate mousse is the crown jewel of French bistro culture, a dessert that manages to be both humble and incredibly sophisticated at the same time. I remember sitting in a tiny, dimly lit cafe tucked away in a corner of the Marais in Paris, watching the waiter approach with a massive, chilled glass bowl.
There were no garnishes, no gold leaf, and no pretense. He simply used two large spoons to scoop a jagged, airy mountain of mousse onto a plate, and the scent of deep, fermented cacao immediately filled the air.
That single bite was a revelation. It wasn't overly sweet or heavy like the puddings I had grown up with; instead, it felt like a dark chocolate whisper that vanished the moment it touched my tongue. It had this incredible "shatter" of tiny air bubbles that felt like silk.
That experience taught me that the most impressive dishes often hide behind the fewest ingredients. When you strip everything away, you're left with the pure essence of the chocolate, and that's exactly what we are achieving here today.
This recipe is about the marriage of high-quality fats and air. We aren't using eggs or gelatin to cheat our way to a thick texture. Instead, we are relying on the natural stability of heavy cream and the firming power of cocoa butter.
It’s elegant, it’s decadent, and it’s the kind of dish that makes your guests wonder how you spent all day in the kitchen when, in reality, you were just folding two things together while listening to your favorite podcast.
Understanding The Secret Science Of Aeration
The magic behind this easy 2 ingredient mousse recipe lies in the structural integrity of the heavy whipping cream. When you whisk cream, you're essentially forcing air into a liquid filled with fat globules. These globules collide and partially "de emulsify," forming a protective wall around the air bubbles.
This is why using cream with at least 36% fat is non negotiable; lower fat content simply won't have enough "bricks" to build the walls of your mousse.
Crystalline Stability: The cocoa butter in your dark chocolate exists in a solid state at room temperature but becomes a fluid when heated. As the mousse chills for 120 minutes, the cocoa butter begins to re crystallize.
This process, known as thermal setting, provides the final structure that allows the mousse to hold its shape even after it leaves the cold fridge.
Emulsification Balance: Chocolate contains a natural emulsifier called lecithin. When we whisk a small portion of the whipped cream into the melted chocolate, we are creating a stable emulsion.
This prevents the fat in the cream from separating and ensures a velvety smooth mouthfeel rather than a greasy or grainy one.
Air Displacement: The act of folding is a physical process designed to preserve the air we worked so hard to incorporate into the cream. If we were to stir vigorously, the weight of the chocolate would collapse the air bubbles, resulting in a dense ganache rather than a light mousse.
| Method | Time | Texture | Best For |
|---|---|---|---|
| Stovetop Double Boiler | 8 minutes | Ultra glossy and even | Ensuring chocolate never scorched |
| Microwave Oven | 2 minutes | Thick and fast | Busy weeknights or quick cravings |
| Warm Water Bath | 15 minutes | Delicate and slow | Beginners who fear high heat |
The stovetop method is generally superior because it allows for total control over the heat. When chocolate hits its "seize" point from direct heat, it becomes a clumpy mess that no amount of whisking can save. By using a gentle steam, we keep the chocolate fluid and manageable.
Selecting The Finest high-quality Components
Since we are only using two ingredients, the quality of each is magnified. You can't hide a cheap, waxy chocolate behind piles of sugar here. You want a bar that you would happily eat on its own something with a high cocoa butter content and a complex flavor profile.
I typically look for a dark chocolate with at least 70% cocoa to ensure that intense, sophisticated bitterness that pairs so well with the sweetness of the cream.
| Component | Science Role | Pro Secret |
|---|---|---|
| Dark Chocolate (225g) | Structural base and flavor | Use bars, not chips; chips contain stabilizers that prevent a silky melt. |
| Heavy Cream (360ml) | Aeration and mouthfeel | Chill the bowl and whisk first to keep fat globules firm during aeration. |
For the cream, "heavy" is the . In some regions, this is called double cream. Whatever the name, check the nutrition label for that fat content. If you're looking for a slightly different flavor profile, you could check out this Espresso Martini Mousse which adds a caffeinated kick to the basic structure.
- 225g dark chocolate: Must be finely chopped to ensure it melts evenly without needing excessive heat. Why this? The higher cocoa percentage ensures a firm set without adding extra sugar.
- 360ml heavy whipping cream: Keep it in the coldest part of your fridge until the very second you are ready to whisk. Why this? Cold fat traps air more efficiently than room temperature fat.
Essential Tools For A Flawless Finish
You don't need a professional pastry kitchen to pull this off, but a few specific tools will make your life much easier. First, a heat proof glass bowl is your best friend. Glass retains heat gently, which helps keep the chocolate melted while you prep the cream.
Metal bowls can sometimes heat up too quickly, which risks "breaking" the chocolate.
A balloon whisk or an electric hand mixer is essential for getting the cream to that perfect soft peak stage. If you're doing it by hand, consider it your workout for the day. You’ll also need a large silicone spatula.
The flexibility of silicone allows you to scrape every bit of chocolate from the sides of the bowl, ensuring no waste and a perfectly homogeneous mixture.
If you're planning an entire menu around this dessert, something simple and savory like a 3 ingredient ravioli bake makes for a great, low effort dinner before serving this "wow" factor dessert.
Chef's Tip: Freeze your metal whisk attachment and your glass mixing bowl for 10 minutes before you start. This "cold chain" technique ensures your cream whips faster and stays more stable, preventing it from turning into butter if you accidentally go a few seconds too long.
The step-by-step Execution Process
- Finely chop 225g dark chocolate. Note: Smaller pieces melt faster and more evenly, preventing the edges from burning while the center is still solid.
- Melt the chocolate in a heat proof bowl over simmering water. Stir until the chocolate is completely melted and glossy. Note: Ensure the bottom of the bowl does not touch the water.
- Remove the chocolate from the heat and let it sit for 5 minutes. Wait until it is barely warm to the touch before proceeding. Note: If the chocolate is too hot, it will deflate the whipped cream instantly.
- Pour 360ml cold heavy cream into a chilled bowl. Whisk until soft peaks form and the whisk leaves a visible trail. Note: Soft peaks should gently flop over when you lift the whisk; over whipping will lead to a grainy mousse.
- Add one third of your whipped cream into the bowl of melted chocolate. Whisk vigorously until the mixture lightens and becomes uniform. Note: This "sacrificial" scoop of cream loosens the chocolate so the rest can be folded in gently.
- Switch to a silicone spatula. Add the remaining whipped cream to the chocolate base.
- Use a 'cut and fold' motion slice through the center and fold the bottom over the top. Fold until no white streaks remain and the mixture is a singular, rich brown color. Note: Stop immediately once mixed to keep the air trapped inside.
- Spoon the mixture into 4 ramekins or glass cups. Refrigerate for 120 minutes until the structure is firm and set.
- Before serving, let the mousse sit at room temperature for 5 minutes. This allows the flavors to bloom and the texture to soften slightly.
Resolving Common Texture And Stability Issues
The most common heartbreak in mousse making is the "split" or "grainy" texture. This usually happens for one of two reasons: either the chocolate was too hot when it met the cream, or the cream was over whipped into butter territory. If your mousse looks like wet sand rather than velvet, don't throw it out just yet!
Resolving Grainy Or Broken Texture
When the chocolate is too hot, it causes the fat in the cream to melt and separate. This creates a greasy, broken appearance. Alternatively, over whisking the cream breaks the fat membranes, leading to a gritty mouthfeel.
| Problem | Root Cause | Solution |
|---|---|---|
| Grainy Mousse | Over whipped cream or hot chocolate | Gently fold in 1 tablespoon of un whipped cream to smooth it out. |
| Soupy Mousse | Under whipped cream or lack of chilling | Chill for an extra 60 minutes or use as a rich chocolate sauce. |
| Seized Chocolate | Water droplets in the chocolate bowl | Add 1 teaspoon of vegetable oil and stir vigorously to emulsify. |
To ensure a perfect result every time, keep this checklist in mind as you work through the recipe. These small details are what separate a home cook from a pastry chef.
Common Mistakes Checklist - ✓ Pat your equipment completely dry; even a single drop of water can cause chocolate to seize and turn into a hard lump. - ✓ Test the chocolate temperature on your inner wrist; it should feel like a warm bath, not a hot stovetop.
- ✓ Stop whisking the cream the moment it looks like thick shaving cream don't wait for it to get stiff. - ✓ Use a large bowl for folding; a cramped space makes it impossible to preserve the air bubbles. - ✓ Avoid "stirring" in circles; always use the folding motion to keep the volume high.
Elegant Variations For Sophisticated Palates
While the 2 ingredient version is a purist's dream, you can easily adapt this base for different occasions. If you want a more complex profile, try adding a pinch of flaky sea salt or a dash of espresso powder to the melted chocolate. These don't change the chemistry, but they amplify the "chocolatey ness" of the dish.
| Original Ingredient | Substitute | Why It Works |
|---|---|---|
| Dark Chocolate | Milk Chocolate | Higher sugar/milk solids. Note: Result will be much softer and sweeter. |
| Heavy Cream | Coconut Cream (Full Fat) | Similar fat content. Note: Adds a distinct tropical flavor and may set firmer. |
| Dark Chocolate | White Chocolate | Cocoa butter base. Note: Requires more chilling time as white chocolate has less structure. |
When scaling this recipe, remember that volume isn't everything. If you are doubling the batch to serve 8 people, do not simply double the whisking time. The more cream you have in the bowl, the faster it can turn from soft peaks to butter due to the increased friction.
If you are cutting the recipe in half, use a smaller bowl for the cream. If the bowl is too large, the whisk won't be able to incorporate enough air into the small amount of liquid, and you'll end up with a flat, dense cream.
Proper Storage And Freshness Guidelines
This mousse is remarkably stable once it has set, making it a fantastic make-ahead option. Because the fat from the cream and the cocoa butter form a solid lattice, it won't "weep" or lose its shape as quickly as a mousse made with egg whites.
Fridge Storage: Keep the ramekins covered with plastic wrap to prevent the mousse from absorbing any "fridge smells" like onions or leftovers. It will stay fresh and velvety for up to 3 days. After that, the cream may begin to lose its aeration and become slightly more dense.
Freezer Instructions: Believe it or not, this mousse freezes beautifully. It essentially becomes a rich, aerated ice cream. Freeze for up to 1 month. To serve, let it thaw in the fridge for about 30 minutes so it regains its signature "give."
Zero Waste Tip: If you find yourself with leftover mousse, don't let it go to waste! You can use it as a decadent cake filling or even whisk it into your morning coffee for a DIY mocha. If the mousse has lost its air and flattened, it can be gently reheated and used as a pourable ganache for ice cream.
Professional Presentation And Plating Techniques
Presentation is where you can really lean into that "achievable elegance" vibe. Instead of just serving it in a bowl, think about the vessel. A vintage coupe glass or a crystal whiskey tumbler instantly elevates the experience. The way the dark chocolate contrasts against clear glass is inherently beautiful.
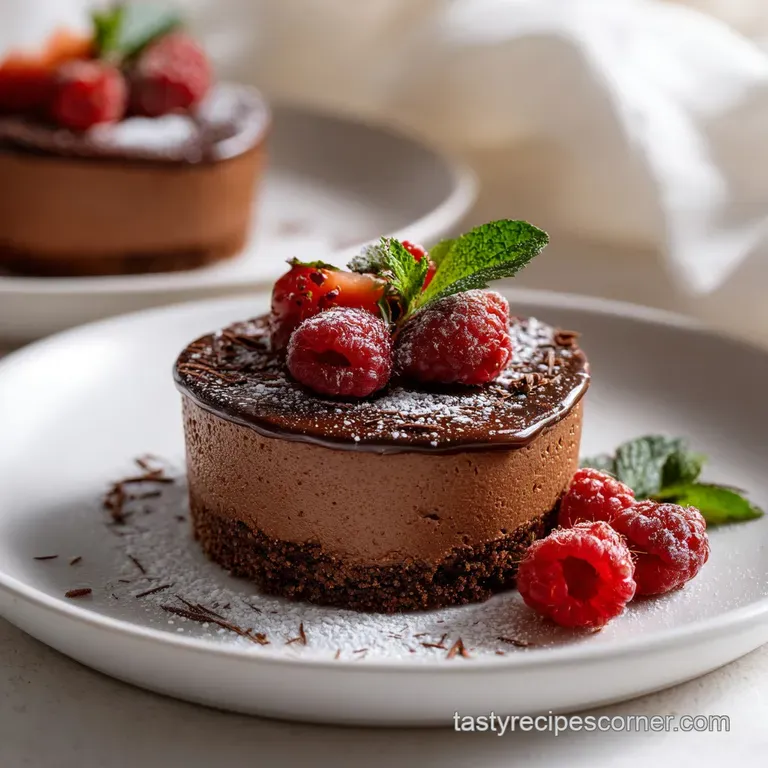
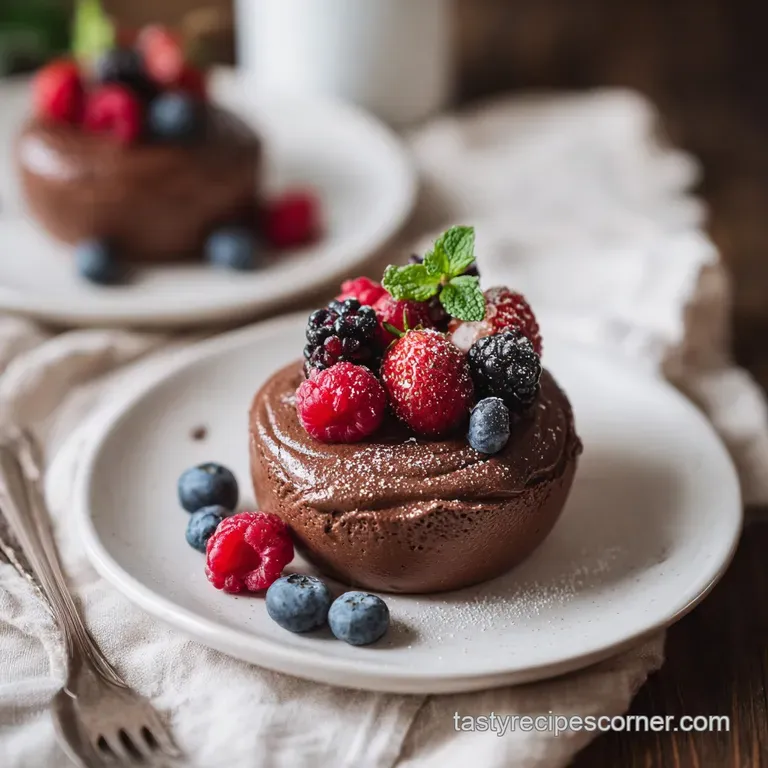
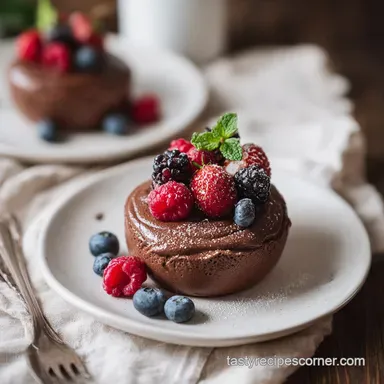
For a professional finish, use a hot spoon to create a smooth "quennelle" (an oval shape) or simply use a piping bag with a star tip for a nostalgic bistro look. A single raspberry or a very thin shaving of white chocolate provides a pop of color that breaks up the deep brown of the mousse.
I often tell my friends that the best part of this recipe is the "shatter." When your spoon first breaks the surface, you should hear a tiny, delicate crackle of air bubbles. That is the sound of a perfectly executed mousse.
Serve it with a crisp biscuit or just on its own, and let the simplicity of the ingredients speak for themselves. It’s elegant, it’s effortless, and it’s a baking secret you’ll use for the rest of your life.

Recipe FAQs
How to make 2 ingredient mousse?
Melt 225g of chopped dark chocolate over a double boiler until glossy, then let it cool until barely warm. Whisk 360ml of heavy cream to soft peaks, fold one-third into the chocolate to lighten it, then gently fold in the remaining cream and refrigerate for 2 hours.
How do you make 3 ingredient mousse?
This recipe strictly utilizes only two high-quality ingredients to achieve its signature airy texture. By focusing on the fat content in the dark chocolate and heavy cream, you avoid the need for extra stabilizers.
How to make basic mousse?
Focus on the 'cut and fold' motion with a silicone spatula when combining your whipped cream and chocolate. If you enjoyed mastering the emulsification of fats here, you will find the same principles of stability essential when preparing other delicate, air-incorporated desserts.
What dessert can I make in 10 minutes?
Prepare the base for this mousse in under 10 minutes of active work. While the final set requires 120 minutes of refrigeration, the actual assembly is incredibly efficient for last minute entertaining.
Is it true I must use eggs to get a stable mousse?
No, this is a common misconception. You can achieve a perfectly stable, cloud like structure using only high-quality dark chocolate and 36% fat heavy cream without needing eggs.
Why is my mousse grainy?
Check your chocolate temperature before folding it into the cream. If the chocolate is too hot, it will melt the fat in the whipped cream, causing the mixture to separate and lose its smooth, silky finish.
Can I store this mousse overnight?
Yes, you can prepare it up to 24 hours in advance. Covering the ramekins tightly helps maintain the texture, and the longer chill time ensures the cocoa butter sets the structure firmly.
Easy 2 Ingredient Chocolate Mousse
Ingredients:
Instructions:
Nutrition Facts:
| Calories | 642 kcal |
|---|---|
| Protein | 6.9 g |
| Fat | 56.5 g |
| Carbs | 28.3 g |
| Fiber | 6.1 g |
| Sugar | 15.9 g |
| Sodium | 28 mg |
