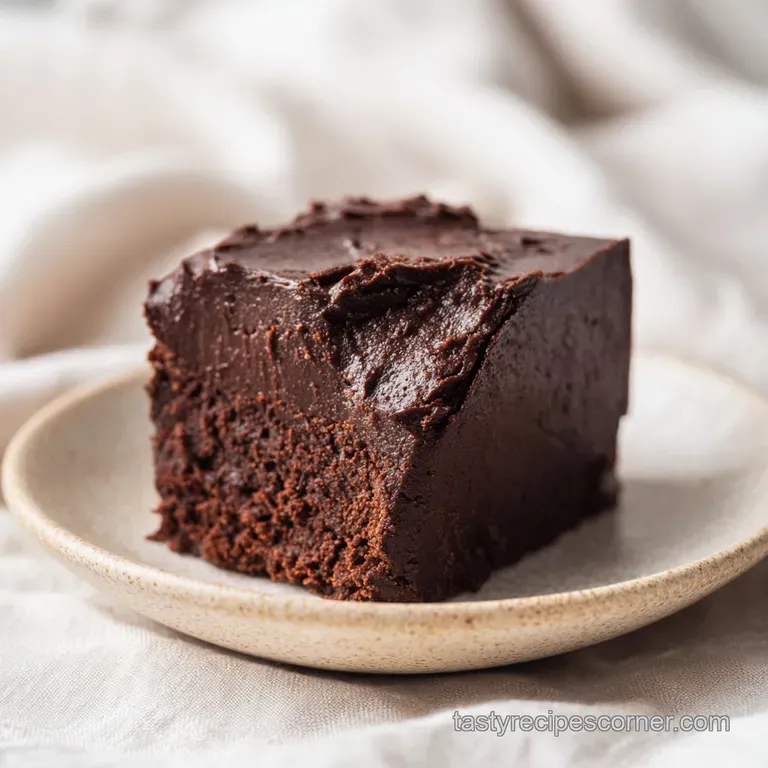
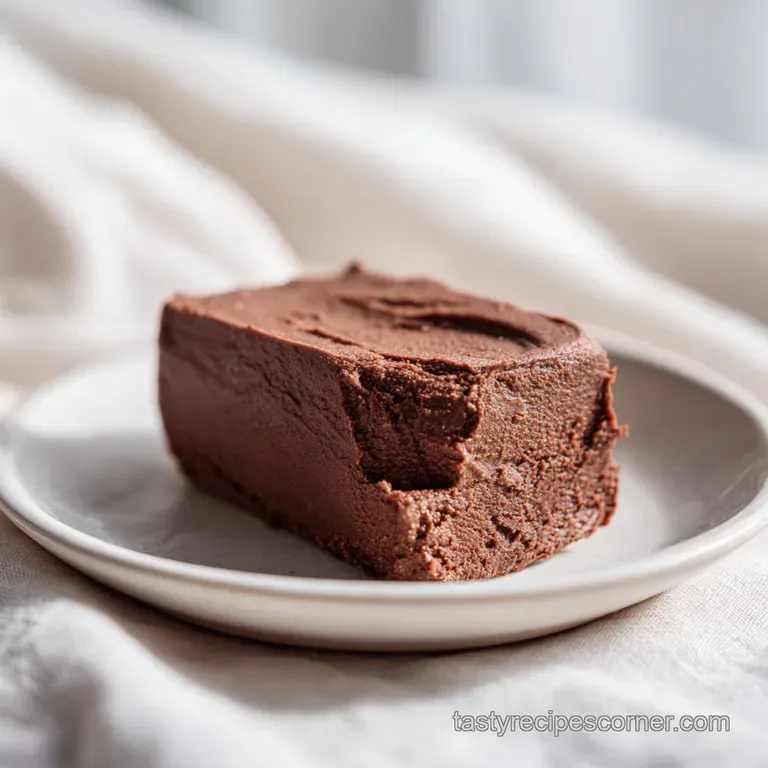
2 Ingredient Chocolate Fudge: Velvety and Smooth
- Time: Active 5 minutes, Passive 2 hours, Total 2 hours 7 mins
- Flavor/Texture Hook: Deeply chocolaty with a velvety, melt away finish and a satisfying snap.
- Perfect for: Elegant gifting, holiday dessert platters, or satisfying a late night craving with minimal effort.
- Master the Ultimate easy 2 ingredient chocolate fudge recipe
- Reliable Texture and Finish Specs
- The Science of Concentrated Ingredients
- Essential Tools for Chocolate Success
- Step-by-Step Directions to Success
- Solving Common Texture Issues
- Tailoring the Recipe for Groups
- Creative Additions for Every Palate
- Proper Storage and Cold Tips
- Elegance Through Smart Garnish Choice
- Recipe FAQs
- 📝 Recipe Card
Master the Ultimate easy 2 ingredient chocolate fudge recipe
The history of fudge is actually a happy accident rooted in American college culture. Legend has it that in 1888, a student at Vassar College "fudged" a batch of caramels, resulting in a grainy, soft, and utterly irresistible new confection.
While traditionalists still stand by their candy thermometers and copper pots, the modern home cook knows that we can achieve that same luxurious density with a fraction of the stress.
This specific method relies on the stable emulsion of sweetened condensed milk to skip the "soft ball stage" entirely, giving you a foolproof result every single time.
When you bite into this, you aren't met with the sticky, cloying sweetness of store-bought alternatives. Instead, there is a clean shatter as your teeth break the chilled surface, followed immediately by a velvety melt that coats the palate. It is a sophisticated experience that belies the simplicity of the process.
I remember the first time I served this at a holiday gathering; guests were convinced I had spent hours over a hot stove, monitoring temperatures like a chemist. I just smiled and offered them another square.
We are aiming for achievable elegance here. The beauty of this recipe lies in the contrast between the dark, rich cocoa notes and the milky, caramelized undertones of the condensed milk.
By using semi sweet chips, we maintain a balance that isn't overly sugary, making it the ideal canvas for high end garnishes like flaky sea salt or even edible gold leaf. Whether you are a seasoned baker or someone who rarely ventures into the kitchen, this is the one recipe that will make you feel like a professional chocolatier.
Reliable Texture and Finish Specs
To ensure your batch turns out with that signature professional finish, it helps to understand the different paths you can take. While the microwave is our primary tool for speed, the stovetop offers a bit more control for those who enjoy the process.
| Method | Time | Texture | Best For |
|---|---|---|---|
| Microwave | 2 minutes | Silky and consistent | Speed and convenience |
| Stovetop | 5-7 minutes | Dense and glossy | Beginners who want to watch the melt |
| Slow Cooker | 1 hours | Soft and spreadable | Large batches for parties |
Regardless of the method, the chemistry remains the same. We are combining a fat heavy solid with a sugar saturated liquid to create a shelf stable ganache. This version is significantly more stable than "classic" fudge because the condensed milk has already undergone the evaporation process, meaning most of the water is gone.
This prevents the dreaded "grainy" texture that occurs when sugar crystals grow too large during the cooling phase.
The Science of Concentrated Ingredients
Understanding the "why" behind your ingredients makes you a better cook. In this recipe, we aren't just mixing things together; we are performing a specific type of food science. Sweetened condensed milk is the secret weapon here because it acts as both the sweetener and the stabilizer, preventing the chocolate from seizing or becoming brittle.
| Ingredient | Science Role | Pro Secret |
|---|---|---|
| Semi Sweet Chips | Provides structure via cocoa butter | Use chips with at least 60% cacao for a darker, less sweet bite. |
| Condensed Milk | Prevents sugar crystallization | Ensure it is "Full Fat" to provide the necessary lipids for a velvety mouthfeel. |
| Residual Heat | Completes the melting process | Stop heating when 10% of chips remain solid to avoid scorching the chocolate. |
Chef's Tip: To deepen the chocolate profile without changing the texture, add a teaspoon of instant espresso powder to the condensed milk before heating. It won't taste like coffee, but it will make the chocolate taste "more like itself."
Essential Tools for Chocolate Success
You don't need a pantry full of specialized equipment to master this easy 2 ingredient chocolate fudge recipe. However, a few specific choices will make the process smoother and the cleanup nearly non existent.
A heavy glass bowl is superior to plastic because it retains heat longer, allowing the residual energy to melt those final stubborn chips without further microwaving.
For the pan, a standard 8x8-inch square baking dish is the gold standard. If you want thinner, bite sized pieces for a large crowd, you could use a 9x9-inch pan, but the thickness is what gives fudge its decadent character.
I always reach for a silicone spatula rather than a wooden spoon; the silicone doesn't hold onto moisture and allows you to scrape every last bit of glossy chocolate from the sides of the bowl.
Finally,, do not skip the parchment paper. While greasing a pan might seem easier, parchment handles allow you to lift the entire block of fudge out at once. This results in clean, sharp edges when you slice it, rather than mangled corners from trying to dig the first piece out with a knife.
step-by-step Directions to Success
- Prepare the vessel. Line an 8x8-inch square baking pan with parchment paper. Note: Leave a 2 inch overhang on two sides to act as handles for easy removal later.
- Combine components. Place 3 cups (525g) semi sweet chocolate chips and 1 can (14 oz / 397g) full fat sweetened condensed milk into a large microwave safe glass bowl.
- Begin the melt. Microwave the mixture on high for 30 seconds. Stop when you hear the first faint sizzle of the milk.
- First agitation. Stir the mixture vigorously with a silicone spatula for 15 seconds. Note: The chips won't be melted yet, but you are distributing the heat.
- Second burst. Microwave for another 30 seconds. The mixture will look thick and lumpy at this stage.
- Final stir. Stir again until the mixture becomes 90% smooth. If significant lumps remain, give it one last 15 second burst.
- Smooth the surface. Pour the glossy mixture into the prepared pan. The batter should flow like thick lava.
- Level and de gas. Use an offset spatula to smooth the top. Tap the pan firmly on the counter three times to release any trapped air bubbles that could cause internal gaps.
- Chill to set. Refrigerate for at least 2 hours. Wait until the center feels firm and resistant to a light finger press.
- Slice with precision. Lift the fudge out using the parchment handles. Slice into 24 even squares using a sharp knife dipped in hot water and wiped dry between every cut.
If you are looking for another chocolate heavy treat to round out a dessert table, these Peanut Butter Balls provide a fantastic textural contrast with their creamy interior and crisp outer shell.
Solving Common Texture Issues
Even with only two ingredients, things can occasionally go sideways if the temperature isn't managed correctly. The most common pitfall is overheating the chocolate, which causes the cocoa butter to separate from the solids, leaving you with an oily, grainy mess.
If you notice the mixture looking "dull" or "shaggy" instead of glossy, it’s likely too hot.
Why Your Fudge Is Soft
If your fudge stays tacky even after three hours in the fridge, it usually means the ratio was slightly off or the condensed milk wasn't full fat. low-fat or "lite" versions have a higher water content, which prevents a firm set.
You can sometimes save a soft batch by folding in an extra half cup of melted chocolate and re chilling.
Dealing With Seized Chocolate
Chocolate "seizes" when a tiny amount of moisture (like a drop of water from a wet spoon) enters the melting fat. This causes the sugar and cocoa to clump together. To fix this, you can actually add a teaspoon of boiling water and stir vigorously; it seems counterintuitive, but the extra liquid helps re emulsify the sugar.
| Problem | Root Cause | Solution |
|---|---|---|
| Grainy Texture | Sugar crystals grew too large | Ensure you use condensed milk, not evaporated milk. |
| Oily Surface | Overheated chocolate | Stir in a tablespoon of room temp condensed milk to cool it quickly. |
| Sticky Bottom | Poor pan preparation | Always use parchment paper handles; never just grease the pan. |
Common Mistakes Checklist
- ✓ Avoid "Evaporated Milk" it lacks the sugar density needed for this set.
- ✓ Never use a wet bowl or spatula even one drop of water can seize the entire batch.
- ✓ Don't walk away from the microwave 10 seconds too long can scorch the milk.
- ✓ Use a sharp, hot knife for slicing this prevents the fudge from squishing as you cut.
- ✓ Let it chill completely cutting too early results in "slumped" edges.
Tailoring the Recipe for Groups
Scaling this recipe is straightforward because the ingredients are sold in standard sizes. If you are making this for a large wedding favor or a massive holiday party, you can easily double the batch. However, when doubling, do not double the microwave time linearly.
Instead of 30 second bursts, stick to 45 second bursts to ensure the center of the larger mass is getting heat without the edges burning.
For those who want a more complex flavor profile, you might want to look at a Baklava Fudge recipe, which introduces nuts and honey for a completely different vibe. When scaling down (if you only want a tiny treat), use a loaf pan instead of an 8x8-inch square to maintain the thickness.
When doubling the recipe, keep the salt and extracts (if using) to about 1.5 times the original amount. Flavors tend to amplify in larger volumes, and you don't want to overwhelm the palate.
If you find the mixture is getting too thick to stir while doubling, you can add a tablespoon of heavy cream to help loosen the emulsion without ruining the final set.
Creative Additions for Every Palate
Once you have mastered the base of this easy 2 ingredient chocolate fudge recipe, the variations are endless. You can swap the semi sweet chips for white chocolate or butterscotch chips, though keep in mind that white chocolate has a lower melting point and requires even shorter microwave bursts to prevent burning.
| Original Ingredient | Substitute | Why It Works |
|---|---|---|
| Semi Sweet Chips | White Chocolate Chips | Sweeter, creamier profile. Note: Sets softer than dark chocolate. |
| Condensed Milk | Coconut Condensed Milk | dairy-free alternative. Note: Adds a distinct tropical nutty flavor. |
| Standard Milk | Dark Chocolate (70%) | Much richer, less sweet. Note: Requires 1/4 cup extra milk for smoothness. |
Chef's Tip: Freeze your mix ins (like walnuts or crushed candy canes) for 10 minutes before folding them into the hot fudge. This prevents them from melting and streaking the chocolate, keeping the colors sharp and the textures distinct.
Proper Storage and Cold Tips
Fudge is remarkably hardy. Because of the high sugar and fat content, it doesn't spoil quickly. You can keep this at room temperature in an airtight container for up to one week, but for the best "snap" and texture, I always recommend fridge storage. In the refrigerator, it will stay fresh for up to three weeks.
For long term storage, fudge freezes beautifully. Wrap the entire block in plastic wrap, then a layer of foil, and place it in a freezer bag. It will last for three months. To serve, let it thaw in the fridge overnight.
Never thaw fudge at room temperature on a humid day, or you will end up with "sweat" (condensation) on the surface, which makes it sticky.
Zero Waste Tip: If you have crumbs or small "off cuts" from slicing your squares, don't throw them away. Put them in a jar and keep them in the fridge. They are incredible when dropped into a mug of hot milk for a "fudge hot cocoa" or melted down and drizzled over vanilla bean ice cream.
You can also pulse the scraps in a food processor and roll them into "fudge truffles" coated in cocoa powder.
Elegance Through Smart Garnish Choice
Since we are focusing on color balance and achievable elegance, the final look of your fudge is just as important as the taste. The dark mahogany of the chocolate needs light and vibrancy to truly "wow" your guests. I recommend three specific color accents to transform this from a simple snack into a gourmet gift.
First, add Flaky Sea Salt (White). Sprinkle this over the top immediately after pouring the fudge into the pan, before it sets. The white crystals pop against the dark chocolate and provide a necessary savory counterpoint. Second, use Freeze Dried Raspberry Dust (Red/Pink).
Once the fudge is set and sliced, lightly sift this over the squares. The vibrant red adds a sophisticated acid note that cuts through the richness. Finally, for a true showstopper, apply a few flecks of Edible Gold Leaf (Gold). Add this only after the fudge is sliced and ready to serve.
Use tweezers to place it; the gold doesn't add flavor, but it communicates a level of luxury that makes the 2 minute cook time our little secret.
Remember to add your "wet" garnishes (like nuts or swirls) while the mixture is hot, but save your "delicate" garnishes (like the raspberry dust or gold) for the very end. This ensures the colors remain bright and the textures don't get lost in the cooling process.
This recipe is your foundation treat it like a canvas and let your creativity take over. Don't forget that the best fudge is the one shared with friends, preferably alongside a strong cup of coffee or a glass of cold milk. Happy "fudging"!

Recipe FAQs
Is it true I must use a double boiler to prevent burning?
No, this is a common misconception. You can achieve a smooth texture in the microwave by heating in 30-second intervals and stirring vigorously between each burst to distribute the heat.
How to ensure the fudge sets with a clean, professional finish?
Refrigerate the mixture for at least 2 hours until the center feels firm. For perfect slices, dip your knife in hot water and wipe it dry before cutting to prevent the edges from dragging or squishing.
Why is my fudge grainy or seized?
Water contamination is the likely cause. Even a single drop of water in your bowl or on your spatula can cause chocolate to seize, so ensure all equipment is perfectly dry before starting.
Can I use evaporated milk instead of sweetened condensed milk?
No, avoid evaporated milk entirely. It lacks the necessary sugar density and fat content to create a solid set, much like how the precise fat ratios are critical for the structure of traditional cookies.
How to remove the fudge from the pan easily?
Line your 8x8-inch pan with parchment paper so it leaves a 2 inch overhang on two sides. Use these flaps as handles to lift the entire block of fudge out of the pan once chilled.
How to know if the mixture is melted enough?
Stop microwaving when the mixture is 90% smooth. Continue stirring off the heat; the residual warmth will melt the remaining chips without the risk of scorching the milk.
How to store leftover fudge?
Keep it in an airtight container in the refrigerator. It stays fresh for up to two weeks, or you can freeze it for up to three months if wrapped tightly in plastic wrap.
Easy 2 Ingredient Chocolate Fudge

Ingredients:
Instructions:
Nutrition Facts:
| Calories | 157 kcal |
|---|---|
| Protein | 2.2 g |
| Fat | 7.1 g |
| Carbs | 23 g |
| Fiber | 1.1 g |
| Sugar | 20.4 g |
| Sodium | 21 mg |
