Blooming Onion Recipe: Ultimate Crispy Pub-Style Appetizer

- Unveiling the Mighty Pub-Style Blooming Onion: Appetizer Perfection
- The Science of Crunch: Why Our Blooming Onion Recipe Delivers
- Essential Components: Ingredients for the Ultimate Blooming Onion
- Mastering the Technique: Step-by-Step Instructions for the Perfect Bloom
- Pro Chef's Notes: Troubleshooting Your Blooming Onion
- Storage and Preparation: Making This Appetizer Ahead of Time
- Presentation and Pairing: How to Serve a Spectacular Appetizer
- Recipe FAQs
- 📝 Recipe Card
Unveiling the Mighty Pub-Style Blooming Onion: Appetizer Perfection
Have you ever had one of those truly legendary pub appetizers? The kind that lands on the table, still sizzling gently, smelling impossibly savoury and slightly spicy? That's what we’re making today, transforming a simple onion into a crispy, colossal 'flower' ready for diving into.
It’s not just an appetizer; it’s a brilliant showstopper.
People often think this is complicated, like some deep fried culinary magic trick reserved only for steakhouse chains. Nope. This recipe is a genuine lifesaver for weekend entertaining because it takes one cheap ingredient a colossal Spanish onion and delivers maximum flavour payoff for minimal effort.
It will seriously impress your guests every single time.
I’ve spent years perfecting the coating, ditching the weak, plain flour bath for a serious, aggressive double dredge that guarantees tremendous crunch. Forget those soggy, sad attempts you see online; we're building a structural masterpiece meant to hold up to the dipping.
Let’s crack on and master the proper pub-style Blooming Onion.
The Science of Crunch: Why Our Blooming Onion Recipe Delivers
What Makes This Recipe Truly 'Pub-Style'?
The real secret to moving this from 'fried vegetable' to 'iconic pub grub' lies in the aggressive seasoning. We aren't being shy here. We load the dry coating with smoked paprika, garlic, and cayenne, giving it that smoky, salty, addictive bite you crave.
This intense flavour profile demands the rich, zesty dipping sauce we pair it with.
A Brief History of the Iconic Onion Bloom
The Blooming Onion, or sometimes the Onion Blossom, exploded in popularity in the US in the 1980s, becoming synonymous with casual, indulgent dining. It’s essentially a deep fried piece of architecture.
While the exact origins are murky, the concept remains the same: take a whole onion, slice it into petals, coat it heavily, and fry it until it looks like a golden, edible firework.
Difficulty Assessment: Is a Blooming Onion Hard to Make?
It’s definitely a Medium difficulty dish, mostly because of the technical skill needed for the cut and the requirement for precise oil temperature control. The ingredients are ridiculously simple.
However, slicing the onion without cutting through the root takes patience, and managing the deep fryer safely is non-negotiable for success.
Achieving Maximum Crispness: The Essential Double Dredge Method
This is the non-negotiable step: the double dredge. A single coat always fails; the wet batter slides off the slick onion surface. We go wet, dry, then wet again, and finally dry again.
This double layer creates an impenetrable, super adherent crust that puffs slightly when fried, ensuring the crunch factor is maximized.
The Role of Buttermilk and Acid in Flavor Development
We use buttermilk in the wet batter for two key reasons. First, the acid naturally tenderizes the outermost layer of the raw onion petal, helping to mellow its sharp flavour slightly. Second, and crucially, the high acidity and thickness of the buttermilk help the batter cling fiercely to the onion structure.
If you don't have buttermilk, don't worry, but it really is superior here.
Balancing the Spices for Savory, Aggressive Depth
The goal isn't just spicy; it’s intensely savoury. The combination of garlic powder and onion powder is essential for bringing out the allium flavor without being raw. The smoked paprika adds crucial depth, giving the final product that slow cooked, slightly smoky character, while the cayenne adds the necessary heat kick.
It's a powerful combination.
Essential Components: Ingredients for the Ultimate Blooming Onion
Choosing Your Colossal Onion (Size and Type Matters)
You need a proper, colossal sized sweet onion, like a Spanish or Vidalia, usually weighing about a pound. These have thick, uniform layers and are naturally sweeter, which balances the aggressive seasoning and the richness of the frying process.
Do not use small, red, or white onions; they lack the necessary structure.
Building the Aggressively Seasoned Batter Mix
Our batter relies on that essential trio: all-purpose flour, baking powder, and buttermilk. The baking powder is critical because it creates tiny bubbles when it hits the heat, resulting in a lighter, airier, and crunchier coating texture. If you skip it, the coating becomes dense and too heavy.
Substitutes and Alternatives for Deep Frying Oil
| Ingredient | Role | Viable Substitute |
|---|---|---|
| Colossal Sweet Onion | Structure & Flavor | Two medium Spanish onions (fry separately) |
| Buttermilk | Acid & Adhesion | Whole Milk + 1 tbsp vinegar/lemon juice |
| Peanut Oil | Frying Medium | Canola oil or Rapeseed oil (must be high smoke point) |
| Prepared Horseradish | Dipping Sauce Kick | Dijon Mustard + a pinch of extra cayenne |
Crafting the Zesty Dipping Sauce Base
The sauce is half the experience, honestly. It needs to be creamy, zesty, and punchy enough to cut through the richness of the fried onion. We start with good quality mayonnaise and add ketchup for sweetness and colour.
The prepared horseradish is the non-negotiable secret ingredient ; it provides sharp, clearing heat that lifts the entire dish.
Mastering the Technique: step-by-step Instructions for the Perfect Bloom
How to Properly Cut the Onion Bloom (The Core and 12 Wedge Method)
- Prep the Root: Slice off the top stem end, but leave the root end (the hairy bit) completely intact. This root is what holds your entire bloom together!
- Mark the Cuts: Place the onion, root end up, on the board. Make your first vertical slice directly through the centre, stopping about half an inch before you hit the root.
- Repeat: Now make slices perpendicular to the first, essentially quartering it. Continue halving each section until you have 12 16 radial cuts, all stopping just short of the base.
The Critical Soaking and Drying Stage
Gently flip the onion over and use your fingers to coax the petals open without tearing them from the root. Immediately submerge the open onion into a bowl of ice-cold water for 15 minutes.
This step is vital because the cold water helps the petals fully separate and leaches out some of the raw, aggressive onion flavour. Drain well and pat the onion dry with paper towels before moving on.
The Double Coating Process for Maximum Adhesion
- Mix & Soak: Prepare your two bowls: one with the wet buttermilk batter and one with the heavily seasoned dry flour mix. Place the dry onion, root end up, into the wet batter and spoon the mixture deep into the petals. Let it sit for two minutes to truly soak.
- First Coat: Transfer the wet onion to the dry mix. Work quickly, spooning the flour mixture over and into every crevice, pressing gently to make sure it adheres fully. Shake off excess dry powder.
- Second Coat: Dip the onion briefly back into the wet batter, just enough to moisten the flour, then return it immediately to the dry mix for the final, heavy coating.
- Chill Time: Place the fully coated onion on a lined baking sheet and chill in the fridge or freezer for at least 30 minutes . This sets the crust and prevents it from falling apart when it hits the oil.
Deep Frying to Golden Perfection and Internal Doneness
- Heat Oil: Heat your oil in a Dutch oven to precisely 175°C (350° F) . Use a thermometer trust me, guessing will lead to disaster.
- Fry: Carefully lower the chilled onion, root end up, into the hot oil.
- Cook: Fry for 4– 6 minutes, gently rolling it onto its side halfway through to ensure even cooking. The petals should be deep golden brown and beautifully crisp.
- Drain & Season: Lift the onion, shake off excess oil, and immediately place it on a wire rack over paper towels. Generously sprinkle with fine sea salt while it is still smoking hot.
Pro Chef's Notes: Troubleshooting Your Blooming Onion
Why Your Petals Fell Off (Coating Failure)
It’s tragic. Don’t let this happen to your beautiful bloom. The main culprit is usually oil that is too cold, causing the batter to absorb the grease instead of immediately crisping up and sealing the surface.
You must also ensure you dried the onion completely after the ice bath and before the coating process.
Chef's Note: I once tried to rush the chilling process and the batter just melted off into the oil, leaving me with a sad, naked onion. That 30 minute rest is mandatory; it solidifies the structure.
The Ideal Oil Temperature for Frying (Avoiding a Soggy Mess)
You must maintain the temperature exactly at 175°C (350° F) . If the oil drops below 160°C (325°F), the onion gets greasy and heavy. If it gets too hot, above 190°C (375°F), the outer tips will burn to a crisp before the thicker inner petals can cook through.
Monitor your thermometer constantly and adjust the heat.
Ensuring the Center Cooks Through Without Burning the Tips
Because the outer tips are thinner than the dense centre, they brown faster. The best way to manage this is to fry the onion root end up initially for 3 minutes, then gently flip it onto its side using tongs or a slotted spoon for the last 2 minutes.
This brief side frying ensures heat penetrates the core.
Storage and Preparation: Making This Appetizer Ahead of Time
Storing the Uncooked, Battered Onion
This is a great make-ahead appetizer! After completing the double dredging process (Step 3), wrap the chilled, coated onion tightly in cling film. You can store it in the fridge for up to 24 hours. When ready to cook, fry it directly from the fridge.
Reheating Leftovers for Maximum Crunch
A deep fried item reheats horribly in the microwave it turns into a rubbery, sad sponge. Do not microwave it. If you have leftovers, place them in an air fryer at 180°C (350°F) for 5– 7 minutes, or in a conventional oven on a wire rack at 200°C (400°F) for 10 minutes.
This blast of dry heat will reactivate the crispness.
Reheating Leftovers for Maximum Crunch
The blooming onion is best eaten immediately, piping hot. If you must store leftovers (and this rarely happens), keep them in an airtight container in the fridge for up to 3 days. Reheating is the secret. Use your air fryer or oven, as described above, to bring back the glorious crunch.
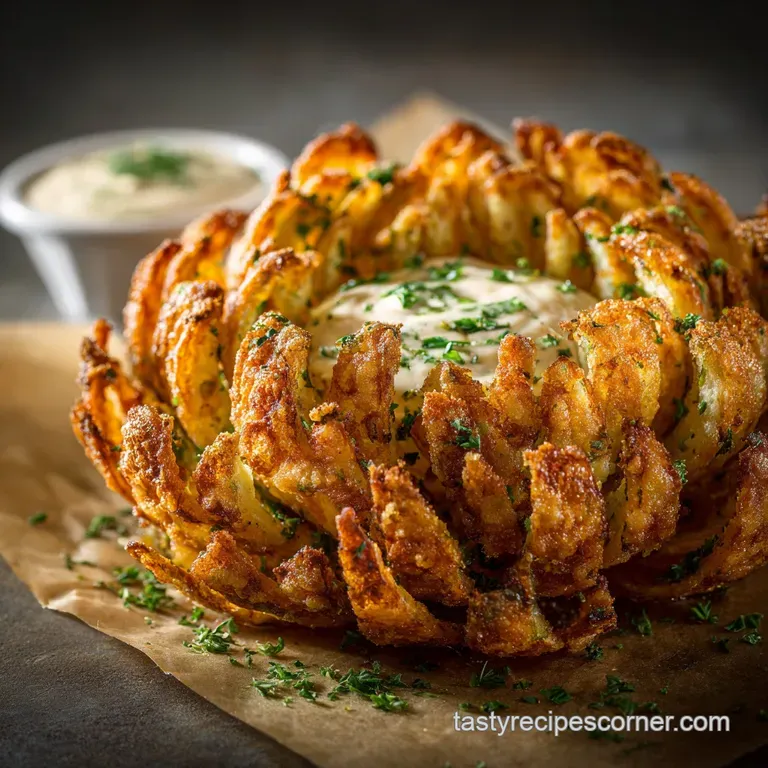
Presentation and Pairing: How to Serve a Spectacular Appetizer
Complementary Side Sauces (Beyond Zesty Mayo)
While our Zesty Dipping Sauce is truly the gold standard, offering variety is fun. Sometimes people prefer a milder option. I highly recommend serving a small bowl of classic ranch dressing alongside it.
Alternatively, a homemade smoky blue cheese dip provides a brilliant, rich contrast to the sharp spices of the batter.
Presentation and Pairing: How to Serve a Spectacular Appetizer
Place the finished, salted onion immediately on a round serving plate. Gently pour the chilled Zesty Dipping Sauce into a small ramekin and position the ramekin directly into the centre cavity of the bloom. Serve with plenty of napkins. To drink?
A crisp, slightly bitter Pale Ale or a light Lager is the perfect liquid partner to cut through the savoury fried richness.

Recipe FAQs
Why is my batter falling off the onion during frying?
Batter separation usually occurs if the onion is too wet or if the coating process wasn't thorough. Ensure the cut onion is completely dried and patted down after the ice water soak, then use the crucial double dip method: dry flour first, then wet batter, then back to the dry mix for optimal adhesion and crunch.
My onion did not bloom or separate properly after cutting. What went wrong?
The key is leaving the root end intact to act as a hinge, but if the cuts were too shallow, the petals won't open. Try soaking the onion in ice water for at least 30 minutes, which stiffens the layers; if it still resists, gently fold the outer petals backward with your hands before coating.
Can I bake or air-fry this recipe instead of deep frying?
While deep frying yields the authentic pub crispiness, you can air-fry for a lighter option. Preheat your air fryer to 375°F (190°C), spray the fully coated onion heavily with cooking oil, and cook for about 15 20 minutes, turning halfway until golden brown and crisp.
What is the ideal oil temperature for frying, and what oil should I use?
The ideal temperature for frying any battered item is 350°F (175°C); use a deep fry thermometer to monitor this closely. Use an oil with a high smoke point, such as peanut, canola, or vegetable oil, ensuring the onion is fully submerged and the oil temperature doesn't drop too low when the onion is added.
Can I prepare the blooming onion ahead of time?
You can cut the onion and keep it soaking in ice water in the refrigerator up to 24 hours prior to cooking, which helps it maintain its shape. However, you must only coat the onion in the batter and flour mixture immediately before frying, as the batter will quickly become saturated and slimy if left sitting.
How should I store leftover blooming onion, and how do I reheat it?
Leftover blooming onion should be stored in the refrigerator for up to two days, though the crust will soften significantly. To reheat, avoid the microwave and instead place the onion in a 375°F (190°C) oven or toaster oven for 5 10 minutes until the batter crisps back up.
Is it possible to make the Zesty Dipping Sauce vegan or dairy-free?
Yes, the dipping sauce is easily adaptable by substituting the traditional mayonnaise base with a high-quality vegan mayonnaise alternative. Ensure all other components, such as Worcestershire sauce (if used), are certified plant based to maintain the necessary tang and creamy texture.
Crispy Pub Style Blooming Onion Recipe

Ingredients:
Instructions:
Nutrition Facts:
| Calories | 929 kcal |
|---|---|
| Protein | 18.3 g |
| Fat | 40.2 g |
| Carbs | 102.6 g |
