Peanut Butter Blossom Cookies: Classic Crinkle-Top Recipe
- The Classic Crinkle-Top Cookie: Why Peanut Butter Blossoms Endure
- The Science of the Perfect Blossom: Texture and Flavor Explained
- Essential Kitchen Kit: Gathering Your Blossom Cookie Ingredients
- Smart Swaps: Adjusting the Recipe for Dietary Needs
- Mastering the Dough: Step-by-Step Instructions for Crinkle-Top Bliss
- Bake Time and the Chocolate Finish: Completing Your Peanut Butter Treats
- Troubleshooting the Crinkle-Top Cookie: Expert Tips and Common Mistakes
- Preparation and Longevity: Storing and Freezing Peanut Butter Blossoms
- Beyond the Tea Tray: Delicious Ways to Serve Your Blossom Cookies
- Recipe FAQs
- 📝 Recipe Card
The Classic Crinkle Top Cookie: Why Peanut Butter Blossoms Endure
That intoxicating, deeply savory sweet aroma of roasted peanuts married with melting milk chocolate? That is the smell of pure, unadulterated comfort, and it's what happens the minute you pull a batch of Peanut Butter Blossom Cookies from the oven.
These aren’t just cookies; they are edible little pieces of nostalgia that anchor every respectable holiday cookie platter. Trust me, the sheer joy of watching that perfect crinkle form around the chocolate kiss is why this recipe has survived for generations.
This cookie is an absolute lifesaver, especially when you need a high impact treat with minimal effort. The dough comes together faster than most cut-out recipes, and while a little chill time is recommended, this version of Easy Peanut Butter Blossom Cookies is practically foolproof.
They require only standard pantry staples, making them an affordable and reliable bake every single time. It's the ultimate crowd pleaser for busy weeks or last minute potlucks.
Forget the dry, overly crumbly versions you might have suffered through before. We are diving into my absolute best method for creating the Softest Peanut Butter Blossoms imaginable, the kind that melt instantly on your tongue.
We are going to nail that signature sparkling crinkle and ensure the peanut flavor shines, not just the sugar. Let's get baking and create the best batch of Peanut Butter Blossom Cookies you’ve ever experienced.
The Science of the Perfect Blossom: Texture and Flavor Explained
The magic behind an excellent cookie isn’t just measuring correctly; it’s understanding what the ingredients do . For these specific Peanut Butter Blossom Cookies , we are aiming for a soft, chewy interior with slightly crisp edges and a beautiful, crackled finish.
We achieve this specific texture using a dual sugar approach and careful control over the fat content.
A Taste of Nostalgia: The Perfect Salty Sweet Balance
What elevates the humble Peanut Butter Blossom Cookies above standard peanut butter fare is the deliberate balance of salt, sugar, and fat. Peanut butter itself provides a robust, savory earthiness that cuts through the sweetness of the granulated sugar and the chocolate crown.
If you skip the necessary amount of salt in the dough, the cookies will taste flat and boring. Don't skimp on the salt; it’s essential for flavor depth.
What Makes Our Recipe the "Jolly Good Cookie" Standard?
This version uses a mix of granulated white sugar and packed light brown sugar. Why both? Granulated sugar helps the cookie spread slightly and creates that perfect light reflecting sparkle on the exterior.
But the brown sugar introduces molasses, which increases moisture retention and acidity, resulting in a much chewier, softer center that stays tender longer. This is how we ensure the cookies don't turn into dry pucks after cooling a common mistake with other recipes for Peanut Butter Blossom Cookies .
Achieving the Signature Crinkle: The Role of Granulated Sugar
That beautiful, crackled surface isn’t random; it’s engineered. The dough is slightly firmer than standard drop cookies, and rolling it thoroughly in extra granulated sugar is the secret.
As the cookie bakes and expands, the sugar coating crystals lock up the moisture, creating a brittle shell that immediately cracks as the center rises. That sparkle, that glorious visual texture? It comes from that final, generous roll.
Creaming Method Mastery: Ensuring a Tender, Chewy Interior
The creaming method beating the softened butter, peanut butter, and sugars together until light and fluffy incorporates tiny pockets of air into the mixture. This aeration is what gives the baked Blossom Cookies their lift and delicate, tender structure. We need to scrape down the bowl frequently to ensure everything is evenly blended and properly aerated, setting the stage for the perfect batch of Peanut Butter Blossom Cookies . If you like intensely chewy cookies, similar to my Peanut Butter Cookies: Ultimate Chewy Classic Fork Pattern recipe, you'll love how the brown sugar works here.
Essential Kitchen Kit: Gathering Your Blossom Cookie Ingredients
Making the best Peanut Butter Blossom Cookies requires simple ingredients, but quality matters, and preparation is key. Make sure your butter and egg are fully softened to room temperature before you start; cold ingredients interfere with proper emulsification, which affects the final texture.
| Ingredient | Why it Matters | Smart Prep Tip |
|---|---|---|
| Creamy Peanut Butter | Provides essential fat and flavor structure. | Use shelf stable brands only! |
| Brown Sugar | Adds moisture and chewiness. | Make sure it’s packed firmly when measuring. |
| Chocolate Kisses | The iconic crown of the cookie. | Unwrap them all before mixing and chill them. |
| Baking Soda | Provides lift and promotes spreading. | Must be fresh check the expiration date. |
Smart Swaps: Adjusting the Recipe for Dietary Needs
Choosing Your Peanut Butter: Creamy vs. Crunchy and Natural vs. Conventional
This is a non-negotiable step for truly excellent Peanut Butter Blossom Cookies . Do NOT use natural peanut butter, the kind where the oil separates. That excess oil will cause the cookies to spread too much, leaving you with thin, greasy discs.
Stick to conventional, shelf stable, creamy types like Jif or Skippy for the most reliable results and best structure. If you prefer texture, crunchy peanut butter works wonderfully and adds a nice nutty bite!
Butter and Sugar Breakdown: Selecting the Right Fat and Sweetener Ratio
If you only have salted butter, feel free to use it, but reduce the added salt in the dry mixture by ¼ teaspoon. Want a cookie that spreads a little less and has a slightly lighter crumb? You can substitute up to half of the butter with vegetable shortening.
This trick is especially helpful for large batches of Peanut Butter Blossom Cookies if your kitchen runs warm.
The Secret to Structure: Flour and Leavening Agents
For the perfect structure, make sure your flour is properly measured scoop the flour into the measuring cup and level it off; don’t scoop directly from the bag. You want 1 ½ cups of all-purpose flour for these delicious Blossom Cookies Recipe to work perfectly.
Going gluten-free: Recommended Flour Alternatives
I have tested this Peanut Butter Blossom Cookies Recipe successfully using a 1:1 gluten-free flour blend (the kind that includes xanthan gum). You can swap it straight for the all-purpose flour volume for-volume, and you might notice a slightly sandier texture, but the flavor remains fantastic.
Upgrading the Chocolate Crown
While the traditional chocolate kiss is iconic for Peanut Butter Blossom Cookies , feel free to experiment! Mini peanut butter cups are phenomenal when pressed into the center, or for a sophisticated take, use high-quality dark chocolate truffles, roughly chopped and pressed down.
Just ensure whatever chocolate you choose is small enough to fit neatly and is fully chilled before use.
Mastering the Dough: step-by-step Instructions for Crinkle Top Bliss
Making classic Peanut Butter Blossom Cookies is a breeze once you understand the timing. Remember, we are looking for texture cues throughout the process.
Stage 1: The Foundation: Properly Creaming the Butter, Sugars, and Peanut Butter
Start by preheating your oven to 350°F (175°C) and prepping your baking sheets with parchment paper. In your mixer bowl, combine the softened butter, peanut butter, granulated sugar, and brown sugar. Beat on medium speed for a good three to four minutes.
Listen to the sound of your mixer; it should transform from a wet, gritty sound to a soft, muffled whir as the fats and sugars lighten and aerate. The mixture should look notably paler and very fluffy before you proceed.
Stage 2: Mixing and Rolling: Forming Consistent Dough Balls for Even Baking
Add your room temperature egg and vanilla, mixing only until the yellow streaks disappear. Next, slowly incorporate the dry ingredients (flour, baking soda, salt) on the lowest speed. Stop the mixer the second you no longer see dry flour dust. Overmixing develops gluten, which makes tough, dry cookies.
Cover the dough and chill for at least 30 minutes. This chilling process makes the dough easier to handle and ensures your final Peanut Butter Blossom Cookies don’t spread too much.
Stage 3: The Sugar Coating Technique: Ensuring Maximum Sparkle and Crinkle
When the dough is chilled, grab your cookie scoop (1.5 Tbsp size is perfect for uniform results) and roll the dough into smooth balls. Now, roll them generously in the reserved ¼ cup of granulated sugar. Don’t be shy!
A thorough coating guarantees that beautiful sparkle and the signature crinkle top on your Classic Peanut Butter Blossoms . Place them on the prepared sheet 2 inches apart.
Bake Time and the Chocolate Finish: Completing Your Peanut Butter Treats
Timing Is Everything: Achieving the Perfect Golden Edges Without Overbaking
Bake the sugar coated dough balls for 8– 10 minutes. Here’s the key sensory cue: you want the edges to look set and lightly golden, but the center should still look slightly puffy, soft, and maybe even a little wet. That’s your sign!
Pull them out before they look completely baked through, otherwise, you'll end up with a dry cookie that lacks that desirable chewiness. This delicate timing makes all the difference when baking Peanut Butter Blossom Cookies .
The Crucial 60 Seconds: Pressing the Chocolate Kisses into the Warm Cookies
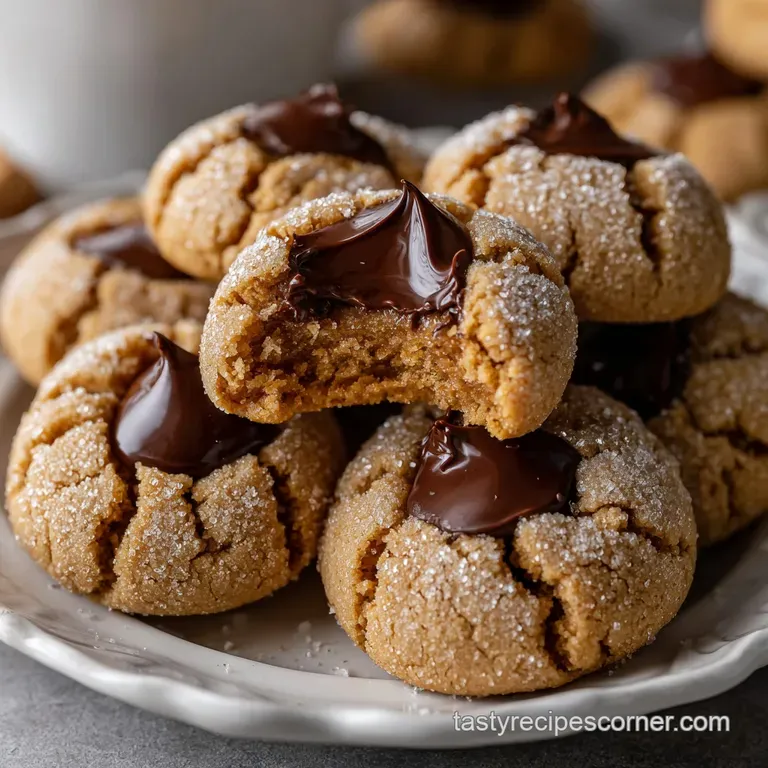
This is the most satisfying part! Immediately after removing the baking sheet from the oven, gently press one chilled chocolate kiss directly into the center of each hot cookie. The heat from the cookie will melt the bottom of the chocolate, securing it in place and causing the cookie to crack beautifully around the base of the chocolate, creating the "blossom" effect.
If you wait too long (more than a minute), the cookie surface will set, and you won’t get that iconic crinkle effect, ruining your Peanut Butter Blossom Cookies finish.
Troubleshooting the Crinkle Top Cookie: Expert Tips and Common Mistakes
Nobody wants a baking fail, especially when making the traditional holiday favourite, the Peanut Butter Blossom Cookies . Here are the pitfalls I fell into when I first started and how you can avoid them.
Preventing Spreading: The Importance of Chilling the Dough
If your cookies spread into flat pancakes, the most likely culprit is either your peanut butter choice (too oily/natural) or skipping the chilling step. Chilling solidifies the fat , preventing it from melting too quickly when the cookies hit the hot oven.
If you live somewhere hot, or if your dough feels overly sticky, chill it for the full 45 minutes or even an hour. This ensures perfect, plump Peanut Butter Blossom Cookies every time.
Why Your Chocolate Kisses Are Sliding Off (And How to Fix It)
Two reasons the chocolate crown might go rogue: 1) The Kisses weren't chilled, so they melted immediately and slicked right off; or 2) You waited too long to press them in. The cookie needs to be hot enough to melt the chocolate base slightly but still soft enough to grip the chocolate as it sets.
If you find the chocolate sliding, press it down, hold for three seconds, and then let the cookie rest on the sheet for five minutes to firm up.
Adjusting Bake Time for Altitude or Oven Variations
If you are baking at a high altitude, you might need to slightly increase your bake time (by 1– 2 minutes) and perhaps reduce your baking soda by about ¼ teaspoon to prevent excessive spreading.
If you suspect your oven runs hot, use an oven thermometer it’s the best tool a baker can own! Adjusting for these factors guarantees better results with your homemade Peanut Butter Blossom Cookies .
Preparation and Longevity: Storing and Freezing Peanut Butter Blossoms
These lovely Peanut Butter Blossom Cookies are fantastic for preparing ahead of time, which is why they are a must have on my annual Christmas Cookies: Ultimate Spiced Shortbread Cut-Outs Recipe list.
Best Practices for Room Temperature Storage
Once completely cool, store your finished Peanut Butter Blossom Cookies in an airtight container at room temperature. They will retain their freshness and soft texture for 5 7 days.
If you keep them in the refrigerator, the chocolate can turn pale (bloom) and the cookies might dry out faster, so room temperature is always best.
How to Freeze Cookie Dough vs. Baked Blossom Cookies
Want to prep a huge batch? Freeze the dough!
Chef's Note: Scoop the raw dough into balls, roll them in the granulated sugar, and then flash freeze them on a tray until solid. Transfer the frozen, sugar coated dough balls to a freezer bag or container. You can bake them directly from frozen just add 2– 3 minutes to the bake time.
Freezing already baked Peanut Butter Blossom Cookies is also easy. Place the fully cooled cookies (with the chocolate kiss set) in an airtight container, separating layers with parchment paper. They freeze well for up to three months. Thaw them overnight at room temperature.
They will be just as soft as the day you made these brilliant Peanut Butter Blossom Cookies .
Beyond the Tea Tray: Delicious Ways to Serve Your Blossom Cookies
The beauty of the traditional Peanut Butter Blossom Cookies is their versatility. They shine on a holiday platter, but they also make a perfect everyday treat.
Pairing Suggestions: Coffee, Tea, and Milk Combinations
There is no better pairing for this particular cookie than a tall, frosty glass of cold milk. The creaminess of the milk is the ideal counterpoint to the intense, salty peanut butter flavor.
If you prefer a warmer beverage, pair these sweet and savory Peanut Butter Blossom Cookies with a strong black coffee or a delicate cup of Darjeeling tea.
If you’re hosting a sophisticated afternoon tea, these pair wonderfully with my Snickerdoodle Cookies: The Best Soft Center Recipe and a few tiny cups of hot cocoa. These Peanut Butter Blossom Cookies are always the first to disappear. They are true perfection, ready to be shared with everyone you love.

Recipe FAQs
Why is my cookie dough too dry and crumbly to roll?
Dry dough usually indicates an imbalance of ingredients, often due to too much flour or insufficient mixing of the fats. Ensure you are accurately measuring flour by using the spoon and-level method rather than scooping directly from the bag.
If the dough is still too dry, add moisture slowly, perhaps 1/2 teaspoon of milk at a time, until it comes together easily.
Why did my Peanut Butter Blossoms spread too much while baking?
Excessive spreading is typically caused by butter that is too soft before mixing, or by an oven temperature that is running too cool. To troubleshoot, ensure your butter is firm but pliable, and try chilling the formed dough balls for 15 20 minutes before baking to firm up the fats.
Always verify your oven temperature with an external thermometer.
Can I use natural (oil-separated) peanut butter instead of commercial creamy peanut butter?
No, it is highly recommended to stick with commercial, shelf stable creamy peanut butter (such as Jif or Skippy) for this recipe. Natural peanut butter, even when fully stirred, often separates during the baking process, resulting in a drier, greasier, and less structurally sound cookie.
The stabilizers in commercial peanut butter are key to the correct texture.
When exactly should I press the chocolate kiss into the cookie?
The chocolate kiss must be pressed immediately after the cookies exit the oven, while they are still piping hot. This short window allows the base of the chocolate to melt slightly and adhere perfectly to the center of the cookie.
Press gently but firmly enough to set the kiss and create the signature crinkle top appearance.
I don't have Hershey's Kisses. What are some acceptable chocolate alternatives?
You can substitute the chocolate kisses with other small, heat safe chocolates that weigh about the same, such as miniature peanut butter cups or small solid chocolate discs. Ensure you press them quickly so they adhere properly, and avoid using hollow or filled chocolates, which may leak when warm.
You could also use an unwrapped truffle for a richer twist.
How can I make these cookies gluten-free?
To successfully convert this recipe to gluten-free, substitute the all-purpose flour with a high-quality 1:1 gluten-free baking blend that already contains xanthan gum. No other major adjustments are usually necessary, though you may find the dough needs a slightly longer chilling time before rolling.
Always check your blend’s specific instructions.
What is the best way to store Peanut Butter Blossoms, and can I freeze them?
Store baked cookies in an airtight container at room temperature, where they will maintain their freshness for up to one week. To freeze, chill the fully baked cookies completely until firm, then layer them in a freezer safe container separated by parchment paper. They freeze beautifully for up to three months.
Classic Peanut Butter Blossom Cookies

Ingredients:
Instructions:
Nutrition Facts:
| Calories | 106 kcal |
|---|---|
| Protein | 2.0 g |
| Fat | 6.0 g |
| Carbs | 13.0 g |
