Classic French Cream Puffs (Choux À La Crème): Light, Airy, and Perfectly Creamy
- The Culinary Magic of Classic Cream Puffs: Mastering Pâte à Choux
- The Science of the Shell: Why Our Pâte à Choux Rises Every Time
- Pantry Staples to Pastry Perfection: Ingredients for Cream Puffs
- The Method: Step-by-Step Guide to Baking Airy Cream Puffs
- Expert Troubleshooting and Chef's Notes for Deflation-Free Cream Puffs
- Making Ahead and Storage: Keeping Cream Puffs Fresh
- Elevating the Experience: Creative Serving Suggestions and Pairings
- Recipe FAQs
- 📝 Recipe Card
The Culinary Magic of Classic Cream Puffs: Mastering Pâte à Choux
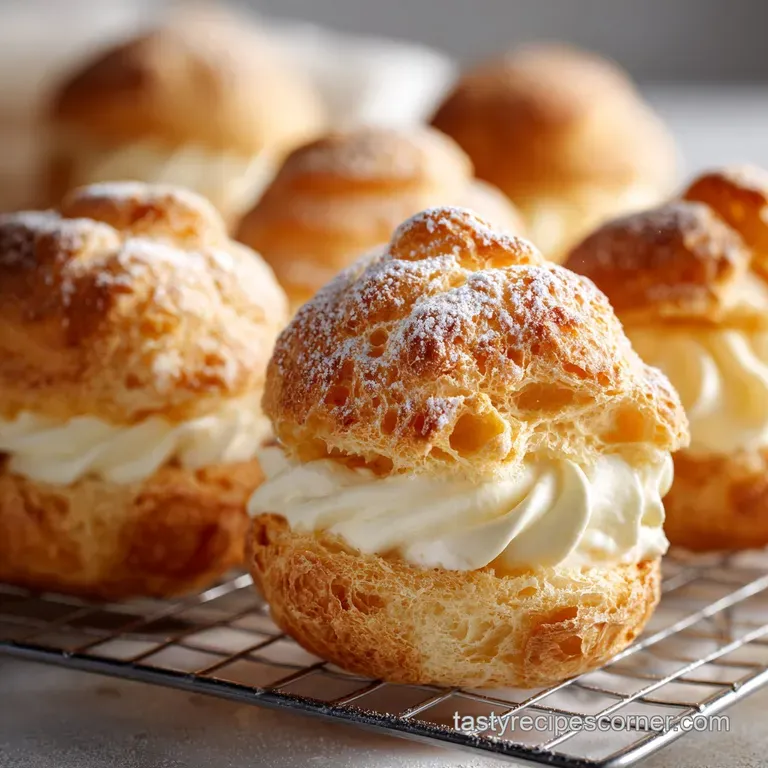
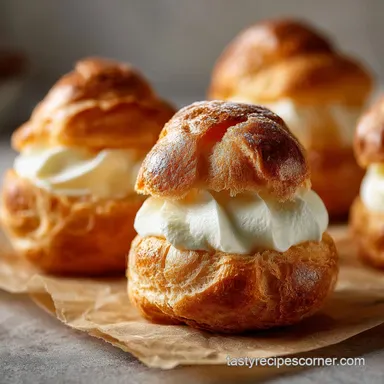
The sheer satisfaction of biting into a perfect cream puff is unmatched. You get that delicate, crisp snap of the shell, followed immediately by the cool, airy rush of velvety cream.
It’s like eating an edible cloud, honestly, and the best part is the whole thing is completely hollow, ready for endless filling possibilities.
This dessert screams sophistication, but I promise you, the process is pure kitchen alchemy using ingredients you already have. We are talking about water, butter, flour, and eggs that’s it!
It’s fast, forgiving once you know the tricks, and so much cheaper than buying those ridiculously tiny, overpriced ones from the patisserie.
I've made every mistake in the book, from scrambled eggs in the dough to sad, collapsed shells. Now I know the secrets to flawless Pâte à Choux (that’s the fancy French name for the dough).
Grab your whisk, because we are going to master the classic cream puffs recipe today.
The Science of the Shell: Why Our Pâte à Choux Rises Every Time
What Exactly Is a Choux à la Crème?
Choux à la Crème simply means "cabbage with cream," named because the baked puff resembles a tiny, irregular cabbage head. It's a cooked pastry dough, which is the key difference from flaky pastries like puff or phyllo.
We cook the starch and fat together before adding the eggs, creating a super thick base called a panade .
A Brief History of the Elegant French Puff
This dough has been around for centuries, evolving from thick medieval frying batters into the light perfection we know today. It was perfected by renowned French chefs in the 17th century who realized the precise ratio of ingredients and the power of steam.
The French are obsessed with precision, and for choux pastry, that attention to detail pays off big time.
The Essential Tools for Perfect Puff Consistency
You absolutely need a heavy bottomed saucepan for the initial cooking stage; this prevents the flour mixture from scorching. A sturdy wooden spoon or a heatproof spatula is also non-negotiable for mixing the dense dough.
While you can beat the eggs in by hand, I highly recommend using a stand mixer or a powerful hand mixer, as it guarantees even incorporation without overworking the gluten, and trust me, your arms will thank you.
The Steam Secret: Developing the Gluten Structure
The incredible rise of the cream puff is all about steam, trapped inside the dough. When the raw dough hits that initial high oven temperature (425°F/220°C), the water in the butter and eggs instantly turns to steam.
Because the cooked flour structure (the gluten) is strong and elastic, it traps that steam, forcing the shell to puff up and hollow out.
Achieving the Golden Ratio of Egg to Dough
This is where many recipes fail, and it's the most critical step. The amount of egg needed varies slightly every time, depending on how much moisture evaporated during the cooking (drying) stage. Never add all the eggs at once.
We are looking for the "ribbon stage": when the dough falls from the paddle in a slow, glossy "V" shape that holds its form for a few seconds. If you add too much egg, your dough will be too sloppy, and your puffs will spread out flat rather than rising tall.
The Role of Oven Temperature in Creating a Hollow Interior
We start high to get that immediate, explosive puff from the steam, setting the structure quickly. After ten minutes, we drop the temperature significantly, which allows the interior to cook and the shell to dry out thoroughly without burning the exterior.
This two-stage temperature dance is what keeps the shells light and crisp, preventing that dreaded internal moisture that leads to soggy cream puffs frozen in time but in a bad way.
Pantry Staples to Pastry Perfection: Ingredients for Cream Puffs
The Three Core Components: Shell, Filling, and Glaze
Our foundation is the Pâte à Choux shell, which relies on a balance of fat, moisture, and starch. For the filling, we stick to classic vanilla whipped cream, which is the perfect light, non-greasy counterpoint to the buttery shell.
You can finish them with a simple dusting or a chocolate ganache, but today, we keep it simple.
Choosing the Right Dairy: Butter vs. Milk Fat
I prefer using a mix of half water and half milk for the boiling liquid. Water maximizes steam production for loft, but milk adds fat and flavor, giving the shells a richer golden color and a tenderer crust. Always use unsalted butter here, cut into cubes so it melts completely before the water reaches a rolling boil.
Scaling the Recipe: Metric vs. US Customary Measures
While I use cups and spoons for convenience in the States, I strongly urge you to use a digital kitchen scale for the flour and especially for the eggs. The size of "large" eggs varies wildly, and even 10 grams of extra egg can ruin the dough consistency.
For true professional results, embrace the metric weight measurements.
Essential Substitutions for the Vanilla Whipped Cream
Want to switch things up, or maybe you ran out of heavy cream? Don't stress. We have options.
| Ingredient | Why It’s Used | Viable Substitute |
|---|---|---|
| Heavy Whipping Cream | Creates stable, airy filling. | Use Crème Pâtissière (Pastry Cream) for a richer custard feel, or pre-made vanilla pudding mixed with stabilized whipped cream. |
| All-Purpose Flour | Forms the essential gluten structure. | Good quality cup-for-cup gluten-free flour blend. |
| Unsalted Butter | Flavor and fat content. | high-quality vegetable shortening (if dairy is an issue); flavor will be less rich. |
| Eggs | Leavening agent (via steam) and binder. | Nothing, really. If you can't use eggs, this recipe isn't for you, I’m afraid. |
The Method: step-by-step Guide to Baking Airy Cream Puffs

Stage One: Cooking the Choux Dough
Get your oven preheated to 425°F (220°C) immediately. In your saucepan, combine the water/milk, cubed butter, salt, and sugar. Bring this to a rapid, rolling boil, ensuring the butter is fully melted before that boil starts. This is crucial.
Take the pot off the heat and quickly dump all the flour in at once. Stir like a maniac until the mixture forms a cohesive, lumpy ball. Return the pot to medium heat and stir constantly for 2– 3 minutes.
You must cook out the moisture until a thin film forms on the bottom of the pan that film means the dough is dry enough to accept the eggs later.
Stage Two: Incorporating the Eggs Correctly
Transfer the hot dough immediately to your mixer bowl. Beat it on low for 60 seconds to release some heat; we need it warm, but not so hot that it cooks the eggs. Start adding your lightly beaten, room temperature eggs one at a time , mixing completely after each addition.
Stop mixing the moment you achieve the ribbon stage. That's the perfect, glossy consistency that ensures maximum rise.
Stage Three: Piping, Baking, and Drying the Shells
Load your dough into a piping bag fitted with a large round tip. Pipe 1.5 inch mounds onto parchment lined sheets, leaving space between them. If you don't have a piping bag, you can totally use two spoons, just try to make them uniform.
Immediately bake at 425°F (220°C) for 10 minutes, then drop the temperature to 375°F (190°C) and bake for another 15– 20 minutes until they are gorgeously dark golden brown.
CRUCIAL CHEF’S NOTE: Do not even look at the oven door during the first 20 minutes! Seriously, the slightest temperature change and those beautiful puffs will collapse.
Stage Four: Preparing the Velvety Vanilla Filling
While the shells cool, whip your very cold heavy cream, sifted icing sugar, and vanilla extract until stiff peaks form. You want it firm enough to hold the shape when piped, but still smooth and creamy.
Once the shells are fully cooled and I mean fully cold —you can slice them open horizontally or pipe the cream into the bottom through the steam vent we made earlier.
Expert Troubleshooting and Chef's Notes for Deflation Free Cream Puffs
Mistake Fix: Why Did My Puffs Deflate in the Oven?
Deflation is usually caused by two things: too much moisture in the dough or opening the oven door too early. If the dough was too wet (you didn't dry the panade long enough, or you added too many eggs), the structure wasn't strong enough to hold the steam.
The fix: Make sure you see that thin film on the bottom of the pan in Stage One, and stop adding eggs right at the ribbon stage. If they deflate after baking, they weren’t dried long enough.
The Essential 'Drying' Period for Crisp Shells
After the baking is complete and the oven is off, you must pierce the shells to let out the steam. This keeps them crisp! I once skipped this step thinking I was rushing things, and the puffs cooled into little soggy sad disks.
The fix: Turn off the oven, poke the shells, and let them sit in the cooling oven with the door ajar for 10 minutes. This is non-negotiable for that perfect crunch.
Checking for Doneness: The Visual and Auditory Cues
They need to be deeply golden brown, almost bordering on too dark, to be done. Also, if you tap the side of a finished puff, it should sound hollow and feel incredibly lightweight.
If they look pale or feel heavy, they are still wet inside, and need another 5– 10 minutes at the lower temperature.
Making Ahead and Storage: Keeping Cream Puffs Fresh
How to Store Unfilled Choux Shells
This is the great secret of Pâte à Choux : the shells themselves keep beautifully. Store completely cooled, unfilled shells in an airtight container at room temperature for up to two days. If they lose some crispness, you can refresh them!
Pop them back into a 350°F (175°C) oven for about 5 minutes right before filling.
Freezing Baked and Unfilled Cream Puff Shells
But does it freeze well? You bet. Lay the fully baked, cooled, and unfilled shells in a single layer on a sheet pan, freeze until solid, and then transfer them to a freezer safe bag or container. They will last three months easily.
Reheat them from frozen in a 300°F (150°C) oven for about 10– 15 minutes until crisp before filling. If you want to find great deals on ingredients for this, look where cream puffs costco and cream puffs walmart source their ingredients!
Shelf Life of Filled vs. Unfilled Puffs
Once you fill them, the clock starts ticking because the moisture from the whipped cream immediately starts softening the shell. Filled cream puffs are best eaten within 2– 3 hours.
If you must refrigerate filled puffs, they will keep for about 24 hours, but the shells will become noticeably softer.
Elevating the Experience: Creative Serving Suggestions and Pairings
If you want to move beyond the vanilla filling, there are endless ways to serve these up. For a truly decadent experience, swap the whipped cream for a rich chocolate mousse or a gooey caramel filling. You could even go full French patisserie and use Crème Pâtissière, the classic custard filling.
For a fun dessert table pairing, serve them alongside something tropical and rich, like my favorite Coconut Pie with Cream of Coconut: The Silky, Rich Indulgence . Serving both gives your guests a choice between light, airy pastry and dense, tropical richness. If you’re feeling extra festive, fill mini puffs with ice cream and drown them in warm ganache to make classic Profiteroles. They are truly fantastic little vessels, ready for anything.

Recipe FAQs
Why did my cream puffs collapse or deflate immediately after baking?
They collapsed because they retained too much moisture and the internal steam pressure was released too quickly. To prevent this, bake them for the full specified time, then turn off the oven and prop the door open for 10-15 minutes to allow the shells to dry out gradually and stabilize before removing them entirely.
My Pâte à Choux dough seems too runny; what went wrong?
The dough is likely too runny because you added too much egg, which prevents it from holding its necessary structure. Remember that egg size varies greatly; the Pâte à Choux should form a glossy, thick paste that holds a 'V' shape and slowly drops off a wooden spoon, so always incorporate the eggs gradually.
How should I store leftover, unfilled cream puff shells?
Unfilled shells should be cooled completely and then stored in an airtight container at room temperature for up to two days to maintain crispness. For long term storage, freeze the cooled shells in a freezer bag and reheat them briefly (5-10 minutes at 350°F) before filling to restore the texture.
Can I use pastry cream (crème pâtissière) instead of whipped cream for the filling?
Absolutely, pastry cream is a traditional and highly recommended filling option for choux à la crème. The key difference is texture; pastry cream offers a richer, denser, and more stable filling, while whipped cream provides a lighter, more ethereal contrast to the crisp shell.
Why do I need to pierce the shells after the initial bake time?
Piercing the shells is a critical step for releasing the hot, trapped steam and moisture from the hollow interior. This essential drying out process strengthens the structure and ensures the interior remains crisp, preventing the puffs from becoming soggy or collapsing upon cooling.
Is it possible to make Pâte à Choux gluten-free or dairy-free?
Yes, gluten-free Pâte à Choux is achievable by substituting the all-purpose flour with a high-quality GF blend containing xanthan gum for necessary structure. For a dairy-free variation, substitute the butter with a high-quality plant based butter stick or refined coconut oil, ensuring the liquid ratio remains the same.
Why are my cream puffs pale and not golden brown?
Lack of proper browning usually indicates the oven temperature was too low or the baking time was insufficient to dry the dough completely. Ensure your oven is accurately calibrated, and do not open the oven door during the first 20 minutes, as this drops the temperature and compromises the crucial steam lift.
Classic French Cream Puffs Recipe
Ingredients:
Instructions:
Nutrition Facts:
| Calories | 619 kcal |
|---|---|
| Protein | 12.1 g |
| Fat | 50.3 g |
| Carbs | 29.5 g |
