Pinecone Cookies: Toasted Almond Shatter
- Time: Active 40 minutes, Passive 12 minutes, Total 52 minutes
- Flavor/Texture Hook: Velvety chocolate shortbread with a toasted almond shatter
- Perfect for: Holiday dessert platters, winter themed tea parties, or impressive edible gifts
- Master the Craft of Pinecone Cookies
- The Science of Structural Integrity
- Components for the Chocolate Foundation
- Essential Tools for Shaping
- Step-by-Step Construction Guide
- Fixing Common Structural Issues
- Creative Flavor Adaptations
- Freezing and Reheating Guidelines
- Presentation Levels for Guests
- Recipe FAQs
- 📝 Recipe Card
Master the Craft of Pinecone Cookies
The scent of toasted nuts and dark cocoa hitting a warm oven is exactly what winter should smell like. I remember the first time I attempted these; I was sitting at my cluttered kitchen island with a massive bowl of almond slices, trying to figure out why my "cones" looked more like lumpy potatoes than forest treasures.
It was a messy, cocoa dusted learning curve, but the moment I figured out the "bottom up" shingling method, everything clicked.
We are making a treat that looks like it belongs in a high end boutique bakery, but it's actually built on a very simple, sturdy chocolate shortbread. There is something incredibly therapeutic about pressing those little almond "scales" into the dough.
It is a slow down and bake kind of recipe that yields a crumbly, buttery bite with a satisfying snap from the nuts.
You can expect a cookie that isn't overly sweet, which is a nice break from the sugar heavy frostings we usually see this time of year. Instead, we're leaning into the deep, earthy notes of Dutch process cocoa and the natural oils of the almonds. If you have ever enjoyed my Italian Christmas Cookies recipe, you’ll appreciate the same focus on texture and tradition, but with a rustic, outdoorsy twist that honestly steals the show every time.
The Science of Structural Integrity
Creating a 3D cookie requires more than just a good flavor profile, it requires engineering. We need the dough to act as a solid anchor for the almonds while resisting the urge to spread into a puddle in the heat of the oven.
- Fat to Flour Equilibrium: Using 225g of butter against 300g of flour creates a short crust that is malleable enough to shape into cones but contains enough starch to hold its vertical height during the bake.
- Low Acid Cocoa Chemistry: Dutch process cocoa powder has a neutral pH, which means it doesn't react with leavening agents to create a massive rise. This keeps our pinecones dense and detailed rather than puffed and distorted.
- Protein Adhesion: The egg protein acts as a biological binder, wrapping around the starch granules to create a "glue" that keeps the sliced almonds from popping out as the cookie expands slightly.
Servings and Batch Sizing
Before we start mixing, it’s helpful to know how this recipe scales for different crowds. Whether you are hosting a small tea or a large holiday bash, the dough behaves consistently if you follow these ratios.
| Servings | Ingredient Adjustments | Pan Size | Cook Time |
|---|---|---|---|
| 12 Cookies | Use 1/2 of all ingredients; beat 1 egg and use half | 1 Half sheet pan | 10-12 minutes |
| 24 Cookies | Standard recipe as listed in Schema | 2 Half sheet pans | 12 minutes |
| 48 Cookies | Double ingredients; use 1.5x salt and spices | 4 Half sheet pans | 14-15 minutes (rotate pans) |
While many people think baking is purely about following instructions, the way you apply heat matters just as much as the ingredients themselves.
Stovetop vs Oven Performance
| Method | Component | Resulting Texture | Visual Outcome |
|---|---|---|---|
| Oven Bake | Entire Cookie | Crumbly base, toasted nut scales | Authentic, rustic pinecone |
| Stovetop Toast | Almonds Only | Deeply browned, brittle | More intense nut flavor |
Components for the Chocolate Foundation
The success of these cookies depends on the quality of your base. We aren't just making a cookie; we are building a foundation for the almond "shingles." Using 225g of softened unsalted butter is non negotiable here. If the butter is too cold, the dough will crack; if it’s melted, the cones will collapse.
Ingredient Deep Dive
| Ingredient | Science Role | Pro Secret |
|---|---|---|
| Unsalted Butter | Provides "short" texture | Use high fat European style for a silkier mouthfeel |
| Dutch Cocoa | Deep color and structural stability | Sift twice to avoid bitter "hot spots" in the dough |
| All Purpose Flour | Provides the gluten skeleton | Measure by weight (300g) to ensure the dough isn't dry |
For the chocolate foundation, we use 150g of granulated sugar. I’ve tried using powdered sugar in the base, but it makes the cookie too soft to hold the weight of the almonds. The granulated sugar provides just enough "grit" to keep the cone standing tall.
For the "Scales" and Snow
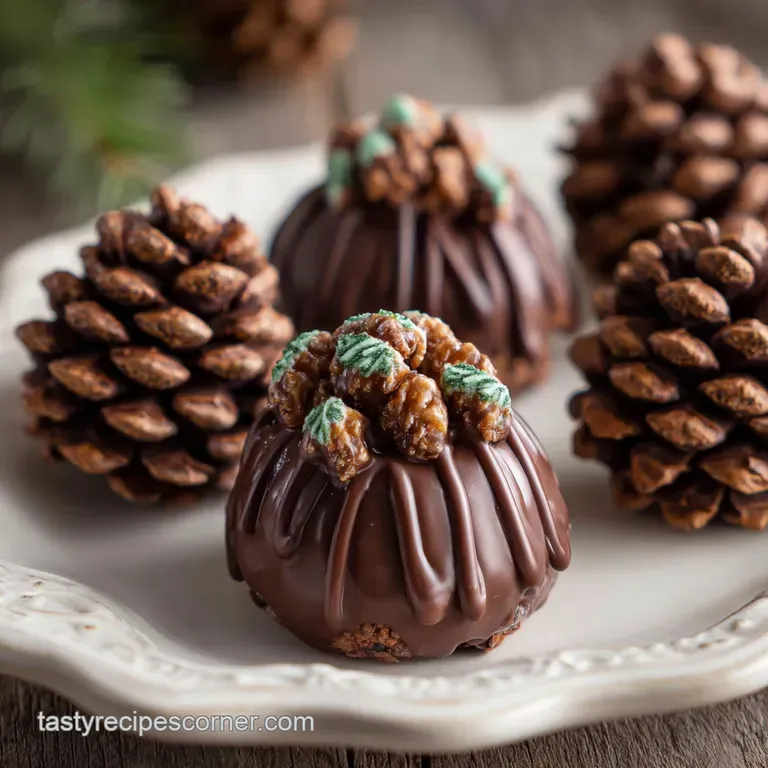
The 150g of sliced almonds are the stars of the show. Look for "natural" sliced almonds with the skin still on the edges if you want a more realistic, woody look. Finally, the 2 tbsp of powdered sugar acts as our "snow," providing that high contrast finish that makes the cocoa base pop. If you want to try something different, my Snickerdoodle Cookies recipe uses a similar cinnamon sugar dusting technique, but here, the white sugar against the dark chocolate is much more dramatic.
Essential Tools for Shaping
You don't need a fancy pine cone cookie mold for this recipe. In fact, doing it by hand looks much more organic and artisanal. However, a few specific tools will make your life significantly easier.
- Fine Mesh Sieve: Essential for sifting the 50g of cocoa powder. Cocoa is notorious for clumping, and a clump in the dough is a missed opportunity for a velvety texture.
- Small Cookie Scoop: Using a 1 tablespoon scoop ensures all 24 cookies are the same size, which means they will all bake at exactly the same rate.
- Precision Tweezers: Optional, but if you have "hot hands," tweezers help place the 150g of almond slices without melting the dough base.
- Silicone Baking Mat: These cookies are delicate. A silicone mat or high-quality parchment paper ensures the bottoms don't scorch while the almonds toast.
step-by-step Construction Guide
This is where the magic happens. Take your time with the shaping; it's a craft, not a race.
- Cream the Fats: Beat 225g softened butter and 150g granulated sugar until pale and fluffy. Note: This aerates the butter, creating tiny air pockets for a lighter crumb.
- Emulsify the Base: Add 1 large room temperature egg and 1 tsp vanilla extract. Beat until the mixture looks like smooth buttercream.
- Sift Dry Ingredients: Whisk together 300g flour, 50g cocoa, and ½ tsp sea salt. Gradually add to the wet ingredients.
- Chill the Dough: Wrap the dough and refrigerate for 30 minutes. Note: Chilling prevents the butter from leaking out during the "shingling" process.
- Form the Cones: Scoop 1 tablespoon portions and roll them into balls, then pinch one end to create a teardrop or cone shape.
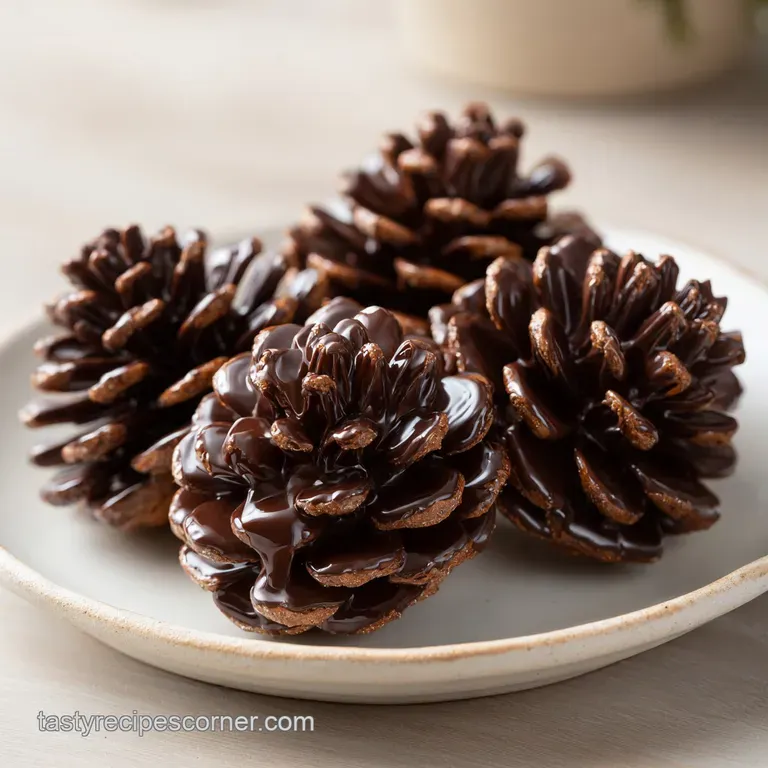
- The Shingling Process: Starting at the wide bottom of the cone, press sliced almonds into the dough at a slight upward angle.
- Layer Upwards: Continue adding rows of almonds, overlapping the previous row until the cone is fully covered to the tip.
- Final Chill: Place the assembled cookies in the fridge for 15 minutes before baking. This "sets" the almonds into the dough.
- The Bake: Heat your oven to 180°C (350°F). Bake for 12 minutes until the almonds are lightly golden at the edges.
- The Snowfall: Let the cookies cool completely on the tray, then sift 2 tbsp powdered sugar over the top for a frosted look.
Chef's Tip: If you find the dough getting too soft while you're working on the 24th cookie, pop the remaining dough back in the fridge. Warm dough is the enemy of a sharp looking pinecone.
Fixing Common Structural Issues
Even the best bakers run into trouble with 3D cookies. The most common heartbreak is seeing your beautiful cones turn into flat puddles or having the "scales" fall off like autumn leaves.
The Almonds are Falling Out
This usually happens because the dough has dried out or the almonds weren't pressed in deep enough. The dough needs to be slightly tacky. If it feels dry, you can lightly brush the cone with a tiny bit of water or egg white before shingling.
The Base is Spreading too Much
If your pinecones look like they’ve "melted," your butter was likely too warm when the cookies entered the oven. Chilling is the most boring part of baking, but it’s the most vital for these cookies.
| Problem | Root Cause | Solution |
|---|---|---|
| Burnt Almonds | Oven rack is too high | Bake on the middle rack and check at 10 minutes |
| Cracking Dough | Too much flour (over measuring) | Add 1 tsp of milk to the dough to restore elasticity |
| Flat Bottoms | Dough was too soft when shaped | Freeze the shaped cones for 10 mins before adding almonds |
Common Mistakes Checklist
- ✓ Don't skip the cocoa sifting; cocoa lumps won't disappear during baking.
- ✓ Ensure the egg is at room temperature to prevent the butter from curdling.
- ✓ Use "sliced" almonds, not "slivered" slivers are too thick and look like porcupines.
- ✓ Wait for the cookies to be 100% cold before dusting with sugar, or it will melt.
- ✓ Handle the finished cookies by the base to avoid snapping off the delicate almond scales.
Creative Flavor Adaptations
Once you’ve mastered the classic chocolate Pinecone Cookies, you can start playing with the flavor profile to suit different occasions.
The Gingerbread Twist
Replace the cocoa powder with an extra 50g of flour and add 1 tbsp ground ginger, 1 tsp cinnamon, and ¼ tsp cloves. This gives you a warm, spicy pinecone that smells like a traditional Christmas market. You can also use pecan pieces instead of almonds for a darker, more rugged look.
Nut Free Substitution
If you have a nut allergy, the "scales" can be replaced with chocolate sunflower seeds or even small pieces of broken cocoa nibs. It changes the look significantly, making it appear more like a weathered, dark pinecone, but the texture remains fantastic.
Decision Shortcut
- If you want a darker, more rustic look, leave the skins on the almonds and use extra dark cocoa.
- If you want a faster version, skip the shingling and just roll the dough balls in crushed almonds (though you'll lose the pinecone effect).
- If you want more "snap", toast the almonds for 3 minutes at 180°C before pressing them into the dough.
Freezing and Reheating Guidelines
These cookies are surprisingly hardy once baked and cooled, making them excellent for gifting or preparing ahead of a big event.
- Storage: Keep in an airtight container at room temperature for up to 5 days. Use a single layer if possible; if stacking, place parchment paper between layers to protect the almond scales.
- Freezing (Unbaked): You can freeze the shaped dough cones (without almonds) for up to 3 months. Thaw in the fridge, then shingle and bake as directed.
- Freezing (Baked): I don't recommend freezing fully assembled baked cookies, as the almonds can become soft and lose their "shatter" texture when thawing.
- Zero Waste Tip: Don't throw away the broken almond bits at the bottom of the bag! Toss them with a little honey and salt, toast them, and use them as a topping for yogurt or oatmeal.
Presentation Levels for Guests
Part of the joy of Pinecone Cookies is how they look on the table. You can take them from "home kitchen" to "professional patisserie" with just a few styling tweaks.
Plating Levels
- Simple: Pile the cookies naturally on a dark wooden cutting board. The contrast between the wood and the cocoa is effortlessly cozy.
- Polished: Arrange the cookies on a white tiered stand. Add a few cinnamon sticks and star anise around the base to emphasize the winter spice theme.
- Restaurant: Use a slate plate. Place three cookies in a cluster. Add a small sprig of fresh rosemary next to them to mimic pine needles. Sift the powdered sugar "snow" over the entire plate, including the rosemary, for a high fashion winter forest look.
| Level | Focus | Key Element |
|---|---|---|
| Simple | Rustic | Wooden textures |
| Polished | Symmetry | Tiered presentation |
| Restaurant | Storytelling | Fresh herbs and "snow" dusting |
The beauty of this pinecone cookie recipe is that it feels like an art project you can eat. It’s elegant, impressive, and despite the detailed look, it’s entirely achievable if you just take your time with the shingling. Right then, let's get that cocoa sifted and start building your winter forest!

Recipe FAQs
What does a pinecone cookie do?
It serves as an impressive, edible centerpiece. These cookies are designed for visual appeal rather than functionality, offering a rich, cocoa shortbread base contrasted with toasted almond scales. They are perfect for holiday platters or adding a rustic touch to tea parties.
Is there anything inedible in a pinecone cookie?
No, everything should be edible. The structure is made from cocoa shortbread dough, and the "scales" are sliced almonds dusted with powdered sugar. If you use rosemary for garnish, be sure to remove that sprig before eating.
Do you have to soak pine cones before baking them?
No, absolutely not. You are building a cookie, not using actual botanical cones. The recipe requires shaping a dough base and layering almonds onto it, a process which requires dry, chilled ingredients.
Why do people bake pine cones (cookies)?
People bake them for their stunning visual realism and complex texture. This cookie requires detailed shaping, which appeals to bakers looking for a project beyond simple drop cookies. If you enjoyed mastering the shaping stability here, see how the same principle of structural integrity applies to our dairy-free Sugar recipe.
How do I ensure my almond scales stick to the cookie dough securely?
Start the shingling at the base and press firmly into chilled dough. The dough must be cold so the almond adheres without sliding down before it hits the heat. If the dough feels warm, briefly chill the shaped cone before applying the almonds.
Can I substitute the sliced almonds with a different nut or topping?
Yes, substitutions are possible, but texture will change. Sliced almonds offer the best aesthetic coverage; however, you can use pecan pieces or sunflower seeds if necessary. If you try sunflower seeds, you might enjoy the textural contrast as much as we do in the Hazelnut Truffle Sandwich recipe.
How long should the cookies be baked to achieve crispy scales without burning?
Bake for 10 to 14 minutes at 350°F (175°C). Watch the edges of the almonds; they should turn light golden brown. Overbaking will result in bitter, dark almonds and a dry cookie base.
Almond Pinecone Cookies Recipe

Ingredients:
Instructions:
Nutrition Facts:
| Calories | 184 kcal |
|---|---|
| Protein | 3.3 g |
| Fat | 11.3 g |
| Carbs | 19.1 g |
| Fiber | 1.7 g |
| Sugar | 6.9 g |
| Sodium | 52 mg |
